It doesn’t matter how much specialized gear and production experience you have, background noise comes for us all. Some noise will always find its way into your recording.
It could be distant car noises or background rumbles from a low-quality microphone.
You can shoot in a completely soundproof room and still get some odd room tone.
Outside wind can ruin an otherwise perfect recording.
It happens, so try not to beat yourself up over it. However, that doesn’t mean your audio is ruined.
There are ways to remove background, room and white noise from your audio or video. It mostly depends on what platform you’re using. For this guide, we’ll be discussing how to remove background noise in Adobe Audition.
What is Adobe Audition?

Adobe Audition is an extremely popular audio workstation for recording, mixing, and editing audio files. It's part of the Adobe Creative Suite, which also includes iconic programs like Adobe Photoshop and Adobe Illustrator.
One of the best things about Adobe Audition is that it can be used for all kinds of audio tasks. Whether you're recording podcasts, editing music, or mixing sound for videos, Audition has everything you need to create a professional product. This makes it a great choice for professionals working in audio production.
Furthermore, Adobe Audition has an easy-to-use interface that's great for both beginners and seasoned users. It also comes with many ready-made settings to help you work faster and more efficiently.
How to Remove Background Noise in Adobe Audition
Audition offers a handful of ways to remove all types of problem sounds from white noise to roomtone. It features light, non-damaging tools like equalizer, as well as more hardcore background noise removal tools.
Video producers that use Adobe Premiere Pro or Adobe Premiere Pro CC are particularly fond of Adobe Audition.
As a rule of thumb, it is advised that you try the gentler tools first so you don’t risk damaging your audio.
CrumplePop AudioDenoise
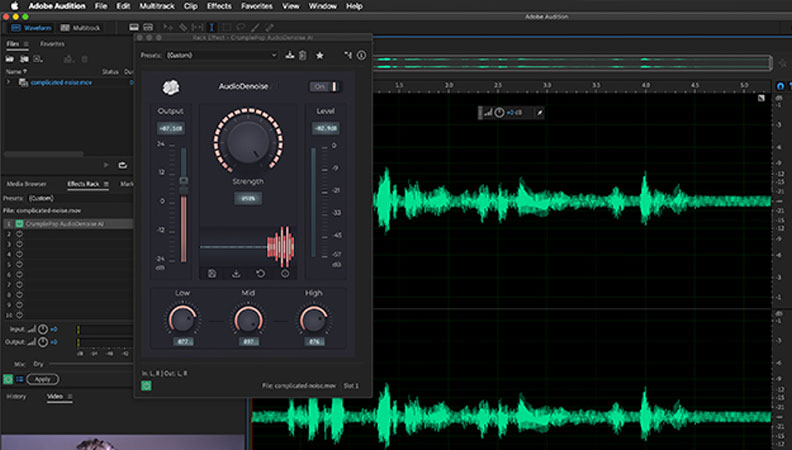
Before diving into some of Audition's built-in tools for noise removal, feel free to check our noise reduction plug-in, AudioDenoise. Using AI, AudioDenoise is able to identify and remove background noise automatically and in real-time.
Hear It For Yourself
Advanced audio AI removes noise and boosts your vocal quality.
Toggle it on/off to hear the difference.
Remove Wind
Remove Noise
Remove Pops & Plosives
Level Audio
Remove Rustle
Remove Echo
Remove Wind
How to Remove Noise in Adobe Audition Using AudioDenoise
After installing AudioDenoise, you may need to use Adobe's Plugin Manager.
- Click Effects
- Select VU orVST3 > CrumplePop and choose AudioDenoise
- Most of the time, all you'll need to do is adjust the main strength knob to remove noise from your audio
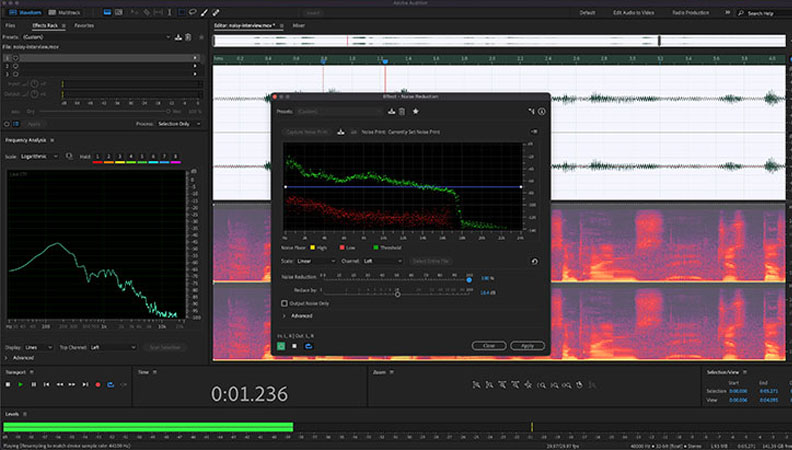
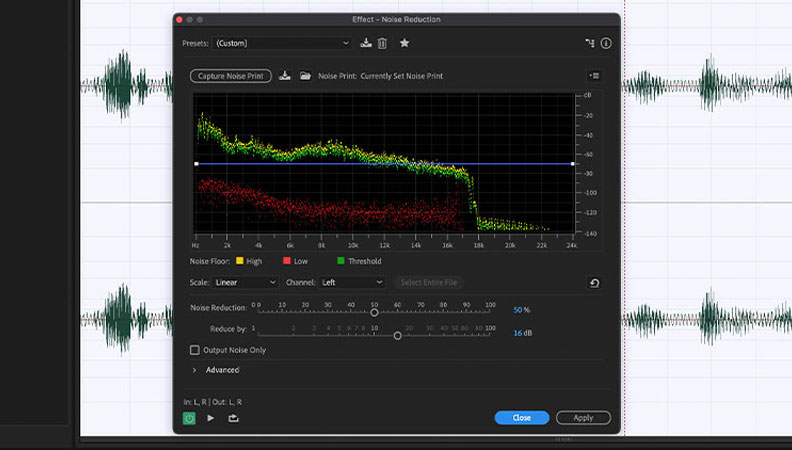
Hiss Reduction
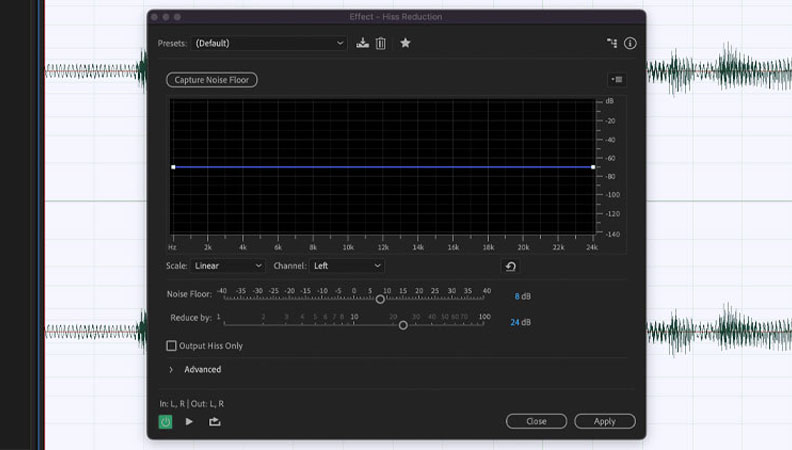
Sometimes, the background noise in your audio is a constant hiss and presents as such. This is what is usually described as a noise floor.
How to Remove Noise with Hiss Reduction in Adobe Audition:
- Open your audio recording in Audition.
- Click Effects. You should see a tab named Noise Reduction/Restoration.
- Click Hiss Reduction.
- A dialogue box pops up with which you can sample your hiss with the Capture Noise Floor function.
- Click the Hiss Sample and select Capture Noise Print.
- Use the sliders to control your noise removal effect until you have your best results.
Equalizer
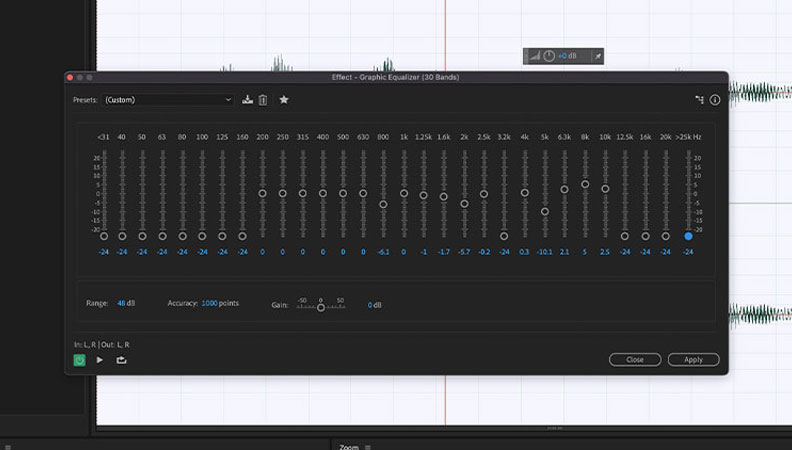
Adobe Audition offers multiple equalizers to choose from, and you should play around with them a little to find which ones you prefer to reduce noise with.
Audition lets you choose between one-octave, one-half-octave, and one-third-octave equalizer settings.
An equalizer is really good at removing low-end background noise from your audio recording.
How to Remove Background Noise in Adobe Audition with an Equalizer:
- Highlight all of your recording.
- Go to the Effects tab and click on Filter and EQ.
- Choose your preferred equalizer setting. For many it is Graphic Equalizer (30 Bands).
- Remove the frequencies with noise. Be careful not to remove important parts of your audio.
EQ is good for low-intensity noise, but not very useful for more serious stuff. EQ won’t magically get rid of all noise but it is a step in the right direction.
Frequency Analysis
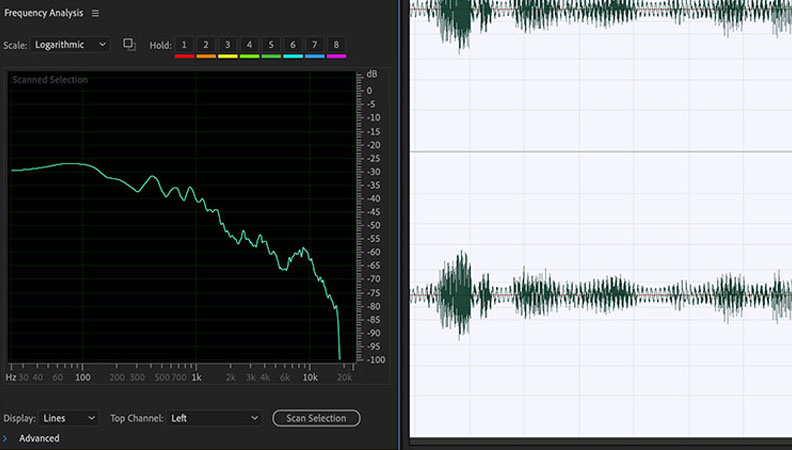
Frequency analysis is a cool tool that helps you find and remove background noise in Adobe Audition.
Unlike with Equalizer where you manually find the problematic frequency band, the Frequency Analysis tool helps you localize the troublesome frequencies.
After you have pinpointed where the noise is coming from, you can apply a filter.
How to Use the Frequency Analysis Tool to Remove Noise in Adobe Audition:
- Click Window and select Frequency Analysis.
- Choose Logarithmic from the scale dropdown. Logarithmic scale reflects human hearing.
- Playback to analyze your frequency.
Spectral Frequency Display
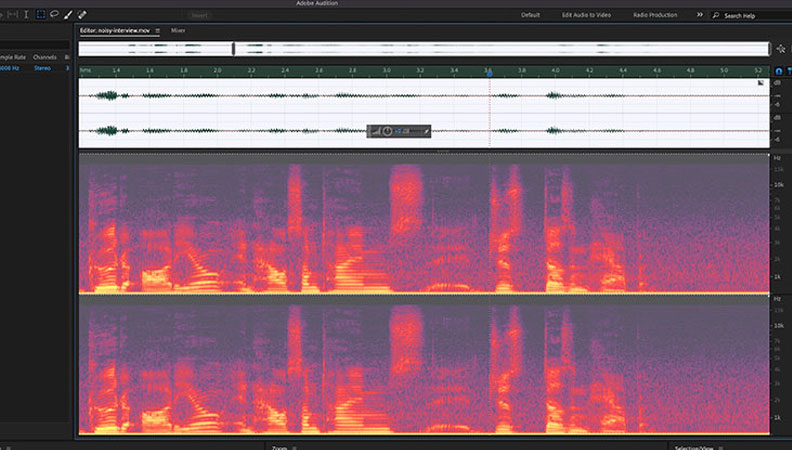
The Spectral Frequency Display is another cool way you can localize and remove any additional noise you may have picked up while you shoot.
The Spectral Frequency Display is a representation of the amplitude statistics of specific frequencies as they change over time. This feature helps you highlight any sound that is obviously contradictory to your work, e.g., a broken glass outside of the scene.
How to Use the Spectral Frequency Display Feature to Remove Background Noise in Adobe Audition:
- Open up your waveform by double-clicking on the Files Panel
- Move the slider at the bottom to reveal the Spectral Frequency Display where your sound is visually depicted.
Spectral Frequency Display highlights the “abnormal” sounds in your audio and you can do whatever you want with them.
Noise Reduction Tool
This is a specialized noise reduction effect by Adobe.
How to Remove Noise Using Adobe Audition's Noise Reduction Tool:
- Click Effects, then click Noise Reduction / Restoration, then Noise Reduction.
Noise Reduction / Restoration also contains the Hiss Reduction and Adaptive Noise Reduction tools, which are also discussed here.
This tool has loose noise and true sound differentiation, so use it with caution and experiment with the sliders for best results.
This tool differs from the Adaptive Noise Reduction effect by being more manual and aggressive.
Noise From Distortion
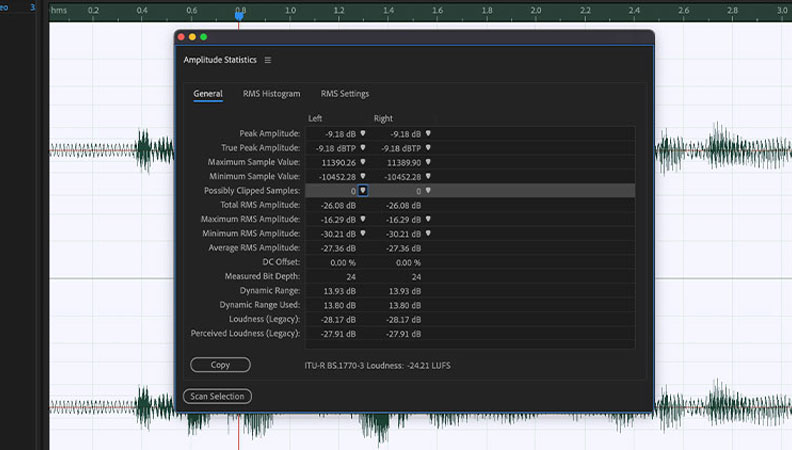
Sometimes what we hear as background noise in Adobe Audition may be noise from distortion caused by your audio source going into overdrive.
How To Check if Your Audio is Distorted with Amplitude Statistics in Adobe Audition:
- Double click on your audio track and access your Waveform.
- Click Window and select Amplitude Statistics.
- An Amplitude Statistics window will pop up. Click the Scan option in the bottom left-hand corner of this window.
- Your audio file is scanned for possible clipping and distortion. You can see the report when you select the option Possibly Clipped Samples.
- Access the clipped parts of your audio file and fix distorted audio.
Adaptive Noise Reduction
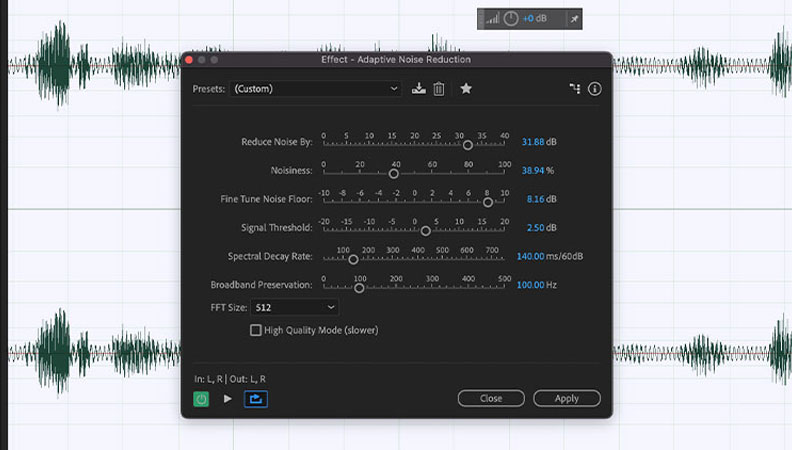
Another way to get rid of unwanted noise in Adobe Audition is by using the Adaptive Noise Reduction tool.
The Adaptive Noise Reduction Effect is particularly useful for wind noise and ambient noise. It can pick up small sounds like a random gust of wind. Adaptive noise reduction is also good at isolating excessive bass.
How to Use Adaptive Noise Reduction to Remove Noise in Adobe Audition:
- Activate Waveform by double-clicking on your audio file or files panel.
- With your Waveform selected, go to the Effects rack
- Click Noise Reduction/Restoration and then Adaptive Noise Reduction.
Echo
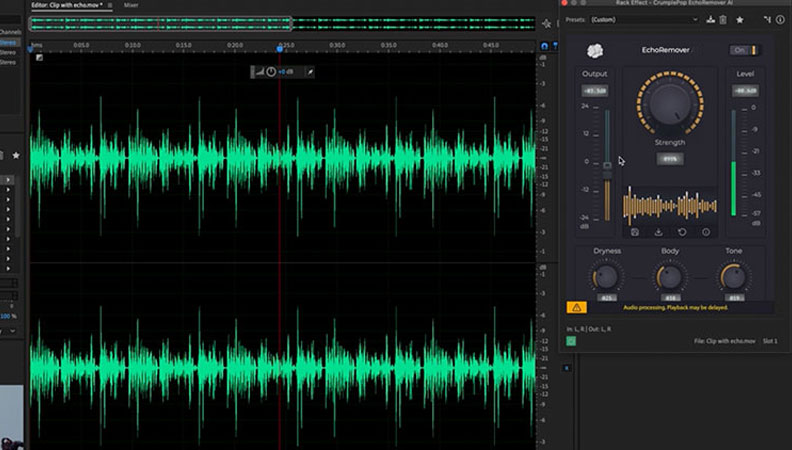
Echoes can be really problematic and are a major source of noise for creators. Hard, reflective surfaces like tile, marble, and metal will reflect sound waves and cause them to interfere with your audio file.
Unfortunately, Adobe Audition isn’t well equipped to handle this and doesn’t offer any feature that really works for echoes and reverb. However, there are several plug-ins that can handle this with ease. At the top of the list is EchoRemover.
Noise Gate
A noise gate is a really effective way to remove background noise, especially if you’re unwilling to risk any audio quality.
It’s also really useful if you’re recording large swaths of speech, like a podcast or audiobook, and you don’t want to have to go through the whole thing to make corrections.
This plug-in works by setting a floor for your sound and removing all noise below that set threshold. It’ll therefore be good practice to accurately measure the noise floor level before applying noise gate to your audio files.
To Use Noise Floor:
- Measure your noise floor accurately. You can do this by playing the quiet part of your audio and observing the playback level meter for any fluctuations.
- Select your whole audio recording.
- Go to the Effects tab.
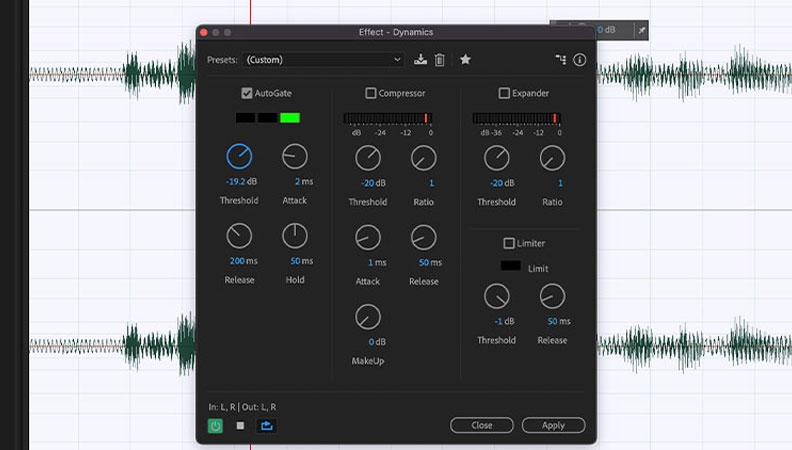
- Click on Amplitude and Compression and select Dynamics.
- Click on the AutoGate dialog box and unclick the others unless they’re in use.
- Set your threshold at the level you measured or a few decibels above.
- Set Attack to 2ms, set Release 200ms, and set Hold to 50ms.
- Click Apply
Final Thoughts
Background noise can be a pain in the butt. Location noises, a low-quality microphone, or a random cell phone ring might ruin your YouTube videos or voiceovers, but they don’t have to. Adobe Audition makes many provisions for the resolution of background noises of different kinds and intensities.
You may already be familiar with the more common ones like Equalizer and Adaptive Reduction. In this guide, we discuss these Adobe Audition tools and how to use them to get the best out of your audio. Feel free to use as many as you like while you work, and don’t forget to tinker with the settings until you have as little background noise as possible. Happy editing!