Marco Sebastiano Alessi
Jun 14th, 2022Whenever you find yourself filming or recording outside of your studio, you’re at the mercy of the environment you’re in.
Crowded places, traffic, background noise: everything can potentially compromise the quality of your audio or video. Chances are, you won’t find out until you’re editing and mixing your content and you hear background noises.
As most of these circumstances are hard to predict or avoid, most filmmakers and field recordists have learned to use equipment that helps them reduce wind noise while filming.
However, removing background noise during production can be an expensive and sometimes ineffective option.
Today we’ll delve into how to remove wind noise, the nemesis of filmmakers recording outdoors.
Wind sound is harder to remove than other forms of background noise for various reasons, which we’ll look into in this article. However, the good news is that WindRemover AI 2 is a tool that’s perfectly tuned to tackle wind noise and reduce background noise on your video or podcast. Let’s find out how.
Background noise comes in many shapes and forms, such as the air-conditioner or a fan, the echo within a room, or the rustle of a lavalier microphone touching the speaker’s collar shirt.
To some extent, background sounds are not necessarily a bad thing: it makes the room’s ambience unique and creates a particular atmosphere that might be difficult to replicate. For example, there are some YouTube videos and podcasts where the white noise plays a crucial role in the quality of the creative product.
However, when background noise risks overshadowing your video, you need the right tools to remove noise and make your audio sound professional enough for publication.
Today, there are various background noise removal editing tools that can help you reduce wind noise and all other forms of background noise during post-production. These effects can identify and target a specific noise while leaving the rest of the audio untouched.
While you still should make sure you create the perfect recording environment before you press record on your camera, these effects will help a great deal when you have to reduce wind noise after you finish recording your content.

Most professional background noise removal software has a dedicated algorithm that can target and remove background noise, like echo or rustle noises.
This is possible because these types of background noise are repetitive and don’t change dramatically throughout the recordings, making it easier to map the soundscape and remove loud background noise.
With wind, things are different. The wind is unpredictable, and wind noise is made up of a mix of low and high frequencies that don’t allow an algorithm to identify it as easily as other artificial noises.
This has been a problem for radio and TV shows for decades, as interviews recorded outdoors could be compromised by an unexpected gust of wind or low-level wind rumble.
It’s possible to remove wind sounds while you’re shooting video or recording audio. Let’s take a look at a few methods and tools that can help you remove wind noise in the first place before you begin editing.
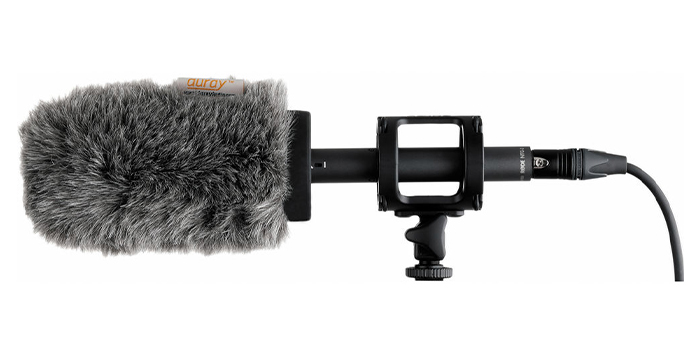
Let’s talk about shotguns and dead cats, things you absolutely need if you’re a filmmaker recording outdoors or a movie director working on a dog-friendly version of John Wick.
A dead cat is a furry cover you often see on microphones on TV. It’s usually wrapped around a shotgun microphone, and it prevents microphones from capturing wind noise. Generally, this is the most effective method of removing wind noise when recording video in windy conditions.
A professional dead cat applied to your shotgun microphone or directional mics will act as a windshield, protecting your microphone from the wind while you’re recording outdoors. This is an effective method to reduce wind noise while maintaining professional audio quality.
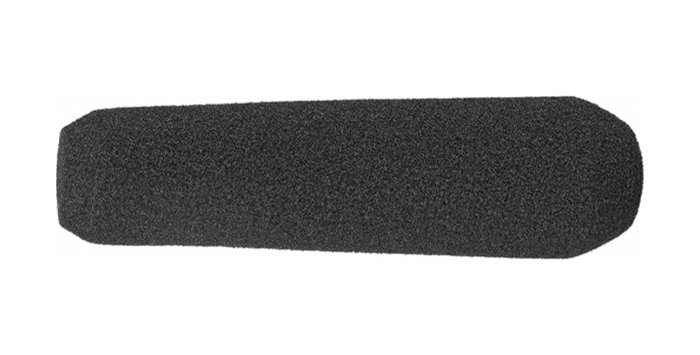
Other great options are the windshield kits, which fully envelop the microphone in a shock-mounted shield and can be adjusted depending on the quantity of background noise in the environment. They’re way more expensive than a dead cat but do a terrific job at reducing wind noise in your audio, especially with the wind hitting hard.
These are fantastic tools that you should absolutely use when recording outdoors. However, if you don’t have the right microphone or equipment or the wind is so strong that even foam windshields can’t remove background noise so piercing, there are noise removal options that can help you save your recordings.
When all else fails, you should opt for the best audio plugins that can guarantee optimal results and make your audio quality truly stand out.
This kind of quality is provided by plugins that can automatically identify and remove background noise without affecting the voice or the rest of the soundscape.
With the support of an advanced AI, WindRemove AI 2 is the most effective solution for wind noise removal currently in the market and will satisfy the needs of filmmakers and podcasters of all levels.
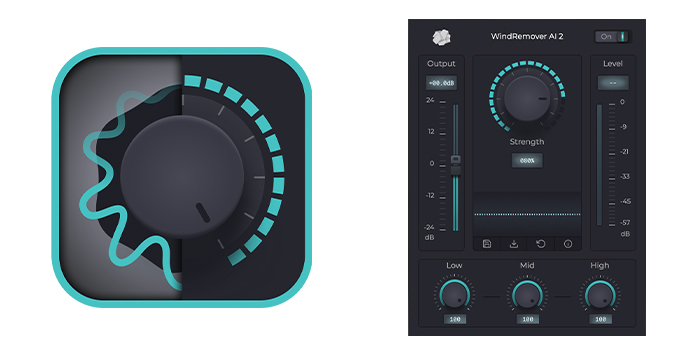
WindRemover AI 2 is the perfect plugin for removing wind noise from your videos and podcasts. Thanks to a highly advanced AI, WindRemover can automatically identify and remove background noise quickly and naturally.
The friendly UI and the intuitive design make it the ideal tool for filmmakers and podcasters who want to achieve optimal results without spending hours in the studio doing wind noise reduction.
Most of the time, you’ll be able to remove the excessive wind by simply adjusting the main knob, which regulates the strength of the effect.
Furthermore, you’ll be able to listen to the result in real-time without having to export your content or use a different app.
WindRemover AI 2 is compatible with Premiere Pro, Logic Pro, Garageband, Adobe Audition, and DaVinci Resolve, and with all these video and audio editing software, it’s as easy to use as it can be.

Let’s say you’ve received some footage shot on a windy day where you clearly notice that the mic has picked up a fair amount of wind noise.
Now you’re sitting down at your computer, wondering what to do. Luckily, if you’re video editing, you have the option to use WindRemover AI 2 to edit out those windy sounds.
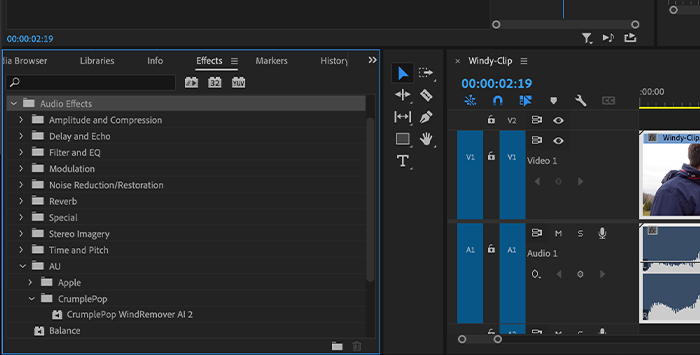
If you use the video editor Premiere Pro, you can find WindRemover AI 2 here: Effect Menu > Audio Effects > AU > CrumplePop.
Select the audio file or video clip you want to improve, then drag and drop or simply double-click on the effect.
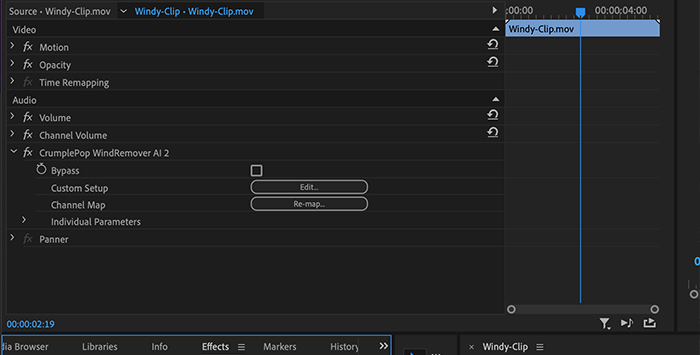
Go to the top left corner to find the effects and click on the Edit button. A new window will open up, and you’ll be able to use the effect!
If WindRemover AI 2 doesn’t appear in Premiere or Audition after installation, you may need to use Adobe’s Audio Plug-in Manager.
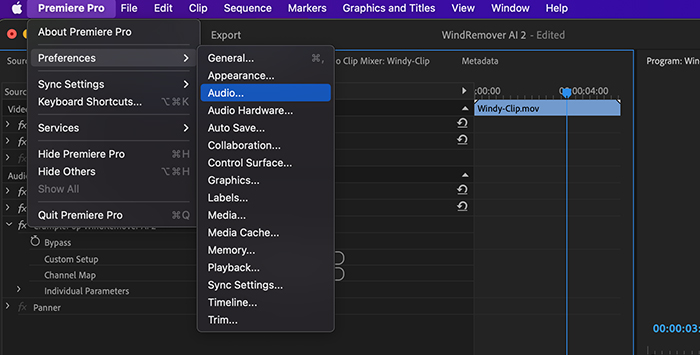
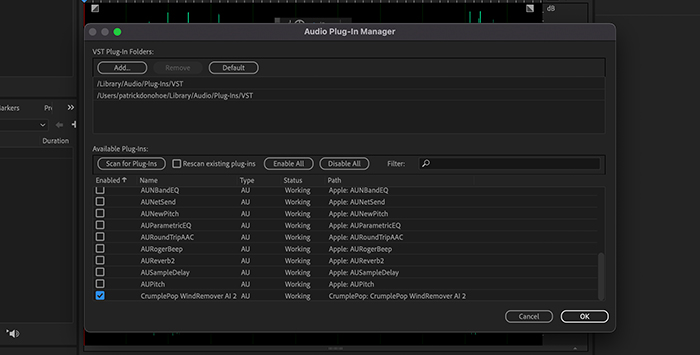
Go to Premiere Pro > Preferences > Audio and select Audio Plug-in Manager.
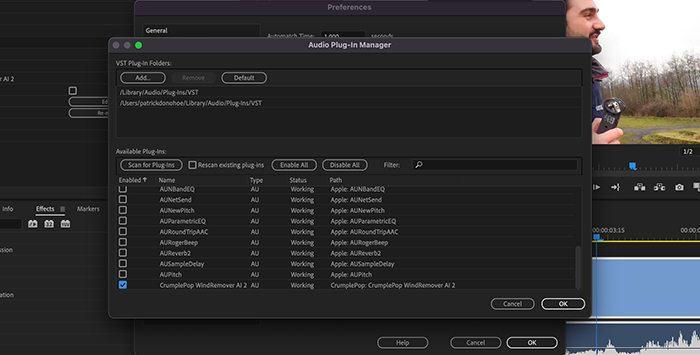
Click Scan for Plug-ins. Then scroll to CrumplePop WindRemover AI 2 and enable it.
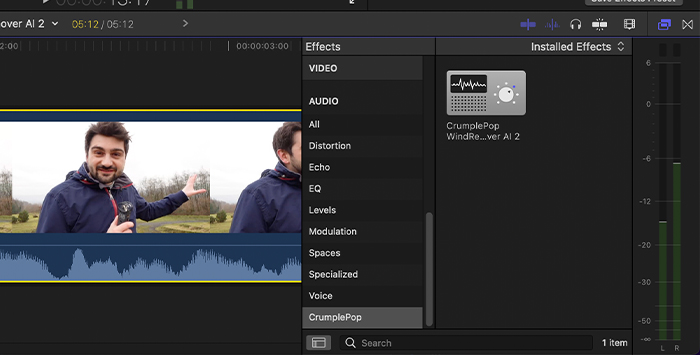
In FCP, Go to your effects browser here: Audio > CrumplePop. Drag and Drop the WindRemover AI 2 plugin into the audio or video track you want to improve.
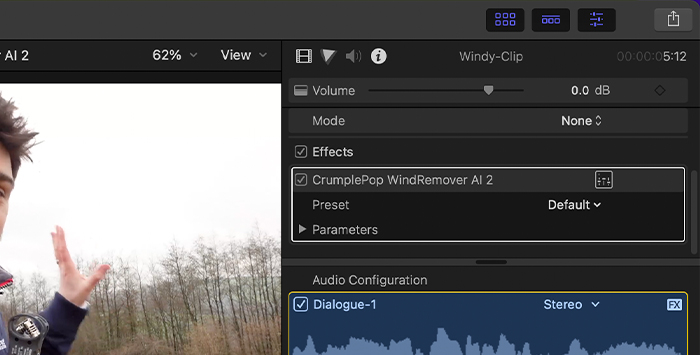
Next, in the upper corner, you’ll see the Inspector Window. Click on the sound icon, and from the menu, select the WindRemover AI 2 plugin.
Click on the box to open the Advanced Effects Editor UI, and from here, you’ll be able to reduce wind noise from your audio and video in no time while using the most advanced video editor on the market.
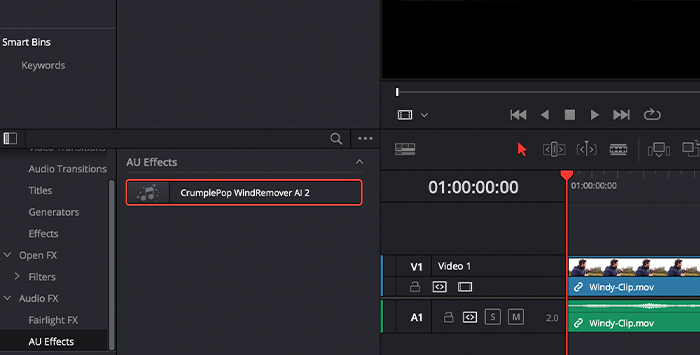
Install the plugin and open the video editor. After installing the plugin, you’ll find it here in Resolve: Effects Library > Audio FX > AU.
Once you locate it, double-click on WindRemover AI 2, and the UI will appear.
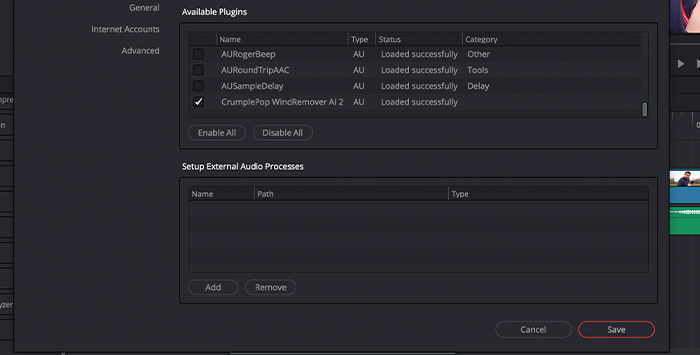
If WindRemover AI 2 doesn’t appear, go to the DaVinci Resolve menu and choose Preferences. Choose Audio Plugins. Find WindRemover AI 2 and enable it.
Currently, WindRemover AI 2 does not work on the Fairlight page.

Now let’s take a look at the wind noise reduction process when you edit audio. WindRemover AI 2 is as easy to use on your DAW as it is on a video editing software, and it’s just as effective!
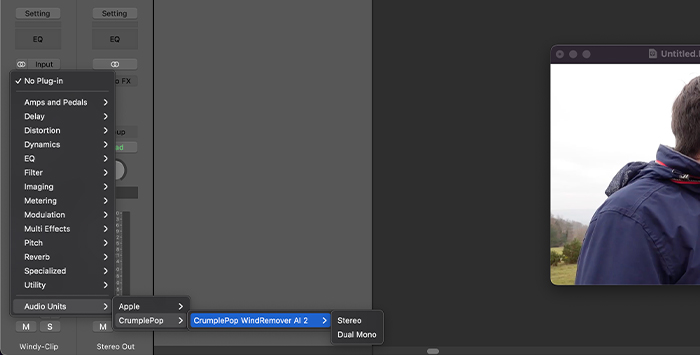
In Logic Pro, go to Audio FX menu > Audio Units > CrumplePop. You can double-click on the effect or drag & drop it into the audio clips that require improvement. The UI will open automatically, and you’ll be able to adjust the effect in no time.
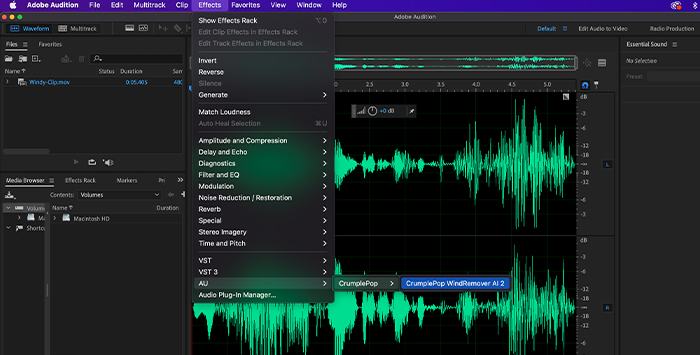
If you use Adobe Audition, you can find WindRemover AI 2 here Effect Menu > AU > CrumplePop. All you have to do to apply the wind removal effect is to double-click on the effect either from the Effects menu or the Effects Rack.
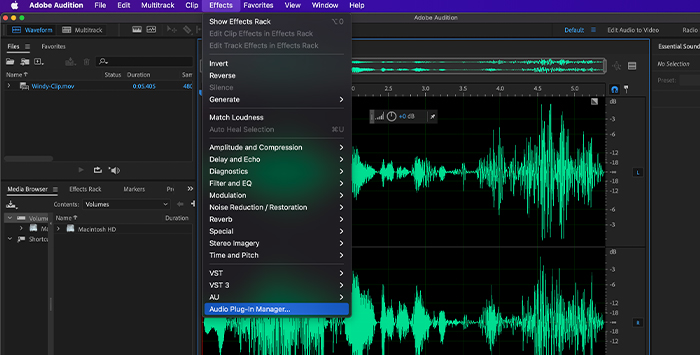
Note: If WindRemover AI 2 doesn’t appear after installation, please use Adobe’s Audio Plug-in Manager.
You can find it under Effects > Audio Plugin Manager.
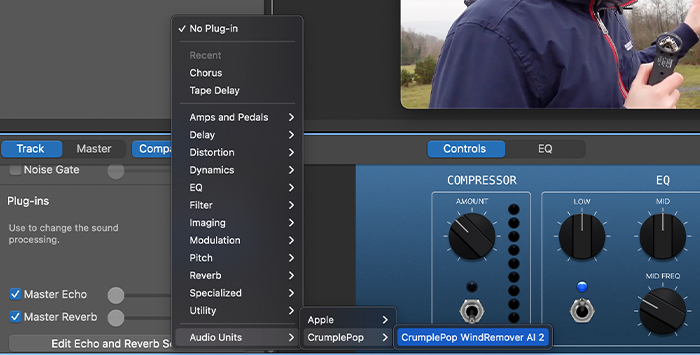
If you use GarageBand, go to the Plug-ins menu > Audio Units > CrumplePop. Same as with the other effects, simply drag & drop the WindRemover AI 2 and start fixing your audio clip right away!
It takes just a few steps to get rid once and for all of the wind noise that’s compromising your audio. From your editing software, find WindRemove AI 2 and open the effect. Depending on the type of software you use, you’ll need to drop the plugin onto your audio track.
As you open the plugin, you’ll see right away that there are three little knobs with a bigger knob on top of them; the latter is the strength control and most likely the only tool you’ll need to perfect wind noise reduction.
Adjust the strength of the effect and listen to your audio in real-time. By default, the strength of the effect is at 80%, but you can increase or decrease it until you reach the perfect result.
You can use the lower three knobs to fine-tune the wind noise removal effect. These are called the Advanced Strength Control knobs and help you directly target low, mid, and high frequencies for optimal noise reduction.
In this way, you’ll be able to further adjust the impact of the effect while leaving untouched the frequencies you’re already happy with.
You can save your settings as a preset for future use too. You just need to click the “save” button and give the preset a name.
Loading an existing preset is just as easy: click on the downward arrow button next to the save button to see all the presets that were previously saved, and voilà!
What makes WindRemover AI 2 unique is its ability to differentiate between the different audio frequencies and remove wind noise throughout the audible spectrum.
Furthermore, it also allows adjusting the strength of the effect on each frequency level, from low frequencies to high frequencies, giving you complete control over the noise reduction on your audio clip.
The resulting sound is authentic, as WindRemover AI 2 leaves all the other frequencies untouched and brings to life a natural and peerless soundscape.
Despite being a sophisticated plugin, WindRemover AI 2 is easy to use and highly intuitive, even for beginners. The main strength knob controls the strength of the effect on the audio clip, and often that’s the only parameter you’ll need to adjust to remove wind noise.
If you want to make further adjustments on separate audio frequencies, you can do so by using the three smaller knobs that control low, mid, and high frequencies.

You can use WindRemover AI 2 within your favorite NLEs and DAWs, as it’s natively compatible with the most popular workstations.
Saving presets is easy and will optimize your workflow dramatically. Furthermore, you can use this feature to use WindRemover AI 2 across different editing software.
You can record something on GarageBand and then do the mixing on Logic Pro, and WindRemover AI 2 will provide you with everything you need throughout the process.
Crumplepop’s plugins for background noise are used by BBC, Dreamworks, Fox, CNN, CBS, and MTV, among others, so choosing our wind noise effect for your audio and video projects will guarantee you’ll get industry-standard results and help you take your creative project to the next level.


