Marco Sebastiano Alessi
Jul 10th, 2023
While recording, a popping noise might occur whenever you make certain sounds, which can compromise the quality of your content. Most of the time, these popping sounds are caused by plosives, a common issue when recording vocals that can easily be fixed with both plug-ins and professional recording equipment.
Today I prepared a list of tips to help you stop the microphone from popping, including some classic techniques, ideal gear, and plug-ins to use in any digital audio workstation (DAW). But first, let’s talk about what plosives are and how they can affect your microphones while recording vocals.
Let’s dive in!
Plosives are air bursts that originate in the speaker’s mouth, caused by the air being blocked, with lips or the tongue’s tip, during the pronunciation of words, and then released. The most common occurrence of plosives is when pronouncing words with the letter P, B, T, and K.
When vocal plosives are recorded, it sounds as if you have dropped or hit the microphone. That sound can distract your audience and make your audio sound less professional, especially for listeners with headphones who will hear the thud in their ears.
Plosives are always present as we speak but are barely audible in our daily life due to the ambient sounds that surround us. However, when recording your voice with a microphone, the sudden release of air expelled by those consonants is powerful enough to hit the microphone’s diaphragm, overloading the capsule and causing it to capture the sound as a popping noise.
Plosives are hard to avoid, but there are ways to remove them in post-production and reduce the microphone pops during recording by getting creative with microphone placement, recording techniques, and using the right gear.

Let’s start with the most common one, which owes its name to the plosive sound or pops. Pop filters protect the microphone’s capsules from being hit by the bursts of air caused by the vocal plosives. Pop filters disperse the voice’s plosive energy before reaching the microphone’s diaphragm.
Pop filters are usually built with metallic or nylon mesh that diffuses plosives and is attached to a gooseneck. Place the pop filter between the microphone and yourself, ensuring there are a few inches between the microphone and the pop filter and about four to ten inches between the pop filter and your mouth. Used in this way, the pop filter will greatly reduce plosives from reaching the mic.
But you don’t have to go and buy a pop filter. You can create a pop filter with supplies from your home. Use a wire hanger or something similar for the frame and a nylon fabric like pantyhose or metallic netting like the ones used for screen doors for the filter.
Here’s a simple trick that can help when you’re building your home recording studio and don’t want to spend money on pop filters. This easy fix consists of taking a pencil and putting it in front of the microphone vertically. You can tape it or use a rubber band to hold it down the middle of your microphone.
By blocking the airflow and hitting the microphone’s diaphragm directly, the pencil prevents plosives from being captured as loudly as without a pop filter. Of course, it won’t be as effective as using a pop filter, but it’s a good way of reducing plosives without spending a dime.
This technique consists in placing your finger, a pen, a pencil, or similar on your lips as you record your voice. It’s the same as the pencil hack but without taping your microphone or using a rubber band (which may fall if not appropriately placed). With your finger pressed vertically in the middle of your lips (as if making a silent gesture) or just about one inch in front of you, the airflow will be spread to the sides, preventing the airflow from hitting the microphone directly in the diaphragm.
Again, you won’t get the best quality recording, but it’s better than recording without anything blocking the airflow. You’ll be surprised to know that this is one of the oldest tricks used by audio engineers in the early years of audio recording.
Sometimes you don’t need to buy any special gear, and all you have to do is change how you speak into the microphone. Simple changes can help reduce plosives from being recorded. Here is a list of a few techniques that reduce microphone pops.
Gently Blowing
Watch out for your breath and avoid blowing too hard directly into the microphone when speaking words beginning with plosives.
Speaking Past the Mic
This recording technique consists of refraining from talking into the microphone directly, which can cause your breath to hit the microphone’s diaphragm. You can place yourself in front of the microphone, tilt your head slightly, speaking past the microphone but with the capsule facing your mouth.
Playing with the position of the microphone to avoid plosives is another popular technique in the music industry that audio engineers used before pop filters. Placing the microphone off-axis reduces the risk of overloading the capsule and recording the microphone pops.
Here are some techniques you can try.
The 45-degree angle: To prevent plosives from entering the microphone capsule, tilt the microphone at a 45-degree angle. In this position, the sound will be directed past the microphone. This position will prevent you from blowing into the mic when speaking words with P, B, T, etc.
Place the Microphone Higher: Set your microphone so it points at your nose rather than your mouth.
Lower the Microphone: Like the previous tip, place the microphone near or below your chin, which will put the mic off-axis to prevent plosives from striking the microphone’s diaphragm.
Headset Microphones Placement: For the headset, follow the same principle to stop the microphone from popping: adjust the microphone slightly over or below your mouth to keep it off-axis.
One last thing to consider is using directional microphones. Although they can sound professional, this type of microphone only picks up sound from one side, and speaking too far from it will make your voice sound muffled.
The sound from your mouth reaches the microphone when you speak, and the longer it takes to get there, the weaker the plosive energy. Therefore, with less energy hitting the microphone, there will be fewer microphone pops. Wireless microphones are a great option as they allow you to experiment with distance without worrying about cables.
The ideal distance may differ depending on the person, type of wireless microphone, and project, so another way to find the perfect distance from the microphone is to determine your plosive range. Put your hand close to your mouth and speak words with loud plosives. Move your hand further away and find the distance where you notice the plosive energy fading.
However, this method comes with a disadvantage. Being away from the mic can make the recordings sound lower, forcing you to turn up your mic preamp which may generate noise. Do a recording test and find the balance between good volume and plosive reduction.
An omnidirectional microphone can record sound from all angles, so speaking to it across, from the side, and in different positions won’t compromise your sound like using a unidirectional microphone would. Plus, omnidirectional microphones are less susceptible to microphone pops.
Many popular condenser microphones are multi-pattern, offering directional, bidirectional, and omnidirectional patterns to provide more versatility to streamers, podcasters, and content creators. You can switch to the omnidirectional pattern to record vocals if you have one of these microphones.
The downside of an omnidirectional microphone is that due to its polar pattern, it will capture all sounds around it with the same strength. So, using this microphone in a more controlled environment is ideal, like in a studio with acoustic treatment or a vocal booth.
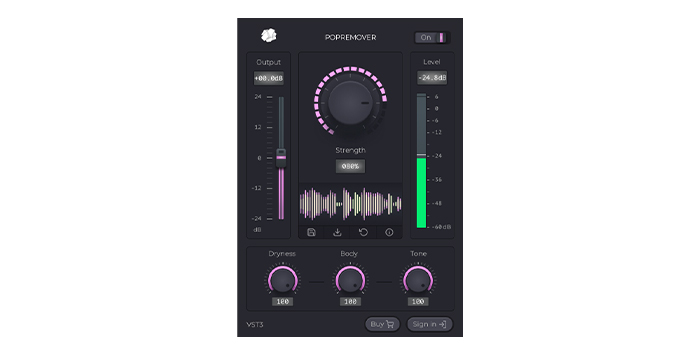
When you find pops in your audio files, you must fix them in post-production. In these situations, the easiest way to achieve professional results is with our PopRemover, which automatically identifies and removes loud plosive sounds using AI technology to streamline the process and deliver exceptional sound quality. All you have to do is drag the plug-in to your audio track, and PopRemover will do the rest.
If you want to adjust the strength and characteristics of the plug-in, PopRemover allows you to do so thanks to an intuitive user interface that works seamlessly on all the most popular audio and video software, like Premiere Pro, Audition, Logic Pro, Garage Band, Pro Tools, Audacity, and many more.
Plosive noises are in the low-frequency range; thus, with the help of a high-pass filter, you can decide what low frequencies to cut to remove the plosives. Some microphones have built-in filters to turn on with a switch, which helps immensely when dealing with potential pops during live performances.
There are also mic preamps with built-in filters. For a cleaner recording, you’ll only need to set the filter below 150 Hz, where most plosive sounds are.
If you don’t have either a microphone or preamps with a high-pass filter, you can still add one in the signal chain in your DAW. Add the plug-in to your track and use it to filter everything below 100 or 150 Hz.
The downside of using such filter is that you may cut crucial low-frequencies. Again, listening and trusting your ears to adjust your settings is crucial.
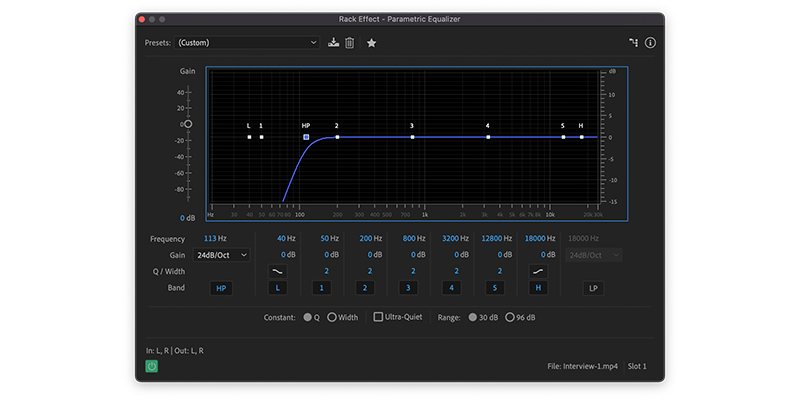
If your goal is to create high-quality content, EQ is a crucial effect. It can help you avoid cutting the desired low frequency by being more flexible with the settings to target only the plosive frequencies. You can use an EQ device or a plug-in within your DAW.
Parametric EQs are particularly helpful because you can narrow your low frequencies more than using a high-pass filter plug-in. It might look daunting initially, but it’s an essential tool that’ll upgrade your content.
I hope this guide will help you remove popping sounds from your recordings once and for all.
The best moment when to stop plosives is before recording, so invest some time learning new recording techniques, understanding mic placement, and the benefits of a pop filter.
When all else fails, you can still solve the problem by relying on the advanced technology of post-production audio tools, PopRemover.
Good luck!


