JG McQuarrie
Apr 22nd, 2023
Premiere Pro is a great piece of software when it comes to video editing. It is a powerful, flexible piece of software as you would expect from Adobe.
However, Adobe Premiere Pro isn’t just great for video editing, it also has good audio editing capabilities. And one of the great tools it has is for audio ducking.
The answer to the question of what is audio ducking is simple. Audio ducking is the process of automatic audio volume control – lowering the volume on one piece of audio to allow another piece of audio to be more clearly heard.
The most obvious example is lowering some background music on a video to allow a voiceover to be heard more clearly. The audio on the background music track is reduced in volume to a quieter level while the voiceover is going on (“ducked down”) before returning to its original level once it has finished.
And that’s all audio ducking is! The process of doing this manually, however, is extremely time-consuming and fiddly. Fortunately, Adobe Premiere Pro allows the process to be automated so it is now much faster and more simple to implement.
The first thing to do, before you set up your audio ducking, is to ensure that you have your tracks in their finished state. That means that any post-production work you want to carry out should be completed.
This is because if you set the audio ducking levels and then decide to make further changes to your audio tracks you may end up changing the volume or balance between the track.
If that happens, you would need to come back and redo the audio ducking all over again. So it’s definitely better to have the levels sorted out in advance.
In this example, we will assume we have dialog and music.
Once your audio is in good shape you need to open the Essential Sound panel. Click the Audio menu at the top and you will see the Essential Sound panel.
You then need to label the clips so that Premiere Pro can tell them apart. Select the audio track which has dialog on it and click the dialog option. This will label the track.
You can then repeat the same process with the music — select the audio track with music on it, then click the Music label. The track will now be labelled as music.
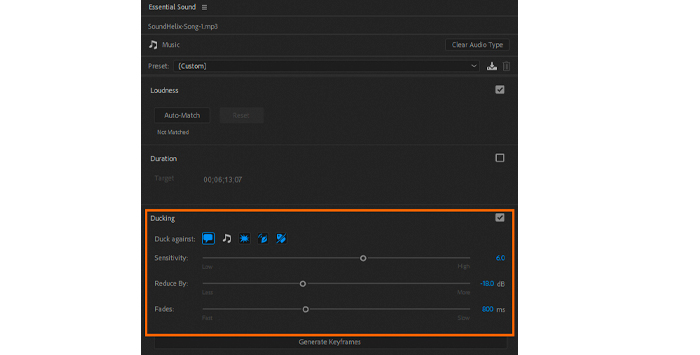
You can then go to the Ducking section, which is around halfway down. This will set keyframes in the audio.

Keyframes are the bits that tell Premiere Pro when to implement the audio ducking and when to return the volume to normal.
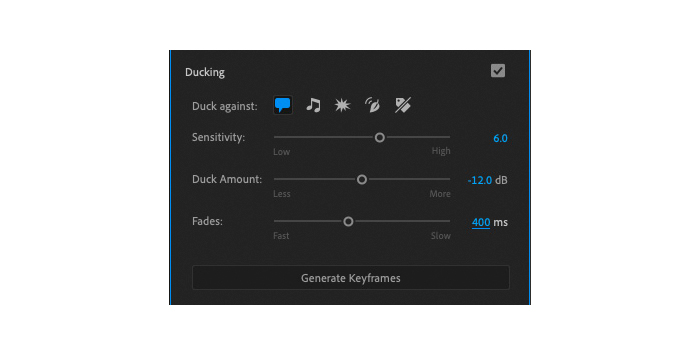
There are three different settings:
The sensitivity setting determines how long the gap in-between clips is before it sets keyframes.
How much, in decibels (dB), the volume will be lowered on the track which isn’t dialog. Note that Premiere Pro also has support for sound effects and ambient sound, which can easily be labeled and ducked as well.
The length of the fade up or fade down in milliseconds. Adjusting this can make the duck sound more or less natural or abrupt, depending on the length of the fade.
As is often the way with operations like this, there is no one “ideal” setting. Every project will be different and have different sounds at different volumes so determining the correct levels will require some judgment.
You will need to play around and experiment until you get the levels correct. However, the more often you use the tool the better you will become at it.
Once you have the settings sounding correct and you are happy with the end results, click the Generate Keyframes.
Premiere Pro will then insert the keyframes automatically into your audio clips and your audio ducking will be ready.
You can then listen back to the audio and confirm if everything is to your satisfaction across the whole project.
If you need to make any further adjustments, you can either select part of the clips or the whole clip and adjust and readjust as necessary.
You can also adjust keyframes manually. This is a labour-intensive process though — it’s exactly what the Audio Ducking panel was designed to do away with.
However, it is important to note that if you manually adjust the keyframes and then go back and use the Audio Ducking panel it will remove the manual frames which have been added.
It’s therefore a good technique to use the Audio Ducking panel to begin with and only make manual adjustments and tweaks when you are mostly happy and just need a few final changes made.
Once you have the levels set the way you want, that’s it – you’re done!
There are a couple of other points it is work paying attention to.
You can apply audio ducking to multiple clips. Simply label the clips, then apply the Audio Ducking. You can then have the audio auto-ducking cover any range of different types of audio in your project.
Audio ducking is always applied to both sides of an audio clip. You can’t apply it just at the start or just at the end — it will always be present in both.
Audio ducking will also always apply the same amount of volume change across your clip. The ducking is applied to the dialog track in this example so if the background tracks varies a lot in terms of its volume audio ducking won’t adjust to different levels.
This brings us back to the initial advice, to do post-production work on your audio before starting audio ducking. Using a compressor or volume leveler before you commence audio ducking will pay great dividends.
But despite these relatively small restrictions, audio ducking in Adobe Premiere Pro remains a great tool
Premiere Pro is a great piece of software. Knowing how to use audio ducking can make video projects sound even more professional and polished.
Now you know how to use audio ducking in Premiere Pro, so your sound can be every bit as good as your video content!


