Marco Sebastiano Alessi
Sep 04th, 2023
There are many reasons why you might want to remove vocals from an audio file: to practice a song with the instrumental backing track only, use the instrumental piece as background music for a video or podcast, or even create a karaoke track!
Unless you produced the song yourself or have access to the stems to create a file without the vocal tracks, you probably have an audio file with all instruments and vocals mixed together. That’s where audio software like Adobe Audition CC can help you.
In this article, you’ll learn how to remove vocals in Adobe Audition in five easy steps.
Grab your music files, and let’s dive in!

Adobe Audition CC comes with your Adobe Creative Cloud subscription, together with other video editing apps like Premiere Pro and After Effects. Audition is a professional audio software used by many podcasters, content creators, musicians, sound designers, and audio engineers. It offers many features for audio recording, mixing, and audio effects like noise reduction, vocal remover, and much more.
The main feature I want to bring up today is the Center Channel Extractor. This effect allows you to modify the channels where most vocals are, boost the bass, remove instrumentals, and amplify, reduce, or separate vocals.
With this effect, Adobe Audition offers one of the easiest ways to remove vocals. Instead of going through a complex process, it provides multiple presets ready to click and go. But it also gives you the tool to customize the preset and find a balance between vocal remover and audio quality.
Here are the steps to remove vocals in Adobe Audition using the Center Channel Extractor effects and its vocal remover preset.
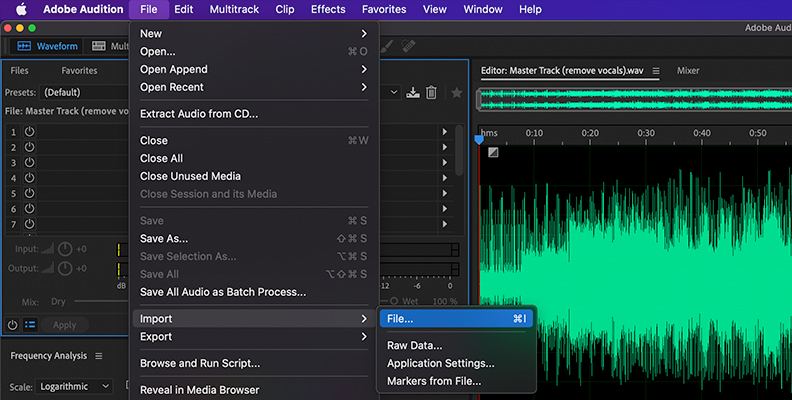
Launch Adobe Audition and import your media and audio files.
Once you have the audio file in the timeline, go to the Effects Rack. Select the first row in the Effects Rack. Click on the arrow on the right end to open a dropdown menu. Choose Stereo Imagery > Center Channel Extractor.
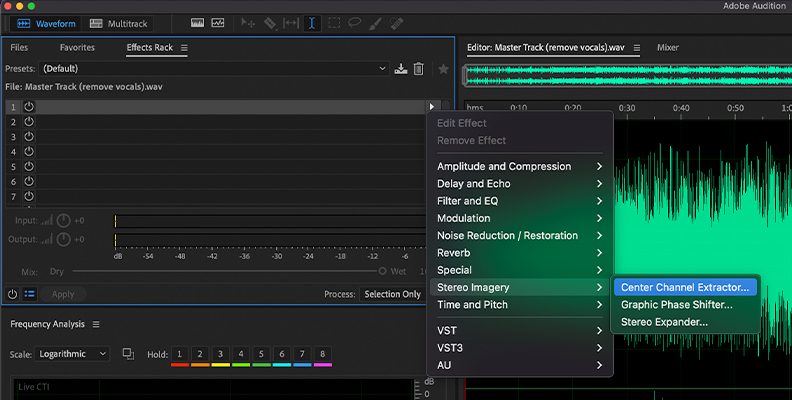
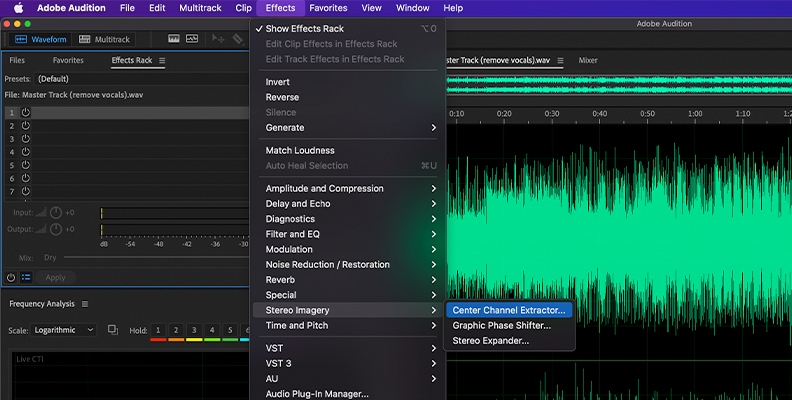
You can also access it through the menu bar Effects >Stereo Imagery > Central Channel Extractor. Bear in mind that the effect requires plenty of CPU power.

Now, you should be in the Central Channel Extractor effect window. Click on the dropdown menu for Presets to change the default one to Vocal Remove.

The effect has other presets to create Acapella, Sing Along, or Karaoke tracks. This time, select Vocal Remove to isolate vocals from the instrumentals. You can preview it and instantly hear there’s been some reduction in your vocals.

You can close the window and export your new track. However, this process doesn’t always work perfectly the first time. In the next step, I’ll show you how to customize the vocal remover effect settings to achieve better results.
In the Extraction tab, ensure you have “Center” as the Extract option. You’ll see two level meters on the right side. The Center Channel Level sets how loud or quiet the vocals on the center channel will be. The Side Channel Level affects other sounds on the audio file, like the instrumental parts.

For quick adjustments, you can increase the Center Channel Level and decrease the Side Channel Level, though it may result in lower-quality audio due to the vocal removal effect altering frequencies. However, Adobe Audition gives you one more tool to fix this issue: the Frequency Range.
In the second section of the Extraction tab, you can edit the Frequency Range setting. First, select Custom from the dropdown menu to manually adjust the Start and End frequencies. These settings will be different for each audio file. So, the best thing to do is listen and reduce the Start frequencies until you hear the lower register of the vocals.

Listen to the audio file again while turning up the End frequencies to the point where you can no longer hear the higher register of the voice.
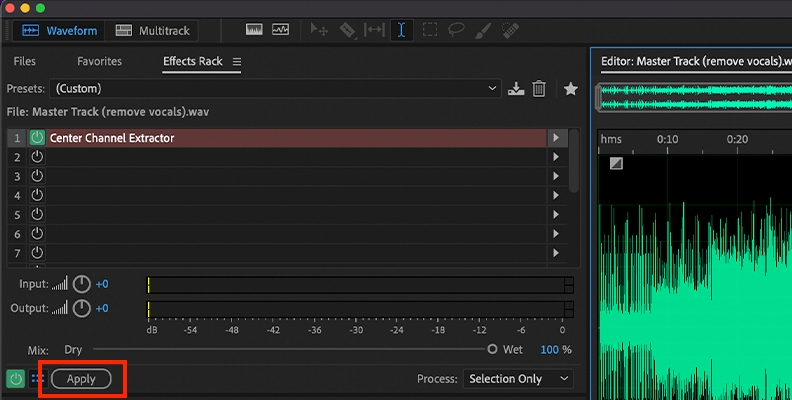
Close the effect window, go to the bottom of the Effects Rack panel, and click Apply. It may take a few seconds for Adobe Audition to apply the effects, depending on the length of your audio files.
The last step is to export the new music track without vocals to use on your mix or videos.
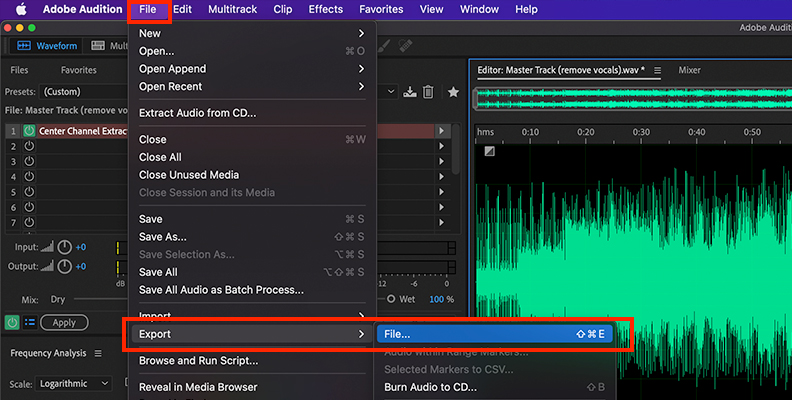
Navigate to File in the top menu and select Export > File. Name the new music file, select the audio format (you can select MP3, WAV, FLAC, AIFF, and more), and click OK.
Use a Sample Type of 48 kHz if you’re working on a video on Premiere Pro or other video editing software. Audio engineers working with video media usually prefer a sample rate of 48 kHz when they work with video.

Depending on the complexity of your project, the Adobe Audition preset might be more than enough. However, having the possibility to endlessly customize your settings makes Adobe Audition CC one of the best audio editing software for professionals. Not to mention how easy it is to set up and edit audio with it.
Good luck, and stay creative!


