JG McQuarrie
Sep 30th, 2022
One of the best things about the iPad is how powerful it is for such a small device. Lighter, more convenient, and smaller than a traditional laptop, the iPad still packs in a huge amount of computing power.
And Apple has ensured that this power can be put to good use.
So when it comes to content creators finding creative ways to use the device, it comes as no surprise to discover that the iPad is there to help.
With nothing more than a USB cable, the iPad can be turned into the ultimate recording, mixing, or podcasting device.
But once you are ready to start recording, you’re going to need something between your iPad and the outside world.
This is where audio interfaces come in.
In this article, we are going to cover what an audio interface is, how to connect an audio interface to your iOS device, and the best iPad audio interfaces available on the market.
Audio interfaces are the middlemen between your iPad and your instruments or microphones.
You connect one end of the interface to your iPad and you connect your instruments or microphones to the interface.
The device processes the audio signals from your equipment and changes them into something the iPad understands.
That signal is then sent back to the interface for you to listen to whatever it is you were recording.
As we discussed in our companion piece talking about the audio interface for Mac, choosing the right interface is a crucial part of any recording set-up.
You want to get the best quality audio, so it’s important to ensure you have the right equipment to realize all your creative dreams.
When it comes to modern iPhones and iPads, Apple has always favored its own proprietary connection, the lightning port.
However, since 2018, the iPad Pro has shipped with a USB-C port in place of Apple’s lightning port. Macs have had this kind of USB port for quite a while, but this was the first iPad to embrace the USB-C standard.
Having USB-C makes connecting to an interface a lot less hassle since it’s an industry standard.
Older iPads with Apple’s lightning port will need a USB adapter. This is an additional lightning-to-USB cable to connect your interface to your iPad (these are sometimes called Apple USB camera adapter cables). This will let you connect to an older iOS device.
However, these usually only cost a few dollars and can be purchased from any online retailer.
To connect your interface to your iPad, follow these steps below:
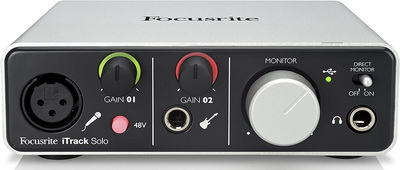
The Focusrite iTrack solo is one of the best audio interfaces to kick off our list, and one which has been built specifically with iOS devices in mind.
This audio interface comes with both a USB-B connection to connect to PCs and Macs and a lightning cable to connect directly to iPads.
The front of the device sports an XLR port alongside a 1/4-inch instrument input. The XLR port has a phantom power button next to it to support condenser mics.
Both the instrument and XLR ports have separate gain controls with a signal halo around them to let you know when your levels are getting too high.
The rear of the device contains the USB-B and device link ports, alongside a line output.
Although this is a budget audio interface, the sound quality is of a high standard. Focusrite is known for the quality of its preamps, and the iTrack certainly lives up to the company’s reputation.
It is also ruggedly built, with a solid aluminum shell that should be able to stand up to any punishment you can mete out while taking it on the road.
If you’re looking to start your recording journey on your iOS devices then the iTrack is an ideal device.
While there are more advanced interfaces out there, the Focusrite iTrack Solo is a simple and affordable audio interface that provides great value for money.
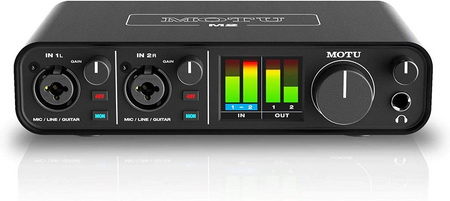
A step up in both cost and quality, the Motu-2 interface is an excellent next stop on the recording journey.
This is another rugged device with a metal shell keeping all the vital parts safe and secure. Portability is key here, and the Motu-2 is ideal to use when out and about in the real world.
The device has two combination XLR inputs / 1/4-inch microphone and instrument ports, alongside separate gain control and separate phantom power buttons.
There are two full-color LED displays showing the sound input and output, so gain control and metering really couldn’t be simpler. It’s a great additional feature to have.
Alongside the USB-C and line-out ports on the rear, there are also two additional ports for MIDI instruments and the device supports MIDI natively.
It also comes with a loopback facility for combining all your signals into one.
If you are looking to take your recording away from entry-level then the MOTU-2 is a great next step. The sound quality is very good, the price is reasonable, and the device is solid and reliable.
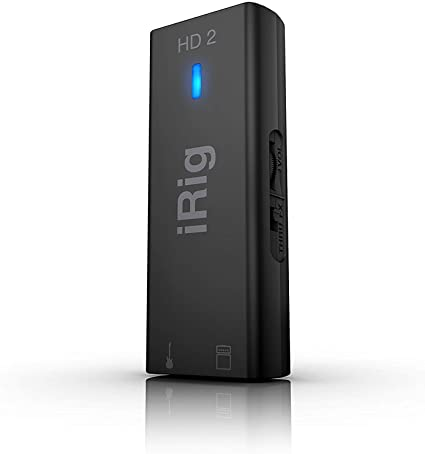
While the IK Multimedia iRig HD2 is specifically targeted at recording electric guitars, it still makes for a good all-around interface. It shouldn’t be overlooked because it has one specific function in mind.
The device is simple and incredibly small — pocket-sized, in fact — so it could hardly be more portable. Connection is via USB and the device has a 1/4-inch instrument port and the same for output.
That means it’s ideal for instruments, of course, but if you want to use it with a microphone you will need to ensure your mic has a 1/4-inch jack on it, rather than the more typical XLR mic input.
And even though this is a tiny device, you’re not sacrificing sound quality for size, with the sample rate of 24-bit / 96 kHz matching other interfaces in this line-up.
The controls on the device are very straightforward, with a simple LED gain indicator giving you a visual representation of your sound and a wheel for controlling the input.
There’s also a 3.5mm headphone jack built in.
Simple, straightforward, and terrific value for money, the iRig HD2 may be designed with guitarists in mind, but anyone can take advantage of this quality iPad portable audio interface. Just grab and go!
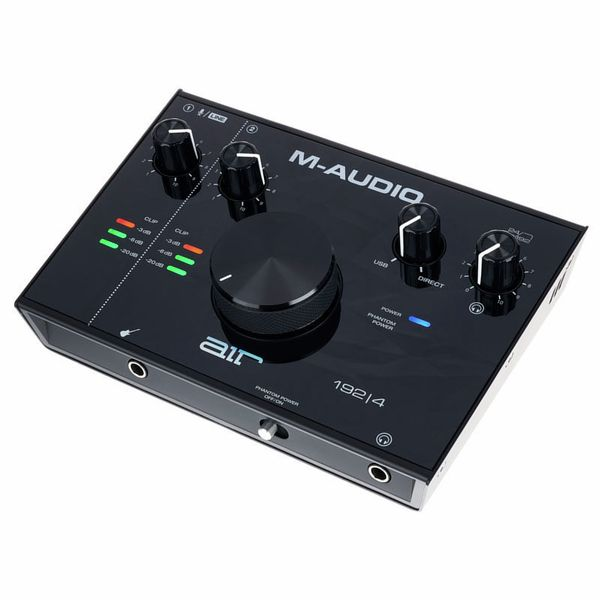
M-Audio is one of those names that, when you see it on an audio interface, you know you are going to be getting quality. And the M-Audio Air 192 is no exception.
The box has its controls on the top, rather than the side, of the device, and features a large central volume knob around which the other controls are situated.
There are two LED gain meters for input and output to the left, alongside individual gain controls.
There’s also a control for blending the input and output signals, for monitoring.
The front of the device contains two 1/4-inch instrument ports as well as a 1/4-inch headphone port and a phantom power switch.
The rear of the device houses an XLR mic input as well as USB and mains power connections.
The sound quality is clear, crisp, and free of noise, and the preamp is great.
While most interfaces come with some kind of software bundle, the M-Audio one is particularly worth paying attention to, as it comes with ProTools: First.
There’s a large suite of plug-ins too, so you can indulge your every creative impulse.
It’s also worth mentioning that the 192 | 4 is the smallest interface that M-Audio produces, and if you require more ports you can scale up to the 6 or even 14-port versions. Whichever size you go for, you will be getting a high-quality, great-sounding audio interface.
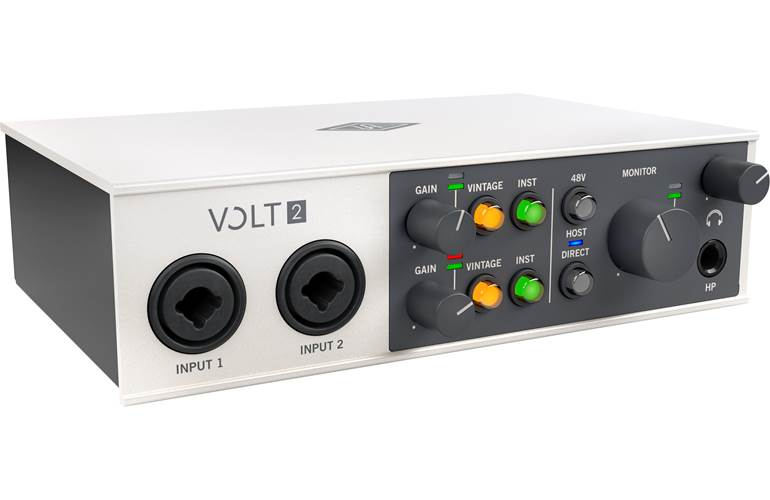
The front box of the Volt 2 looks positively retro compared to some of the other sleek devices on this list. But don’t let the retro stylings on this audio interface fool you — this is a quality bit of kit that’s bang-up-to-date.
And the look isn’t purely cosmetic — under the hood, you will find a warm, vintage preamp that works equally well on instruments and voice and really adds texture and life to your recordings.
But even without the vintage preamp turned on, the superior sound quality shines through.
There are two XLR inputs on the front of the device, each of which has its own gain control.
Each has a single LED to let you know if you’re clipping. A phantom power button sits next to the monitor knob, and there’s a 1/4-inch headphone port as well.
The rear of the device features the monitor output, two MIDI ports and the USB-C interface, mains power, and a satisfyingly chunky on/off switch.
As with the M-Audio 192, this is another interface that comes with a huge range of software. So if you’re looking to expand your production skills as well as your physical hardware, the Volt 2 is a great choice.
It’s not the cheapest interface on the list, but the quality speaks for itself.
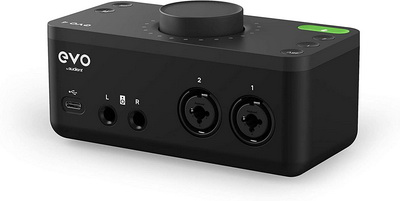
A slightly unusual oblong design houses the Evo 4 interface, but with inputs on the front and controls on the top, it’s a simple enough piece of equipment to use.
The Evo has a multi-function knob in the middle of the top side of the box, which controls the headphone output as well as the gain for each of the two channels.
The knob has a halo meter around it to indicate levels and simple, intuitive buttons control the mic, channel, and phantom power settings.
On the front, there are two multifunction XLR / 1/4-inch instrument ports, as well as 1/4-inch monitor ports and a USB-C connection.
The rear of the device has an additional instrument port and a 1/4-inch headphone port.
Sound quality is clear and clean, and recording with the device is hassle-free. You can also mix the input and output signals as well with loopback, which makes monitoring your recording just as free from trouble.
Overall, the Evo 4 doesn’t reinvent the wheel but it’s a solid, dependable, and affordable interface that benefits from the extra instrument port on the rear and good sound quality.
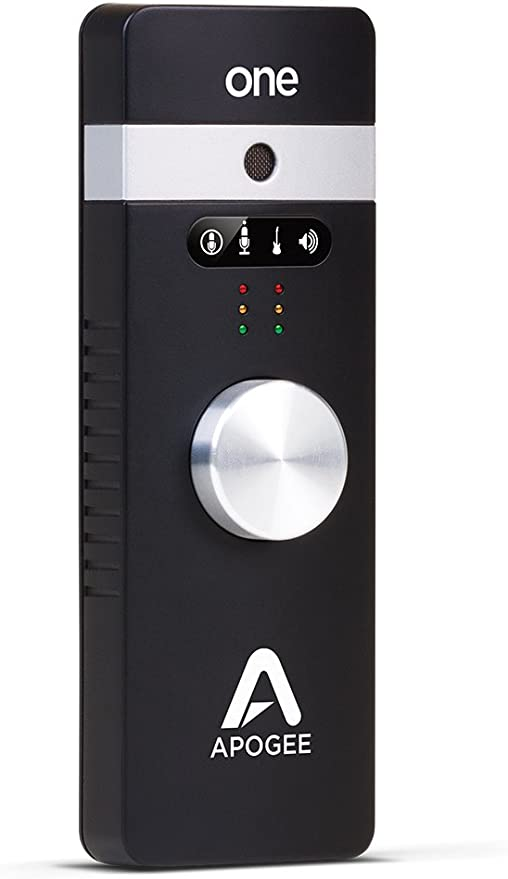
Portability is always an important feature for any interface that’s going to be hooked up to an iPad. With the Apogee One, you have a perfect pocket-sized device for the content creator on the go.
Due to the tiny size of the device, the functionality is controlled by a single knob on the front of the box. You need to depress the knob to run through the different functionality, rather than there being a series of buttons to press.
There are two LED gain meters to allow you to keep track of your levels.
Rather than having ports built into the device, the Apogee One instead features a breakout cable that connects to the top of the device.
This helps keep the size of the box down, though means you need to carry an extra cable. The cable features one XLR and one 1/4-inch instrument connection.
The Apogee One has one other trick up its sleeve — it features a built-in microphone. The quality of this is surprisingly high. Though it might not be quite up to the standard of dedicated condenser microphones it still delivers a great-quality sound and is noticeably better than the mics in many laptops.
The Apogee name stands for studio-quality devices and despite its diminutive size, the Apogee One lives up to that reputation. It’s terrific and compact, and a quality iPad audio interface.
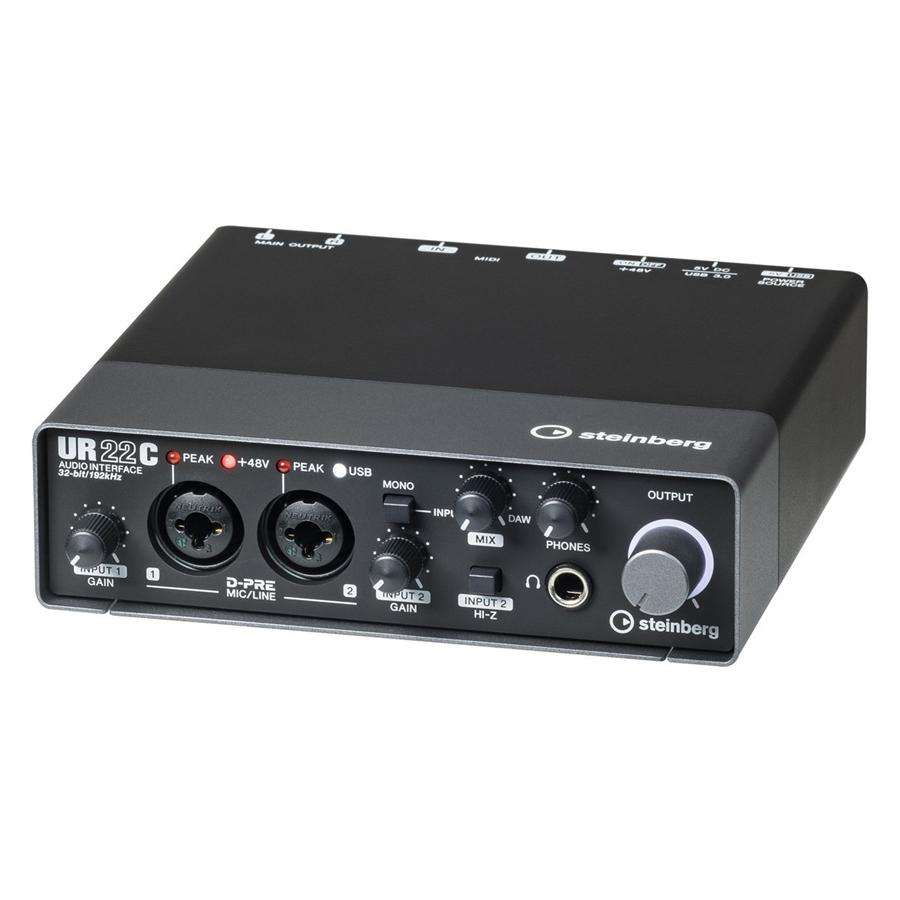
Steinberg’s UR22C is another rugged, metallic box that is well placed to take a beating on the road and still carry on working without any problem at all.
The device itself captures great quality audio and the build quality is carried through internally as well as externally. The device has two multifunction XLR / 1/4-inch ports on the front, alongside a gain control for each input.
There’s a separate peak LED for each input as well, so you can see when you’re clipping. There’s a mono/stereo button, a 1/4-inch headphone jack, and an output control knob.
On the rear, there are two MIDI ports, two 1/4-inch monitor output ports, and a power switch alongside the USB and DC power ports.
Sound capture is warm and natural sounding, and the mic preamp delivers great quality.
Steinberg has a reputation for great quality sound and the UR22C has excellent dynamic range when it comes to recording both instruments and vocals.
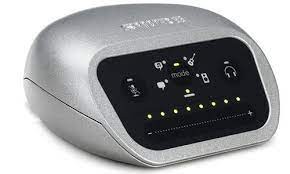
Looking like something from a 1950s sci-fi movie, the unusually-designed Shure MVi audio interface nevertheless packs a punch.
It’s a small device, but that doesn’t compromise the quality of the sound. There’s an excellent mic preamp under that silver surface and recording with the Shure MCi certainly won’t disappoint.
The front panel is informative, featuring an LED gain meter, mode selection, and headphone and mic controls.
These are all touch panels, though the mode selector just lets you cycle through the options rather than choosing a specific one.
The rear of the device houses a single XLR/1/4-inch instrument port, as well as a 3.5mm headphone port and a USB connection.
There are five different DSP (digital signal processor) modes for different types of recording — these are acoustic instruments, singing, flat, speech, and loud. You can choose whatever suits your style of recording and the DSP will ensure you get the best results.
Despite its odd design, the Shure is nevertheless still a great audio interface, and what’s more, it is specifically made for iOS devices — it is MFi certified (Made for iPhone/iPad).
There are many factors to consider before you invest in buying an audio interface for iPad.
As you can see from the above list, there are a lot of criteria that need to be taken into account.
Audio interfaces vary widely in price, and spending more money doesn’t always mean getting a better piece of kit.
Obviously, you want to ensure your recording sounds as good as possible. Sound quality can vary a surprising amount, even between more expensive audio interfaces, so be certain your device will deliver the sound quality you need.
If you are taking your interface on the road with you, choose a device that is light and portable, but also rugged enough to stand up to knocks and bangs.
If you’re home recording or in a studio environment, then this won’t matter as much as you can be freer in your selection.
These can vary greatly between audio interfaces, and it’s important to ensure that the interface you select is going to be able to support all your hardware in the way you want.
Consider what it is you actually want to use the audio interface for. There’s no point in forking out for an eight-channel interface if you only ever use one mic or instrument.
Make sure the interface you invest in is actually appropriate for your recording task and has the right number of inputs and outputs.
Some interfaces are better for spoken word,some are better for instruments, and some will be equally suited for both. It pays to do your research and make sure you’re getting the right one that suits your needs.
Most audio interfaces come packaged with software. These can be top-quality professional recording software packages, others may only be basic tools to adjust sounds or settings.
Choosing audio interfaces with a good software package can really help you get the most bang for your buck.
iPad audio interfaces come in all shapes and sizes, and not all audio interfaces are created equally.
The range and price of iPad audio interfaces are wide, and there are many excellent audio devices available for budding creatives.
Whether you want to dip your toe in the water of recording, or whether you’re a seasoned professional, there’s bound to be an audio interface out there for you.
Just make your choice and start creating!