
With the rise of social media and different ways of viewing different content, the number of different sizes and aspect ratios has exploded.
Videos have always had varying dimensions as time has passed and technology has developed, such as the move from “square” to widescreen TV. As these dimensions change, it is important for creators to know how to work their way around them.
For filmmakers and editors, especially those new to the software, learning how to change a video’s aspect ratio in Final Cut Pro may be a bit of a challenge.

What is aspect ratio? The aspect ratio of an image or video is the proportional relationship between the width and height of that image or video. To put it simply, it is the parts of a screen occupied by the video you see. For example, an old TV program displayed on a widescreen TV might have black bars at the sides to keep the program looking square. The aspect ratio is the width and height of the image displayed, not the width and height of the entire screen.
It is usually depicted by two numbers separated by a colon, with the first number representing the width and the last number representing the length.
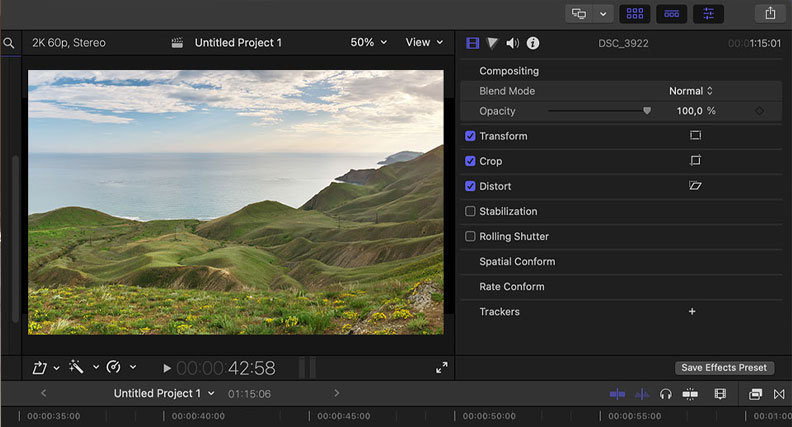
Final Cut Pro is Apple’s professional video editing software. If you work with a Mac and want to change a video’s aspect ratio, Final Cut Pro is the perfect tool to achieve this. It allows you to repurpose projects that have standard horizontal aspect ratios.
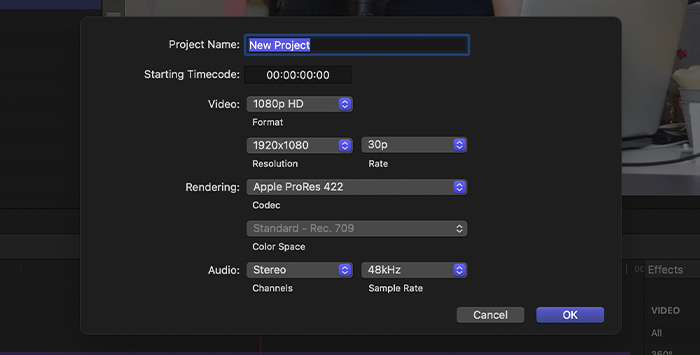
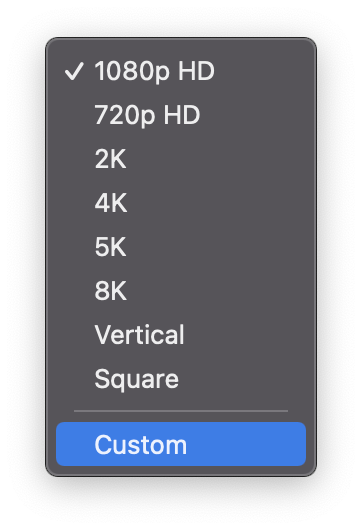
Before we get into the “how?”, it is important to have a full grasp of the resolution and aspect ratio options present in the Final Cut Pro. Aspect ratio options available in Final Cut Pro include:
These options are usually displayed according to their resolution values.
This is how to change aspect ratio in Final Cut Pro:
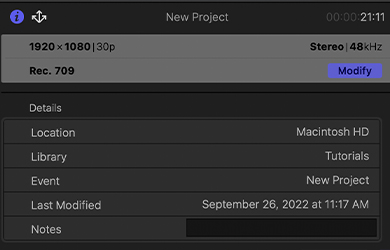
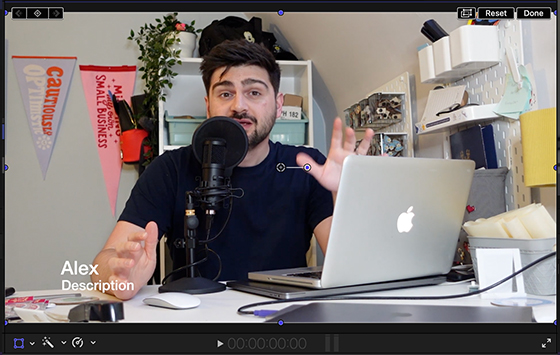
Final Cut Pro also has a Crop tool for a more old-fashioned way of working as a video editor if that’s what you prefer. You can easily find it by clicking the pop-up menu in the lower-left corner of the viewer.
Final Cut Pro has another feature to help you with aspect ratios. This is known as the Smart Conform feature.
It lets Final Cut scan each of your clips for the details, and preemptively reframes clips that are different from the project in terms of aspect ratio.
This feature also lets you quickly create an orientation (square, vertical, horizontal, or widescreen) for your project, and make manual framing choices later.

Once selected, Smart Conform analyzes the clips in your project and “corrects” them. You can do an overscan of your corrected clips and manual reframing if needed using the Transform feature.
Why is it important to know how to change aspect ratio in Final Cut Pro? Well, aspect ratio is important in all creations with a visual component. For the same content to travel from a Mac to television, YouTube, or TikTok, adjustments need to be made to preserve features and details.
TV sets, mobile phones, computers, and social media platforms have varying aspect ratios for various reasons. As a Final Cut Pro user, being able to change your aspect ratio on a whim is a skill you want to have.
If the aspect ratio of a video is not well adjusted to a television screen, it will be compensated for by letterboxing or pillar boxing. “Letterboxing” refers to the horizontal black bars at the top and bottom of the screen. They appear when the content has a wider aspect ratio than the screen.
“Pillarboxing” refers to black bars on the sides of the screen. This occurs when the filmed content has a taller aspect ratio than the screen.
For the longest time, the majority of videos have had horizontal dimensions with some minimal variation. However, the ascent of mobile devices and social media networks have led to media files being consumed in other ways. Simply working on a TV screen or cinema screen just isn’t enough any more.
We are embracing the portrait format – what you see when your hold your cellphone in front of you vertically rather than horizontally – more and more every day. This means content has to be adapted to every valid platform to boost visibility and get views
This has become an important part of post-production – creating many versions of video content with each one having a different aspect ratio.
Even within a platform, there may be the need for different aspect ratios. A good example of this is seen in two of the more popular social media houses in the world: YouTube and Instagram.
On YouTube, videos are uploaded and consumed mainly in a horizontal format, and viewers access them through smartphones, tablets, laptops, and nowadays directly via television. However, there are also YouTube Shorts, which are usually vertical in a 9:16 ratio.
On Instagram, most content is consumed vertically and in a square format. However, there is the Reels feature where videos are portrayed vertically but on fullscreen.
Therefore, if you want your work to appeal to multiple crowds even within the same social network, being able to change the aspect ratio of your videos is a must.
As a beginner video editor, you may find Final Cut Pro a bit difficult to work around. If, like many, you’re wondering how to change a video’s aspect ratio in Final Cut Pro, this guide should help you.
If you don’t use a Mac for your video editing, then Final Cut Pro will not be accessible to you as it is a Mac-only product.