JG McQuarrie
Feb 06th, 2023
Producing audio, whether on its own as a part of a podcast or with video as part of a video project, is a challenge. Many complexities can be faced but getting the audio portion of any video project right is absolutely crucial.
No matter how good your images are and no matter how striking your finished piece is, if the audio is poor nobody is going to pay attention to it.
That means that it is important for any video producer to have a good understanding of how to record high-quality audio as well as capture good images. Unfortunately, this is something that is often missed and myriad audio problems can occur as a result.
And one of the most common that can occur is audio clipping. But what is it, and how fix audio clipping?
Audio clipping is something that occurs when the audio itself is being recorded.
Every piece of equipment will have a certain limit that it can record. This limit is the amount of signal the equipment can capture.
This is true whether you are recording on a video camera or separate audio equipment, whether you are using a built-in mic or external mic, digital or analog… they all have limits as to what can be captured.
When the incoming signal strength is more than the equipment can cope with you will get audio clipping.

Clipped audio is very easy to identify on any recording. When clipping occurs you will hear that the audio you have recorded is distorted, has fuzz or buzz over it, or otherwise will be of poor quality.
This makes it difficult and unpleasant to listen to. Clipped audio can easily ruin whatever it is you are trying to present.
Under normal circumstances and when your equipment has been correctly configured, when audio is recorded it will be captured as a sine wave. This is a regular, repeating pattern that is smooth and continuous.
When audio equipment is not set correctly and the signal overloads the limits of what the recorder can cope with, the top and bottom of the sine wave are cut off – the audio peaks and troughs are cut off. It looks like the top and bottom of the waveform have been clipped, thus the term audio clipping.
This clipped waveform is what produces the distorted audio that you want to try and avoid.
One method to fix clipping that has occurred on your audio is to use a third-party declipper tool, such as CrumplePop’s ClipRemover.
This is an incredibly useful tool for repairing audio that has been clipped.
All you need to do is load your damaged audio file and let the advanced AI repair the damage to the clipped waveform. The tool is very straightforward to use. There is a central dial that you adjust to where the clipping occurred . Then simply find the sweet spot by adjusting the level meter until you are happy with the restored audio.
ClipRemover is a simple, powerful piece of software, and it works with most major audio and video editing software and is available on both Windows and Mac platforms.
However, if you have audio or video software you use for editing you may want to use the built-in tools to help repair the clipped audio you need to deal with. Adobe Premiere Pro is a powerful piece of software and contains everything you need to repair damaged audio.
When your audio has clipped it is going to need to be repaired to prevent it from having to be re-recorded. Adobe Premiere Pro can help with this. There are a number of steps you need to take in order to clean audio and have it sound better.
Please note that for this technique to work you need to have Adobe Audition installed as well as Adobe Premiere Pro. If you do not have Audition installed you will need to download it from Adobe’s website. Without it, the instructions below will not work.
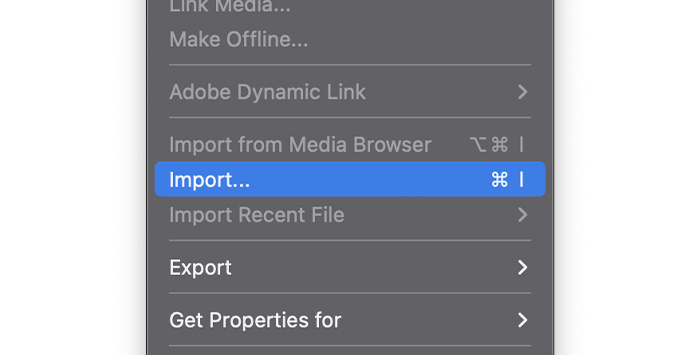
Firstly, import the file you want to work on into Adobe Premiere Pro.
Create a new project by going to the File menu, then choosing New.
Once the new project has been created you can go to the Media Browser and import the file you want. Double-click the browser, then browse your computer to find the audio or video file you want to work on.
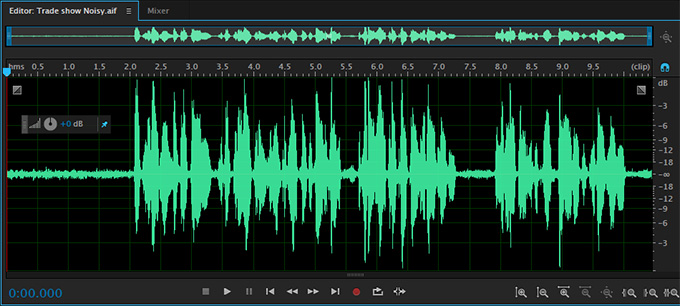
Once the file has been successfully imported you will be able to see it in your timeline.
Right-click over the file in your timeline, then select the Edit In Adobe Audition option from the menu.
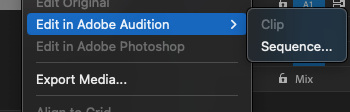
The audio clip will then be prepared for editing in Audition.
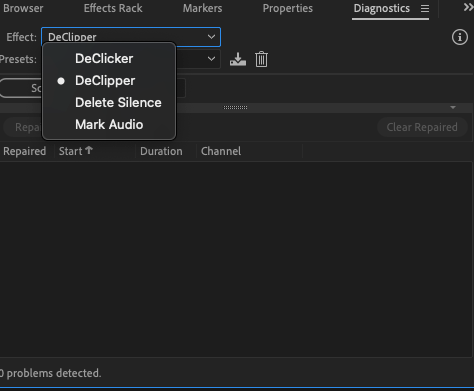
Once the audio clip is ready, in Audition go to Effects, then Diagnostics, then DeClipper (Process)

This will open the DeClipper effect in the Diagnostics box on the left-hand side of Audition with the Effects panel selected.
Ensure the Effects option has DeClipper chosen, as the other Diagnostics effects are also available from this menu.
You can process the whole of your audio by selecting it all (CTRL-A on Windows or COMMAND-A on Mac). You can also edit clip problems by left-clicking and selecting a portion of the audio you want to apply the DeClipping effect to if you don’t want to work on the whole track.
You can then apply the effect to the audio that you want to repair.
The default setting on the DeClipper is a basic setup that allows you to apply a simple repair to the audio.
Click on the Scan button and Audition will then scan the audio you have selected and apply the DeClipper effect to it. Once this has been done, listen back to the results to see if they have been improved to your satisfaction.
If you are happy with the results then Audition has done its work. However, that is just the default setting. In addition, there are three other settings. These are:
You can use these settings either on their own or in combination with each other.
For example, if you apply the default setting to your audio, the results might sound fine but they may also sound distorted. This can be the result of many different factors, including problems with the original audio, how bad the clipping is, or other distortions or factors that appear on your recording apart from the clipping, such as hiss.
If this is the case, then you may want to apply one of the other settings to your audio. Taking audio that has already been declipped and applying further effects can resolve the distorted audio issue.
Select the audio you applied the original effect to. Once you have done so, choose one of the other presets from the menu that you think will best help the audio.
If there is only light distortion chose the Restore Light Clipped option. If it seems very bad then try the Restore Heavily Clipped option.
You can try different combinations until you find one that you are happy with. And because editing in Adobe Audition is non-destructive you can be confident in experimenting with your audio without having to worry about restoring it if you aren’t satisfied with the end results.
Hopefully, the default settings will be able to restore your clipped audio and make everything sound great again. However, if this is not the case and the presets aren’t producing the results you hope for, you can always adjust the Settings manually to see if you can improve things that way.
Click on the Settings button next to the Scan button to access the manual settings for the DeClipping tool.
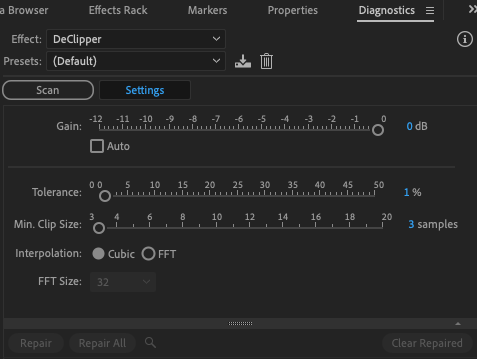
There are a number of settings available.
Sets the amount of amplification (audio gain) that will be applied before the DeClipper processing begins. Adjust the audio gain until you find a satisfactory level.
This is the most important setting. Adjusting this will have the biggest impact when you are trying to fix clipped audio. Changing the tolerance will change the amplitude variation that has occurred in the clipped part of your audio.
What that means is that it will affect the chance of each individual noise on your recording. So if you set the Tolerance at 0% then it will only detect and affect the clipping which occurs at maximum amplitude. If you set it at 1% it will affect clipping that occurs 1% less than maximum, 2% at 2% less than maximum, etc.
Getting the correct tolerance will take some trial and error but as a general rule anything under about 10% is likely to be effective. However, this will depend on the original audio you are trying to repair, so there is no exact setting that will work. Of course, this process will be different for every piece of audio you want to repair because each is likely to have a different amount of clipping.
This sets how long the shortest clipped samples run in terms of what needs to be repaired. A lower percentage value will repair a higher percentage of the clipped audio and a higher percentage value will repair a lower percentage of the clipped audio.
Consists of two options, Cubic or FFT. The Cubic option uses what are known as spline curves to recreate the clipped parts of your audio waveform. Generally speaking, this is the quickest of the two processes but it does have the downside of sometimes introducing artifacts (distortions or other unwanted audio effects) onto your recording.
FFT stands for Fast Fourier Transform. This normally takes longer than the Cubic option and is most effective when it comes to restoring heavily clipped audio. If you choose the FFT option to repair your audio you will be presented with one more option, which is:
This is a fixed number value on a logarithmic scale (8, 16, 32, 64, 128), with the number representing how many frequency bands the effect will analyze and replace. The higher the value chosen, the more effective the restore process is likely to be, but the longer it will take to complete.
With all these settings, it takes time and practice to ensure that you get the best results, but learning how to adjust the individual settings in the DeClipper can yield much more impressive results than the available presets.
Once you have managed to set all the levels so you are happy with where they are, whether using the presets or manually setting them yourself, you can then click the Scan button. Adobe Audition will then scan the affected audio that you have selected and generate the parts which have been clipped.
When Adobe Audition has finished scanning the audio you are then ready to repair it. There are two options here, Repair and Repair All. The repair will let you select specific areas that you want to apply the changes to. Repair All will apply the changes to your entire file.
As a general rule, Repair All is almost always fine, but if you feel the need to customize what parts of the audio need to be repaired then you can do this.
Play back the file and confirm that you are happy with the resultant audio after the DeClipper effect has been applied. If you are not quite happy with it yet, you can undo the changes applied so you can start again, or you can apply further declipping to see if the clip fix can be improved any further.
Once you are satisfied, you can save the file. Go to File, then Save, and your clip will be saved.
You can now close Adobe Audition and go back to Adobe Premiere Pro. The saved, enhanced version of your audio recording will have replaced the original.
Clipped audio can be a real headache for anyone who has to deal with it. But it doesn’t need to be a disaster, and you don’t need to re-record everything just to get a better version of the audio that you have already recorded.
With just a few simple steps you can restore even badly clipped audio to a great state. You can spend a lot of time investigating each individual setting or you can use the presets in Adobe Audition to clean things up quickly and simply.
Either way, nobody need ever know there was a problem with your audio recording in the first place and it will be left sounding great!


