Marco Sebastiano Alessi
Nov 04th, 2022We constantly work with multiple videos and audio clips from different takes to have more material during post-production. However, often we need to merge clips to create the effect we envisioned.
Whether we are video editing a music video, a short film, an interview, or content for YouTube or other social media platforms, learning how to merge video clips will make your workflow smoother.
With Adobe Premiere Pro, you can merge audio efficiently and in no time. Premiere Pro is a top-rated video editing software: it offers everything you need to create professional-quality videos, from simple tools like cutting and trimming to adding effects and creating stunning visuals.
In this article, you’ll learn how to merge clips in Adobe Premiere Pro. I’ll divide this guide into different sections so you can jump straight to the one you need now.
There are two ways to merge videos and audio clips in Premiere Pro: creating a subsequence and a nested sequence. I’ll review each step so you can choose the one that adjusts to your workflow.
Make sure you have all the clips you want to merge on your computer and bring them to Premiere Pro.
1. Open or create a new project.

2. Go to File on the upper menu bar and then Import. Select the clips to merge.
1. Add the imported video files from your Project panel to the Timeline panel to create a new sequence.

2. If you have a sequence and want to create a new one, right-click the video clip on the Project dashboard and select Create a New Sequence From Clip.
3. You’ll be able to see the clips on the Timeline.
A nested sequence is a method to combine video and audio clips inside a compact sequence. You can use a nested sequence to group multiple clips, which can then be added again to your main sequence. Think of it as a vessel containing several clips that will act as a single clip in the Timeline.
Once a nested sequence is created, you’re allowed to move, trim, add effects, and use other video editing tools as if you were working with any single clip. It’s a time-saving technique when you need to add the same effects to a series of clips.
Follow these steps to create a nested sequence to combine video clips:
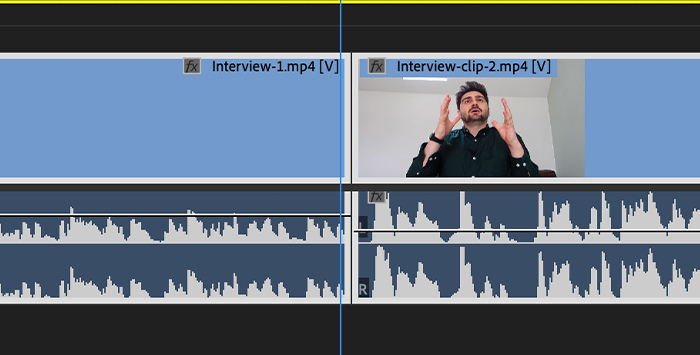
1. Select the clips in the Timeline with a shift click.
2. Right-click on any of them to display the dropdown menu.
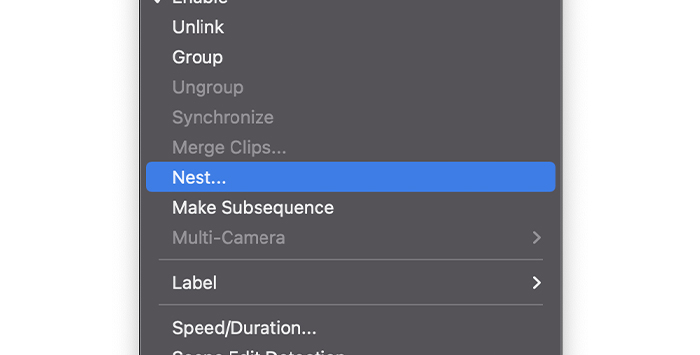
3. Search for Nest and select it.
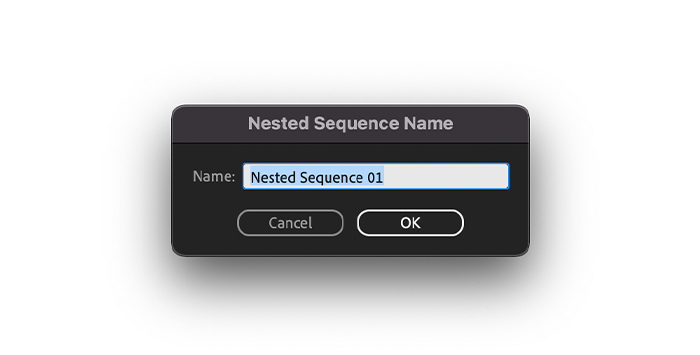
4. A pop-up window will appear to rename your new nested sequence; write a name and click OK.
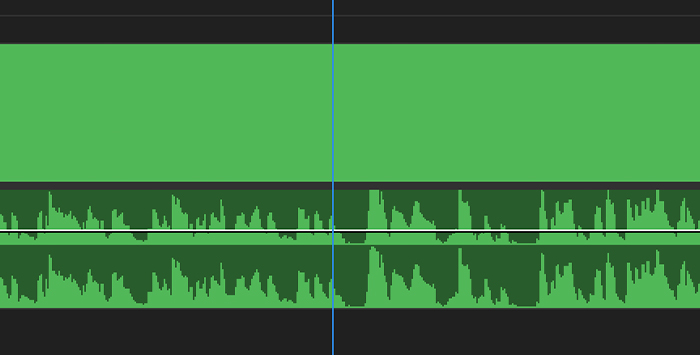
5. The selected videos on the Timeline will now be one single clip, and the background color of that clip will change.
The nested sequence is now replacing the original clips, and you can edit or add effects to it as if it was a single clip. However, you can edit the merged clips individually by double-clicking on the new nested sequence to open it. After editing single clips, you can continue working on your main sequence with the merged clips as a nested sequence.
The process is similar to the nested sequence. Still, instead of creating a container for your clips in the Timeline, you’ll create a subsequence in the Panel project, so your video files in the Timeline remain intact.
1. In a new project, import the videos from the File menu. Follow the path File > Import.
2. Your files should be in the Project panel.
1. Add the video files from your Project dashboard to the Timeline.
2. Shift-click the clips you want to combine to select them.
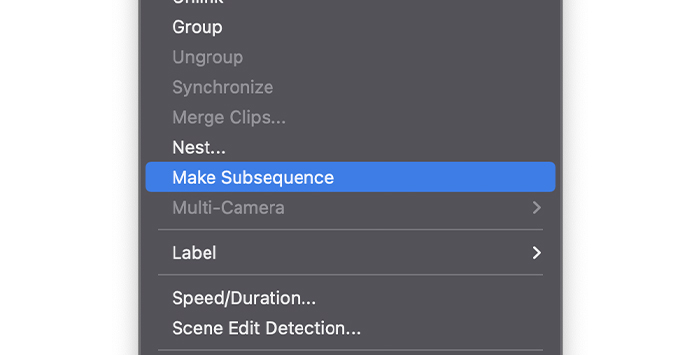
3. Right-click on the selected clips and select Make Subsequence from the dropdown menu.

4. You will find the subsequence in the Project panel.
5. Drag the new subsequence to the Timeline to add effects.
6. You can open the subsequence with a double click to edit the clip individually.
Occasionally, you need to join audio clips to use them later in a project. This process is similar to combining videos using a nested sequence: you put the audio in a container sequence to act as a single clip you can move and use in the main sequence.
1. In a new project, import your audio files from the File menu and click Import.

2. Find the audio files you want to combine in your computer or any external storage device.
3. Drag the audio tracks to the Timeline.
1. Select the audio tracks to merge with shift-click.
2. Right-click on any selected audio clip.

3. When the dropdown menu appears, choose Nest.
4. Rename your nested sequence and click OK.
5. The nested sequence will show in a different color on the Timeline.
If you need to edit each audio clip independently, you can double-click the nested sequence and make it the active sequence where you’ll see the merged clips.
1. Double-click the nested sequence on the Timeline to make it the active sequence.
2. You should see the merged clips individually and can proceed to edit.
3. Go back to your main sequence.
You can render the nested sequence to convert the combined clips to an audio track. It will reduce the resources needed from your computer to improve its performance, but it won’t allow you to edit the clips individually, so consider it before doing this.
1. Right-click on the nested sequence.
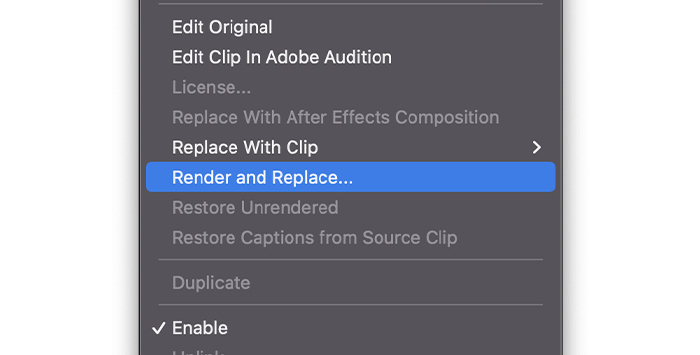
2. Choose Render and Replace in the dropdown menu.
3. Your nested sequence will be replaced with a new single audio track.
If you need to revert this process and return to the nested sequence, you can do it by following the next steps.
1. Select the audio clip with right-click.
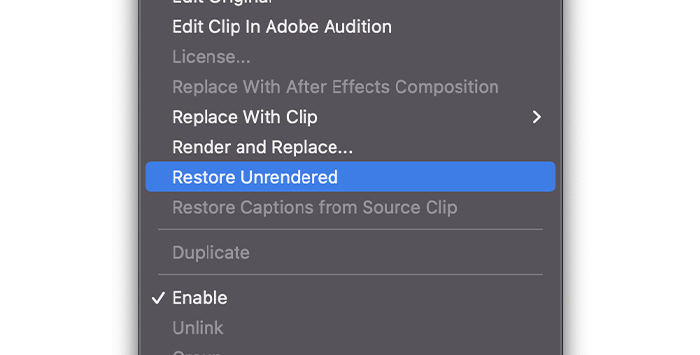
2. Choose Restore Unrendered in the dropdown menu.
3. Your audio track will revert to a nested sequence.
Now is the time to merge multiple audio sources with a video clip. With Adobe Premiere Pro, we can merge up to 16 audio tracks into one video or AV clip and sync them together. The audio tracks can be mono (they count as one track), stereo (they count as two tracks), or surround 5.1 (they count as six tracks), but it cannot exceed 16 tracks in total.
Follow these simple steps to merge video and audio clips in Premiere Pro.
1. Import the clips from your computer.
2. Drag the component clips to the Timeline.
Before merging the audio and video clips, you must ensure they are in synchronized. You can manually move the clips, but there’s a more straightforward method if you are replacing audio from your camera with the one from a microphone:
1. Select the clips you want to sync.
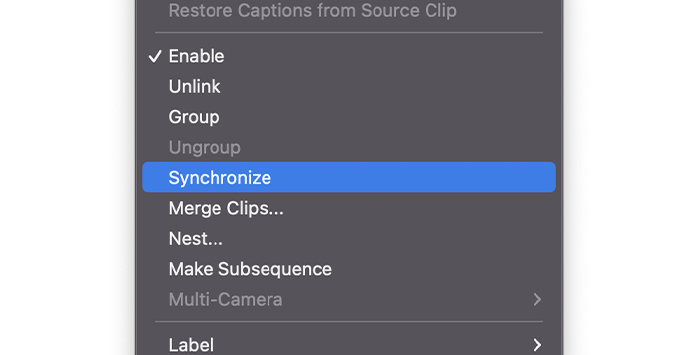
2. Display the dropdown menu by right-clicking on it and choosing Synchronize.

3. In the Merge Clips dialog box, you can choose between synchronizing methods. Choosing Audio Premiere Pro will automatically sync audio files. When you’re done, click OK.
4. You’ll see the clips automatically adjust.
5. Listen to the audio to ensure it’s synchronized.
1. Select the clips, both audio and video clip, with shift-click.
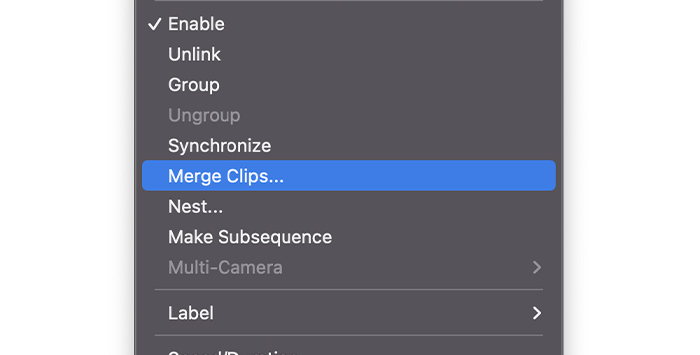
2. Right-click on any selected clip and then click Merge Clips.
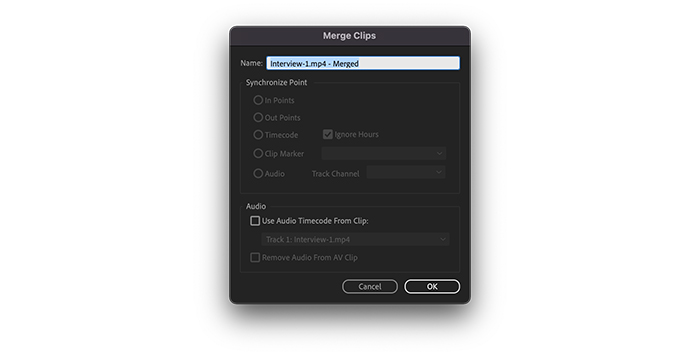
3. The Merge Clip window will pop up where we can remove the audio from the AV clip if that’s what we need. Rename the clip and click Ok.
4. The new merged clip will appear on your Project panel.
5. Drag the merged clip to the Timeline as a single AV clip.
So far, we’ve explained how to combine video clips, multiple audio clips, and up to 16 audio clips into one video. Let’s analyze a different scenario where you have multiple cameras and microphones operating simultaneously. In this context, is it possible to merge videos using Adobe Premiere Pro?
Creating a Multi-Camera sequence will allow us to import clips from multiple sources and synchronize them manually or with the Audio function to sync content automatically.
The following are the steps to merge multiple clips in Adobe Premiere Pro.
1. On Premiere Pro, go to the menu bar and choose File > New Project and name your new project.
2. Return to File, but this time select Import.
3. Find the folder holding all your files.
4. Select them all and click Open.
1. On the Project dashboard, choose all the clips you want to merge.
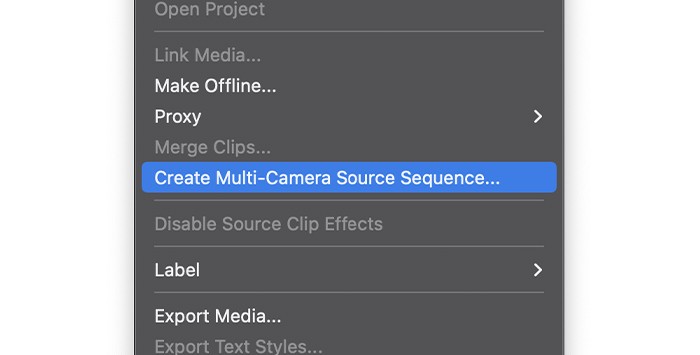
2. Right-click your selected clips and choose to Create Multi-Camera Source Sequence.
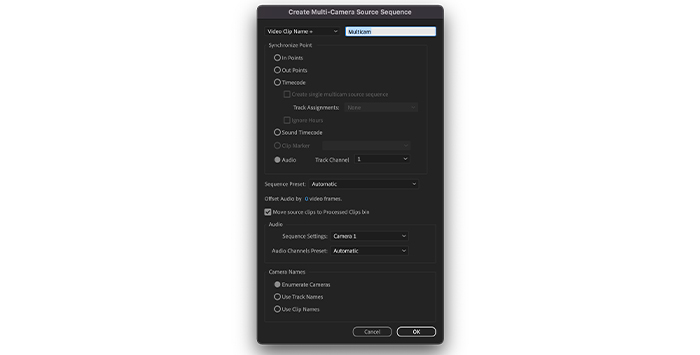
3. The Multi-Camera dialogue box will show a pop-up with the sync settings.
4. Name your Multi-Camera Sequence.
5. For easy synchronization, choose Audio to let Premiere Pro take care of it. Just make sure your source video clip has its own audio.
6. Check Move source clips to processed clips bin. Premiere Pro will create a bin and move all processed clips in there except those that can’t be synchronized, making it easy to determine which ones were not included in the Multicam sequence.
7. You can leave the other settings as default and click OK.
8. The new sequence will be in the Project dashboard.
1. Drag the Multicam sequence to the Timeline.
2. You should see a single audio and video file.
3. To see all the files merged in the Timeline, double-click on the sequence to open it up, just like you would work with a nested sequence.
As you see, merging video clips with Adobe Premiere Pro is a simple process, and the results can be incredible. The only thing left to do is to record as much footage as you need, play around with the settings in Premiere Pro and let your creativity run wild!


