JG McQuarrie
Nov 14th, 2022Adobe Premiere Pro is a great piece of video editing software and offers content creators and video editors a chance to get expressive with their clips.
There is a range of different effects that you can use when video editing. One of the simplest, but most effective, is reversing video clips.
The explanation is there in the name — the software takes a piece of video and reverses it. Or, to put it another way, plays it backward.
Instead of the video running forwards as it was shot, it will run in the opposite direction. It can be at normal speed, in slow motion, or even sped up — the important thing is that it runs the other way around.

There can be several reasons for choosing to reverse video.
It can make your video content pop and stand out from the crowd. Much video content can simply be point-and-shoot, and by throwing in effects like reversing video you can really add something to your final product.
Reversing a video can highlight a particular section. If you have someone on video that’s done something difficult, playing it in reverse can highlight how hard it was and give viewers the wow factor.
If you make the reverse footage run in slow motion, it can carry even more of an impact.
Imagine someone pulling off a really difficult skateboarding stunt. Or maybe a guitarist doing a dramatic jump in a music video. Reversing the footage will really help show how impressive the skills of the person doing it are. If you edit videos regularly, it’s a great trick to use.
Another reason is that it will help hold your audience’s attention. Breaking up your content with interesting editing techniques helps to hold people’s interest and keeps them watching whatever it is you have recorded. You want to keep as many eyeballs on your content as possible.
But the best reason of all to reverse video footage is the simplest one — it’s fun!
Fortunately Adobe Premiere Pro makes it easy. So this is how to reverse a video in Premiere Pro.
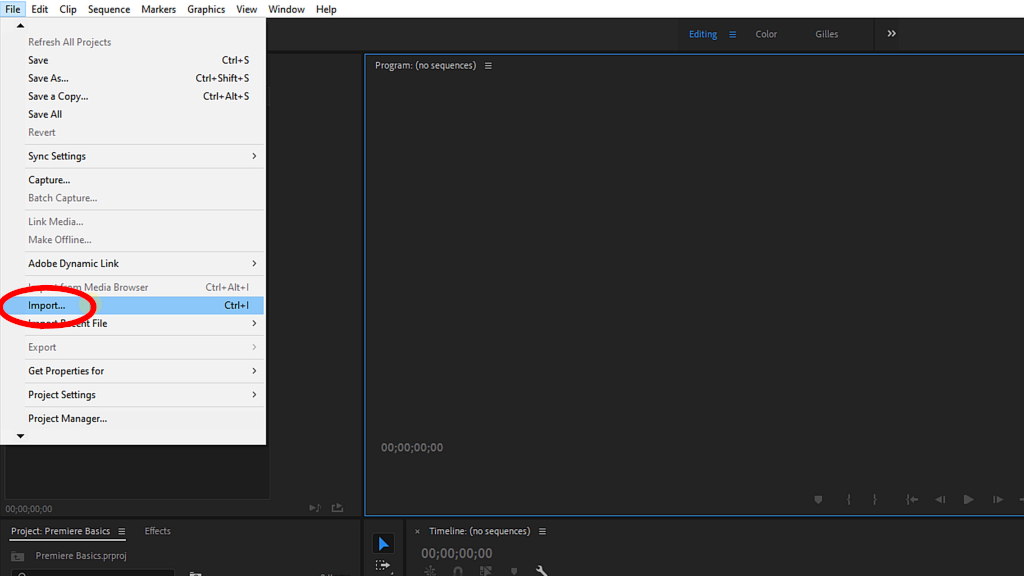
Firstly, import your video file to Premiere Pro.
Go to File, then Import, and browse your computer for the clip you want to work on. Hit Open and Premiere Pro will import the video file into your timeline.
Once you have the video file on your timeline, right-click the clip and go to the Speed/Duration menu.
This is where you can reverse the speed on your clip and apply the reverse video effect.
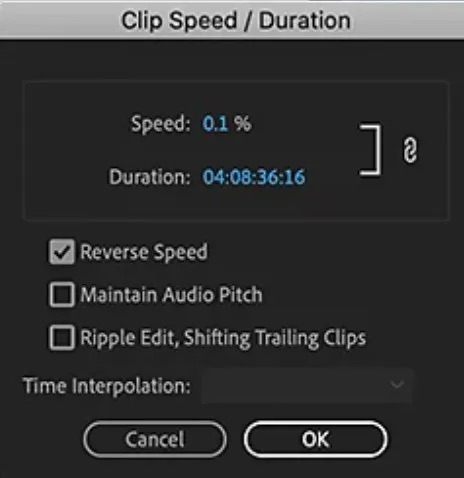
Put a check in the box “Reverse Speed”.
You can then select by what percentage you want the speed of your clip to be played at. Normal video speed is 100% – this is the original speed of the clip.
If you set the value to 50% then the clip will play at half video speed. If you select 200% it will place twice as fast.
You can adjust this until you are satisfied with the reverse speed.
When you reverse a clip, the audio on the clip is also reversed. If you play the clip back at 100% it will sound backward, but normal. However, the greater the change in speed, the greater the audio will be distorted when you play it.
If you want Premiere Pro to try and keep the audio sounding as normal as possible, put a check in the Maintain Audio Pitch box.
The Ripple Edit, Shifting Trailing Clips setting will help to get rid of any gaps which are created by the reversing process on your video files.
There are also three other tools which are in the Time Interpolation setting. These are:
Once you are happy with how everything looks, click on the OK button. This will apply the change to your clip.
Once you have applied the change, you need to export your project from Premiere Pro.
Go to File, then Export, and select Media.
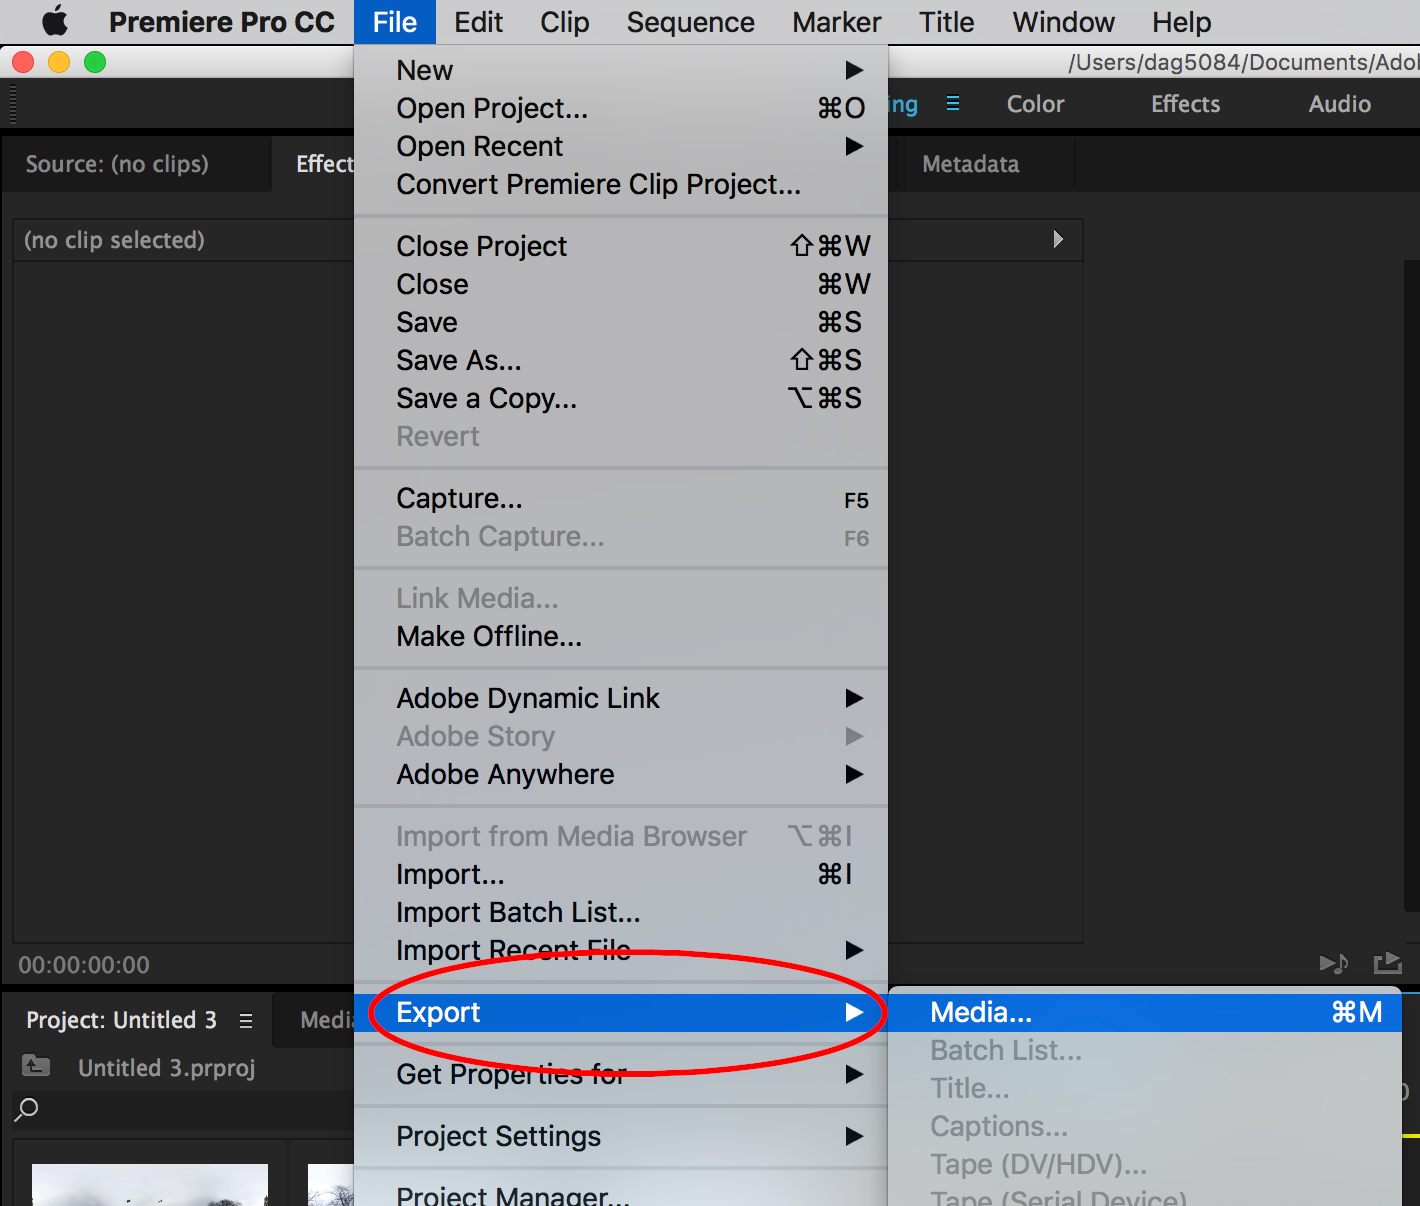
Choose the type of export that you require for your finished project, then click the Export button.
Premiere Pro will then export your video file.
As we have seen, reversing video is a relatively straightforward process in video editing software like Premiere Pro. However, just because something is easy doesn’t mean that it can’t be effective.
Reversing video footage is a fairly easy technique but it can make a real difference when it comes to making your videos stand out from the crowd.
So get reversing and see what cool effects you can come up with!
Additional resources: