JG McQuarrie
Nov 14th, 2022When it comes to video editing, Adobe Premiere Pro is one of the best tools available. Whatever your video editing needs, chances are you will be able to find what you need with Adobe Premiere Pro.
One of the advantages of Adobe Premiere Pro is such a great video editing suite is it not only allows you to edit your footage to assemble it into a final product, but it also allows you to fix, adjust, and alter your video when something might have gone wrong.
And one of the most common problems that can occur is shaky video. So to fix this we need to Stabilize Video.

Shaky footage can happen to anyone. Maybe your tripod was in a high wind outside and it resulted in a little judder on the captured video. Perhaps a gimbal wasn’t quite calibrated and there’s a little shake. Or even just an unsteady hand can result in a less-than-balanced picture if you’re going for a hand-held approach. There can be many reasons to end up with shaky footage.
Whatever the cause, it’s something that needs to be fixed. Wobbly images, shaky footage, or unbalanced video when it shouldn’t be there is very distracting for whoever is watching the footage. It makes it hard to concentrate on what has been recorded and will result in an inferior final recording — in short, it just doesn’t look good.
Fortunately, Premiere Pro has everything you need to rectify the problem.
Premiere Pro makes stabilizing video easy with the Warp Stabilizer Effect.
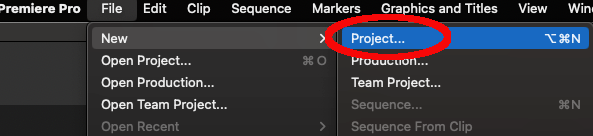
Import your video clip into Premiere Pro. Start a new Project by going to File, New, Project, and selecting your footage.
Once you have imported the video clip, add it to your timeline by dragging it from the preview window to the timeline.
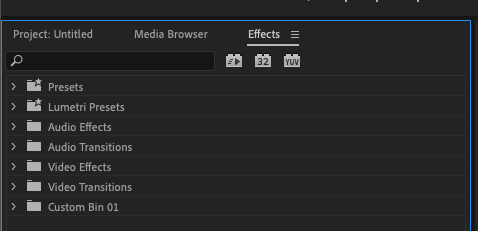
Click on the Effects group, then choose the Video Effects folder.
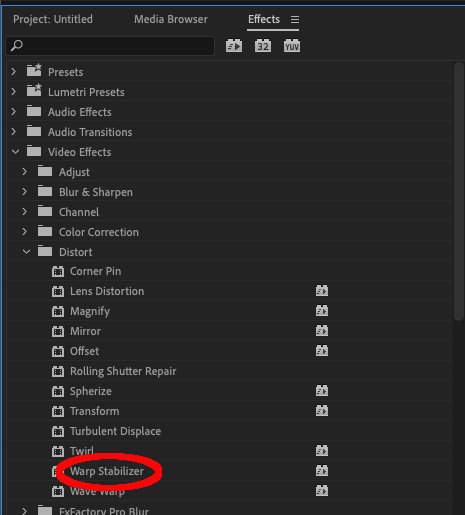
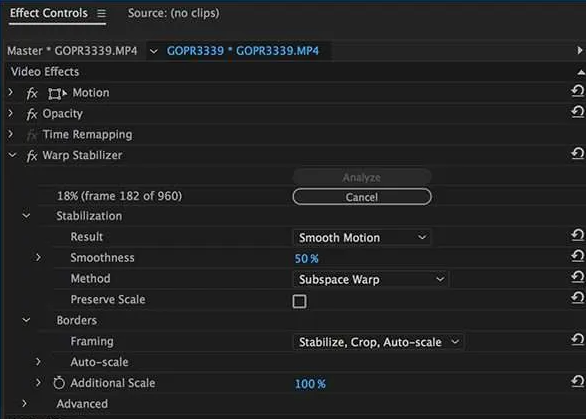
Click on Video Effects to expand the folder. Then click on Distort to expand that folder. Finally, choose the Warp Stabilizer option.
There are a number of parameters that can be adjusted to change how Premiere Pro applies the stabilization effect.
This can take a little practice to get right. However, the default setting of 100% is usually a good place to start and can often be fine for most stabilization requirements.
It is also possible to adjust the counter-movements (the movements that balance the image) by changing the settings under Method.
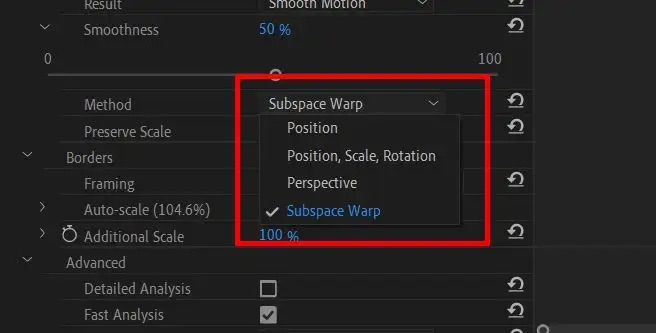
These settings are:
Once you have chosen the parameters that will work best for your footage you can then continue.
Premiere Pro will now analyze your video to apply the stabilization effect. Please be aware that because of the complexity, this can take some time.
So you need to be patient to let Premiere Pro do its thing! The longer the footage, the longer it will take Premiere Pro to apply the effect.
Once Premiere Pro has finished analyzing your footage, it will apply the effect. This can also take a little time, so please be patient.
Once the effect has been applied, you can play it back to see whether the stabilization is to your satisfaction.
Although the Warp Stabilizer effect can do a great job of stabilizing your shaky video, some alternatives can help.
There are third-party plug-ins that can assist when you need to stabilize shaky footage. Many of these have additional controls and allow a greater degree of refinement than Adobe Premiere Pro.
So if you find that, even after using Warp Stabilization, you aren’t getting the results you want, investing in a third-party plug-in might be the way to go.
Another possibility is to use Adobe’s own After Effects suite. It also features a Warp Stabilizer, just like Premiere Pro, but it is a little more accurate and thus can produce better results when it comes to eliminating camera shake.
After Effects has the option to use motion tracking and keyframes to stabilize the footage manually. Learning how these work and how they can be applied to your footage makes a big difference to the final result.
While this does require more technical knowledge, and it takes some practice to get used to, the final product is usually better than the more automatic approach that Premiere Pro’s Warp Stabilization takes.
Using equipment to stabilize your video is the best way to ensure good results. The less shaking there is on the original video, the less the software will need to correct when it comes to editing.
There are three main kinds of stabilization hardware. These are:
Pretty much everyone should be familiar with a tripod, and everyone who’s serious about recording video should have one.
Mounting your camera, or even your cellphone, on a tripod will result in solid images. It will also allow for much smoother and more fluid camera movement, compared with hand-held shooting.
Panning and tilting are easy, and any camera shake should be kept to an absolute minimum.
Gimbals come in all shapes and sizes and can be found on some of the cheapest devices right up to the most expensive.
They use a mix of technology-controlled gyroscopes and weight-balancing to achieve a smooth, natural movement that keeps the camera steady even in the bumpiest of conditions.
Gimbals are an invaluable tool to filmmakers and well worth the investment to help generate smooth footage.
Steadycams are really for the professional end of the market, but they are still worth mentioning.
A Steadycam is part of a whole suit that is physically worn by the cameraperson and is used in professional TV and movie production.
It’s a complicated piece of equipment and requires dedicated skills and training to operate correctly. However, the results are the best image stabilization of all.
As a rule, lighter cameras are harder to keep stable than heavier ones. This is worth remembering when you are purchasing a camera.
Lighter devices are more likely to be affected by external events, such as high winds. Heavier cameras will have more stabilization but may be harder to move around to get smooth camera motion.
Considering the balance between the two is important when choosing the right camera to shoot with.
It’s worth becoming familiar with the Advanced Settings in Warp Stabilization.
These can seem intimidating to newcomers, and it can be frustrating to sit for minutes while Premiere Pro adjusts your footage only to find it’s not satisfactory.
However, learning how these settings impact the final result will make a real difference to your footage.
Sometimes, even the smallest adjustments yield great results, so take the time to learn what those changes make.
When you apply stabilization to your footage, one of the effects is the that footage will be slightly cropped. Adobe Premiere Pro slightly “zooms in” to apply the stabilization effect and produce stable footage.
This means you may notice peripheral details on your video not being there anymore, or that the focus is slightly tighter than on the original footage.
However, this is also something that you can adjust. Under Advanced Settings, you can change the Crop Less Smooth More slider. This lets you balance the amount of cropping the software applies balanced against how smooth the final result will be.
The less stabilization Premiere Pro has to apply, the less this “zoom” effect will apply, so this is another good reason to have as little shake in the original footage as possible.
Once you have found the ideal setting for your stabilization, you can also export it as a Preset. This means you won’t have to go through the repetition of adjusting the settings every time you need to stabilize a new piece of footage, so it’s worth remembering to do this.
The best rule of thumb when it comes to stabilizing video is this – the less shake there is on the original footage, the less post-production work Adobe Premiere Pro will need to do to fix it and so the better the results will be!
If you have been cursed with shaky video footage, it’s good to know that there is something that can be done about it. And Adobe Premiere Pro has all the tools you need to address shaky videos with its warp stabilizer tool.
Using warp stabilizer, it’s just a few clicks and a few simple settings before your shaky videos become a thing of the past!