Marco Sebastiano Alessi
May 16th, 2022If you’re a Mac user, GarageBand is the perfect digital audio workstation to start making music for free. Over the years, GarageBand has become the favorite tool of beginners and professionals alike thanks to its versatility and varied audio editing options.
One of the most interesting audio effects GarageBand provides is the pitch correction tool, which allows you to adjust the pitch of an imprecise vocal track and make it sound just right. This is an indispensable tool that can massively improve the quality of your recordings and make them sound professional.
Pitch correction software has been in use since the 1980s, and many worldwide-known artists, especially in pop and rap music, have used it to adjust their recording’s pitch. Today, autotune is also popular as an audio effect, rather than just a correction tool, as artists like Travis Scott and T-Pain have proved.
Thanks to GarageBand’s intuitive interface, it’s now easier than ever to adjust and enhance your vocal track; however, if you want to achieve professional results, you’ll need to fully understand how this pitch correction software works and how it can specifically meet your needs.
In this article, I’ll explain how to use pitch correction on GarageBand and how you can make the most of this fantastic tool.
Let’s dive in!
GarageBand is a DAW (digital audio workstation) available for Mac users that allows audio recording and editing through an intuitive and engaging interface. GarageBand is a free tool that comes with all Apple devices, which makes it the ideal software for novices.
What makes GarageBand great is that it comes with many plug-ins and effects that you’ll find in other professional DAWs that cost hundreds of dollars. Pop artists and music producers use it regularly to sketch out tracks because of its versatility and straightforward approach to music production.
The pitch correction in GarageBand is only one of the amazing effects included in this versatile digital audio workstation: with practice, here you’ll find everything you need to record a professional album.
Pitch correction is a process that allows adjusting mistakes in voice recordings. It’s the perfect tool for vocal editing since you can use it whenever you didn’t hit the right note during your recording session.
Pitch correction allows you to isolate certain notes and adjust their pitch, a process that simplifies the recording process by simply fixing the mistakes without having to record audio regions all over again.
But you don’t have to use it exclusively on your vocal track. You can use pitch correction for all kinds of musical instruments, from guitars to trumpets, but bear in mind that you can’t use it on MIDI tracks. Pitch correction only works on an actual audio track.
If you’re a beginner, I’d recommend you restrict pitch correction to vocal tracks, simply because it’s easier to adjust voice recordings rather than musical instruments.
While pitch correction is mostly used to make subtle changes to the vocals and improve their precision, nowadays it’s also popular to exaggerate the pitch correction until the voice sounds unnatural and robotic. You can check out Travis Scott’s music to hear how this tool can be used as a vocal effect for your music.
There are a variety of pitch correction plug-ins that you can run on GarageBand, but for the purpose of this article, we’ll focus exclusively on plug-ins that come with the free DAW.
Auto-Tune is an audio effect developed by Antares Corporation. It’s a pitch correction tool and, like the plug-in on your GarageBand project, is fully automated. With Auto-Tune, you can choose the note you want to hit, and the Plugin will automatically edit your recordings so that your voice will reach precisely that note.
Autotuned songs became popular in the early 2000s thanks to artists like Cher, Daft Punk, and T-Pain, who transformed this correction tool into a distinctive voice effect. It makes the voice sound more artificial than the standard pitch correction.
If you want to learn a few tips and tricks about How to Master a Song – check one of our articles!
We’ll go over the easiest way to adjust the pitch on GarageBand using the pitch correction software provided with the DAW. It’s a relatively straightforward process, but you need to make sure you do everything right, otherwise, your vocals will sound terrible.
Unless you want to record audio regions over and over again, I suggest you identify beforehand the kind of sound you want to achieve. If you want to achieve a natural sound, you should try to limit pitch correction as much as possible.
Needless to say, if your objective is to industry-standard results, the vocal recordings should be as precise as possible before you apply any effect to the track. The more strength you’ll need to apply to counterbalance imprecisions, the more evident the effect will be in the final result.
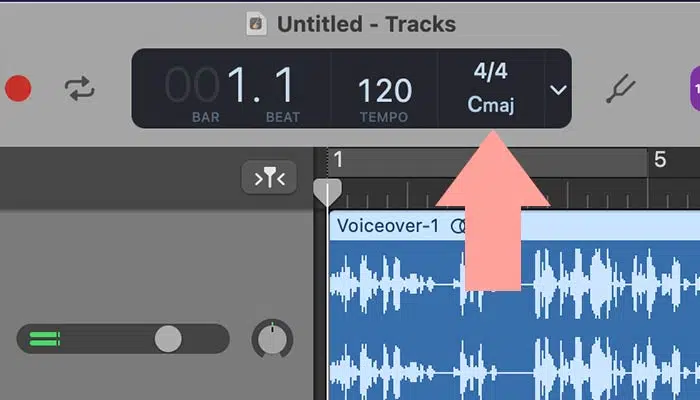
The first fundamental step in using auto-tune is identifying the key signature. Without getting too technical, the key signature is the tonal center of your track, meaning the note the melody revolves around.
If you have even a basic musical background, it shouldn’t be a problem to find the key signature of your piece.
On the other hand, if you’re a beginner, here’s a tip: with the song playing in the background, pick up your keyboard or guitar and play notes until you find a note that fits the vocal progression and melodies. It may be difficult at first, but trust me, the more you do it, the easier it’ll be to identify the key signature.
Furthermore, setting the wrong key signature and using auto-tune will lead to vocals that will sound completely off, so take some time to figure out how to complete this step efficiently.
To change the key signature of your track, click on the LCD dashboard at the top center of your DAW. You’ll open a drop-down menu, where you’ll find all key signatures. Select the correct one and save your project.
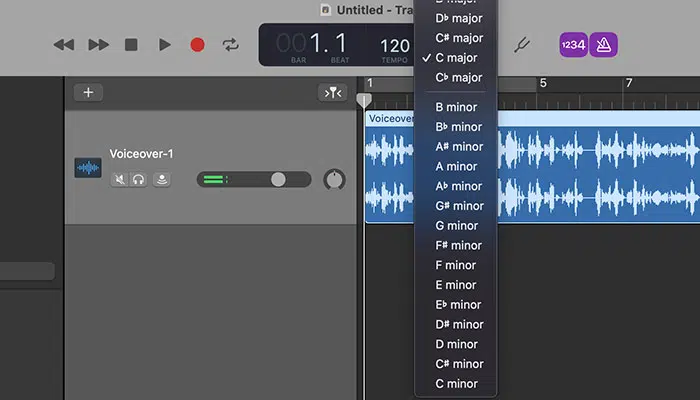
Have you noticed that the key signature options are divided between majors and minors? So, how do you know which one is right for your song?
If you’re making music with your guitar, there’s no way you don’t know how to identify a major or minor chord.
On the other hand, if you don’t have a music background, or you’re a drummer like myself and therefore an excuse for a musician, you can just take a MIDI or digital keyboard and play the note you identified earlier together with either the third or the fourth note after it, going to the right.
If the former chord fits well with your song melody, then your track is in a minor chord. If it sounds right when playing the signature key plus the fourth note to the right, then it’s a major.
This is useful for a variety of purposes outside the pitch correction. When you make music, having an understanding of how to identify different chords will help you improve your composition skills, and expand your sound palette considerably.
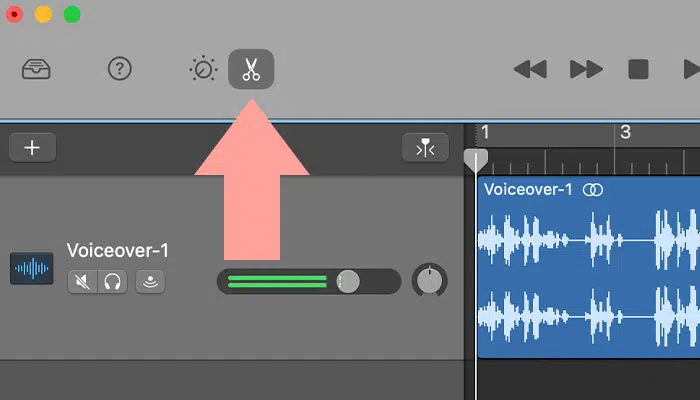
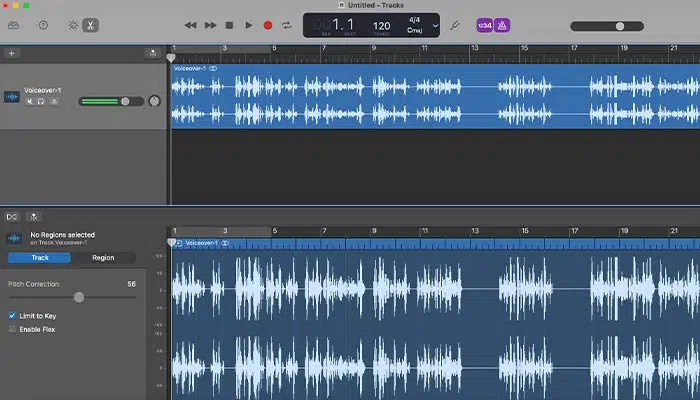
Select the audio track you want to add the pitch correction to by clicking on it. Don’t click on the actual recording, but select it by clicking the track’s panel on the track’s left side.
Next, you’ll have to open the editor window of the audio track you want to adjust.
Click the scissors icon on the top left of the workstation, and on the bottom left, you’ll see the control section dedicated to that specific track.
You have two options here. You can either select “track” or “region”. For the purpose of the article, we’ll restrict pitch correction to a single audio track and apply it exclusively to it.
If you select “region”, you’ll be able to use autotuning to multiple tracks across your piece within a defined time frame. This is ideal when you need to adjust an entire area of your track, and align all musical instruments to the correct pitch.
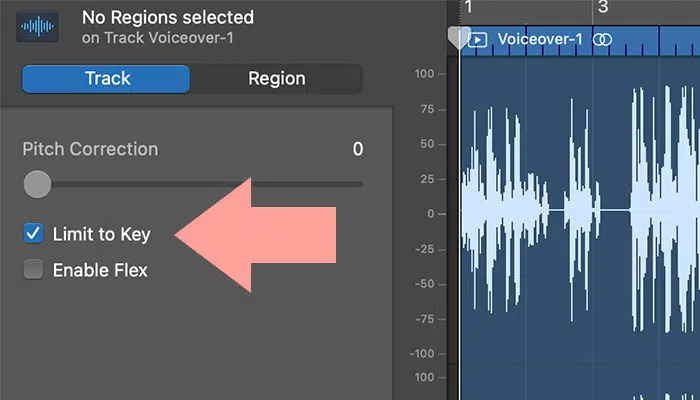
This is a crucial step if you want your song to sound professional. By limiting GarageBand’s automation to the key signature, you’ll ensure that the DAW will adjust the pitch of your vocal sound, taking into account the tonal center of your track.
Of course, you can use the pitch correction without limiting the effect to the key signature, in which case, the plug-in will automatically adjust all imperfect notes to the closest identifiable note in the chromatic scale.
The latter option could work if your vocal recordings were already close to perfection, as the effect will just make some minor adjustments to make the recordings sound right.
If there were some bigger issues in your vocal track, these will be enhanced and make the piece sound wrong.

You’ll notice right away the pitch correction tool on GarageBand is quite straightforward. In the Control Section mentioned above, you’ll find a pitch correction slider that goes from 0 to 100, the latter adding a more extreme autotuning effect.
The amount of pitch-shifting you may want to add will depend on various factors, like the music genre you’re working on and how bad the original recording is.
Although there are many plug-ins that can help you cover bad recordings, it’s highly recommended to record an audio track in the best possible quality before adding effects.
Personally, I think that leaving the pitch correction slider between 50 and 70 will help you maintain the natural voice while making the vocals sound more accurate. Any more than that and the changes in the pitch will sound too robot-like and will compromise the audio track.
You can try to record two audio tracks and add different auto-tune levels to them. Both your own recordings will sound better, but the one with the pitch correction slider higher up will sound unnatural compared to the other.
If you want to sound like Travis Scott or T-Pain, by all means, go all the way to 100. Next, you’ll need to play around with plug-ins like compressor, reverb, EQ, exciter, and stereo delay.
You can check out this video to see how you can reach a Travis Scott-like sound: HOW TO SOUND LIKE TRAVIS SCOTT
This is a more complex process that requires a chain of effect to achieve professional results. Nevertheless, by learning how to use pitch correction in GarageBand, you’ll already be able to get similar results without having to invest in professional plugins.
That’s all, folks! Make sure you use your Auto-Tune tool wisely and never go overboard with it. It’s easy to overuse pitch correction, especially if you don’t have much experience as a singer.
Auto-Tune is a fantastic tool that’s helped thousands of artists improve their vocal tracks for the last twenty years. If you’re aiming at publishing your music, making some minor adjustments with this pitch correction tool will greatly benefit the overall quality of your song.
However, it’s better to have a decent audio track and add some pitch correction later rather than having a lousy recording and using too many effects to adjust it.
Limit pitch correction as much as you can, unless you’re trying to achieve that sound typical in modern music production that tends to enhance the autotune effect.
Many people consider auto-tuning as a way of hiding an artist’s inability to sing. Nothing could be further from the truth: some of the best singers worldwide use pitch correction effects to improve their recordings. When used correctly, auto-tune can benefit the recordings of all singers, experienced and beginners alike.
Give it a try and see for yourself, on both your own recordings and when mixing other artists’ music. GarageBand’s effect will keep you busy for some time, and once you start finding them limiting, you can opt for one of the dozens of pitch correction plug-ins available in the market.
If you’re into trap music, you can use the GarageBand pitch correction tool to create the typical voice effect of the genre by maximizing the strength’s effect.
Most likely, the pitch correction tool won’t be enough to achieve the results you envisioned, but will undoubtedly be a good starting point.
Good luck, and stay creative!


