Marco Sebastiano Alessi
Jul 24th, 2023It’s not uncommon to come back home after a whole day of filming, only to find out that our footage is filled with background noise.
It might be some background noise we didn’t realize was there, a constant hiss, some rustling noise coming from the actor’s lavalier microphones, or other sounds. Regardless of the type of noise, you have no choice but to fix this in post-production.
Background noise removal is the bread and butter of audio engineers, sound designers, and music producers, but even if you’re a filmmaker, learning how to remove background noise from video will be a lifesaver for your future projects.
People say the easiest way to remove background noise is not to do it. Avoiding low-level noise should be your top priority, but we know that sometimes we don’t have the equipment or the right location to record noise-free audio, and we end up stuck with white noise compromising our sound.
The video editing software Sony Vegas Pro, with its professional post-production video editing tools, has everything you need to mitigate background noise, so let’s take a look at how to remove background noise using Sony Vegas Pro.
I’ll also analyze some alternative software, as well as tips and tricks to avoid background noise from slipping into our audio tracks.
Before we start getting rid of low-level noise, you need to have installed Sony Vegas Pro and your audio file ready. Next, we’ll begin removing background noise with these simple steps.
1. Run Sony Vegas and have your media file on your computer.
2. Go to File > Import > Media.
3. Browse the file and click open.
Dragging and dropping the files will work too.
Let’s begin with the more straightforward solution first. Low-level background noise from sources not close to the microphone may be barely perceived and only heard when the audio is at higher volume levels.
An easy solution to reduce background noise is lowering the overall volume. To do this, you’ll need to adjust the gain level.
1. Select the track on the Timeline.
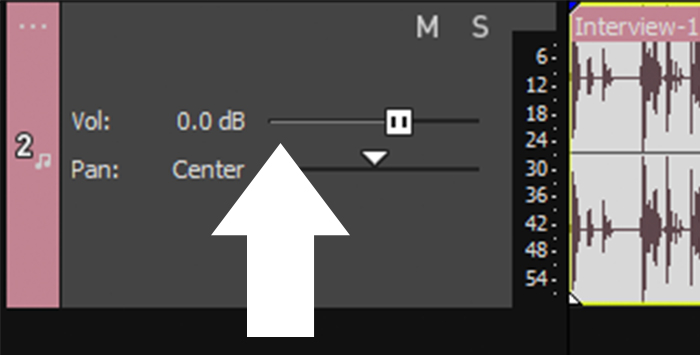
2. Use the volume slider in the track header on your left side. It will decrease the volume of all audio recordings.
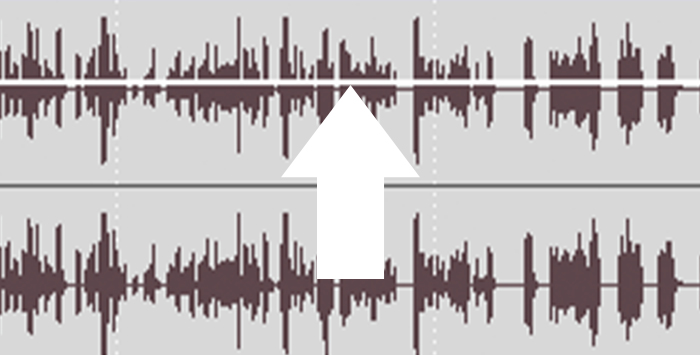
3. To select a single audio event, hover over the specific audio clip until you see the Gain level. Click and drag down to reduce the overall volume.
Most of the time, with a low-level background noise volume, the audio quality of your product will increase considerably. If a microphone is close to the source of the unwanted background noise, you’ll need to follow the next steps.
If the previous step did not remove the background sound, using audio events effects will be your best shot. With Noise Gate, you’ll reduce sounds below a predetermined volume level. Instead of decreasing all the volume from the track, the Noise Gate will only reduce the audio volume when there’s no one speaking.
To adjust the Noise Gate:
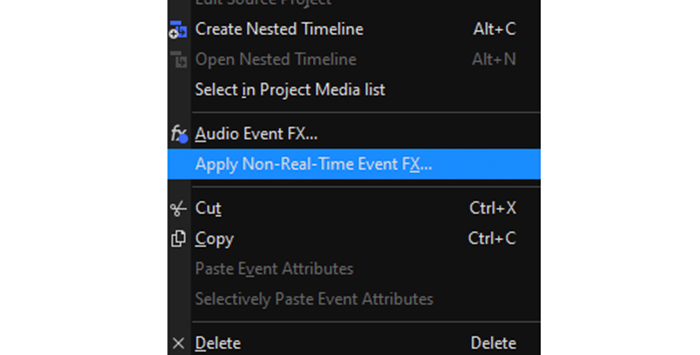
1. Right-click on the track and click on Apply Non-Real-Time Audio Event FX.
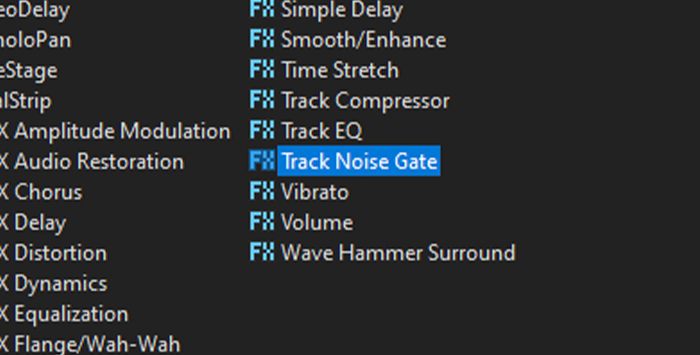
2. Select Track Noise Gate, Track EQ, and Track Compressor. We’ll be working with the other later. Click OK
3. The Audio Track FX window will open.
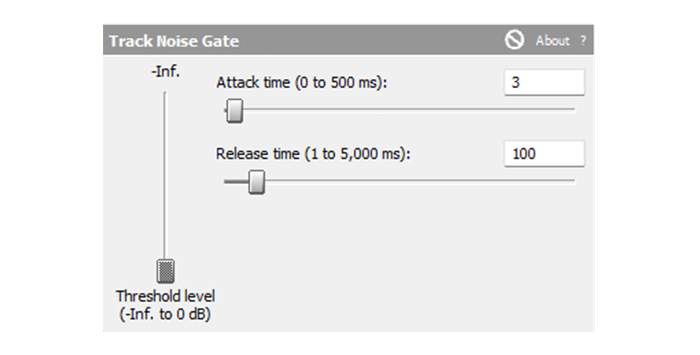
4. Click on Noise Gate to see the controls: Threshold level, attack time, and release slider.
5. The threshold level slider will set the given volume under which the Noise Gate will reduce the volume. Be careful, as this may reduce the voice if the volume varies along the video.
6. To avoid affecting spoken parts in the audio, use the Attack and Release sliders to control the Noise Gate. The Attack slider will set how fast the Noise Gate begins to act and the Release slider how quickly it will stop. It’ll help affect background noise while leaving the spoken words untouched.
7. Preview the track and adjust the settings until you find a perfect balance of background noise removal and sound clarity.
Without leaving that window, let’s go to the Track EQ tab.
Reducing background noise with EQ can be another option when the noise is in a particular frequency. With an equalizer, we can control the volume on those frequencies without affecting the rest of the audio.
Let’s jump into the Track EQ window.
1. If you close the window, select Track FX from the track header or right-click on the track in the Timeline and select Audio Events FX to open it again.
2. When the Audio Track FX window pops up, select Track EQ.
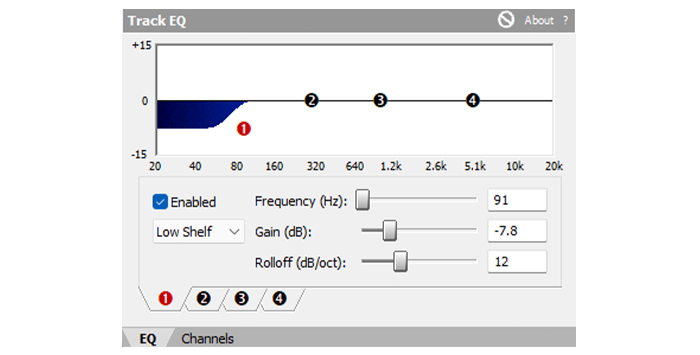
3. You’ll see the EQ controls, a white screen with a flat line connected by four dots. Each point controls a range of frequencies. Number one is the lower frequency, and number four is the higher frequency.
4. Click and drag the dots down to lower the volume on those specific ranges of frequencies, or drag right and left to increase or decrease the range of frequencies. A blue shade will represent all the affected frequencies.
5. Lowering the low frequencies will help remove background noise for hums or rumbles. For hisses or other high-pitch sounds, reduce the higher frequencies.
6. You can also adjust the setting with the controls at the bottom of the graphic. Select the range with the number at the bottom and then change the Frequency, Gain, and Bandwidth sliders.
7. Preview audio and make adjustments if necessary.
To make the EQ editing even more effortless, you can create a Loop Playback.
1. Double-click the video event to create a region. You can see the loop region with yellow arrows on the top of the Timeline.
2. Play the loop region to listen while adjusting the EQ settings.
Your audio should be devoid of background noise by now, but there’s one final tweak to do in the Track FX window.
The last step is to use a compressor to give the audio the final tuning. If you find that with all the tweaking we did, the audio track has become quieter than before, a compressor could help us to turn up those soft parts while keeping the loudest sounds from getting louder to avoid distortion and clipping.
It can do much more, but for simple background noise removal, we won’t dig too much into it.
1. In the Track FX window, click on the Track Compressor tab.
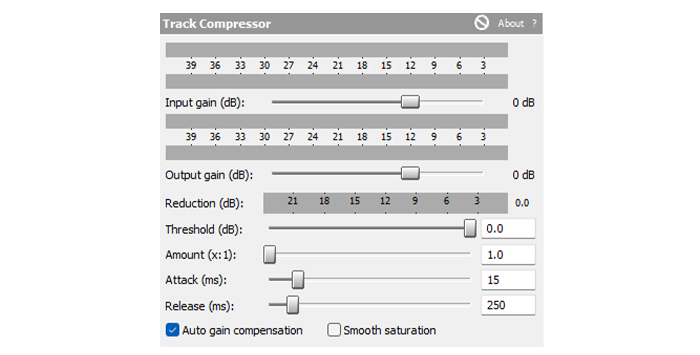
2. Here you’ll find several options to adjust the audio levels:
a. Input Gain to adjust the volume before compression.
b. Output Gain to adjust the volume after applying compression.
c. The threshold is the volume at which the compression starts to work.
d. Amount determines how much compression to use.
e. Attack sets how fast the compressor will begin to lower the volume on quiet sounds.
f. Release sets how quickly the compressor will stop and increases the volume.
Adjust these settings while listening to the Loop Playback to keep track of the changes in the volume and audio quality.
Consider this as a last resort: use background music to hide unwanted noise.
1. To do it, add an audio clip with the background music.
2. Lower the volume of the audio until they merge smoothly one with the other.
This method is ideal for YouTube videos or commercials where having music does not affect the video. But it’s not suitable when removing background noise from interviews or movies where you need a quiet scene.
If you want to simplify the post-production process, you can try to avoid background noise in the first place. These are a few things you can easily do and prepare for the next time:
Sony Vegas Pro is just one of many editing software that can reduce background noise. Let’s take a look at another couple of options to give you a better idea of what you can do to mitigate background noise.
AudioDenoise is a plugin that will help you remove noise automatically, thanks to cutting-edge AI technology which detects and mitigates noise naturally and efficiently. Follow these simple steps to easily remove noise from sound clips in your favorite video editing program.

Audacity is a free, open-source software used and loved by many. Its user interface is straightforward, and thanks to many online tutorials, you can start using it to reduce unwanted noise in no time.
Let’s take a look at how to remove background noise in Audacity and the steps we need to take to achieve professional results.
1. Import your audio with background noise.
2. Click on the track to select it.
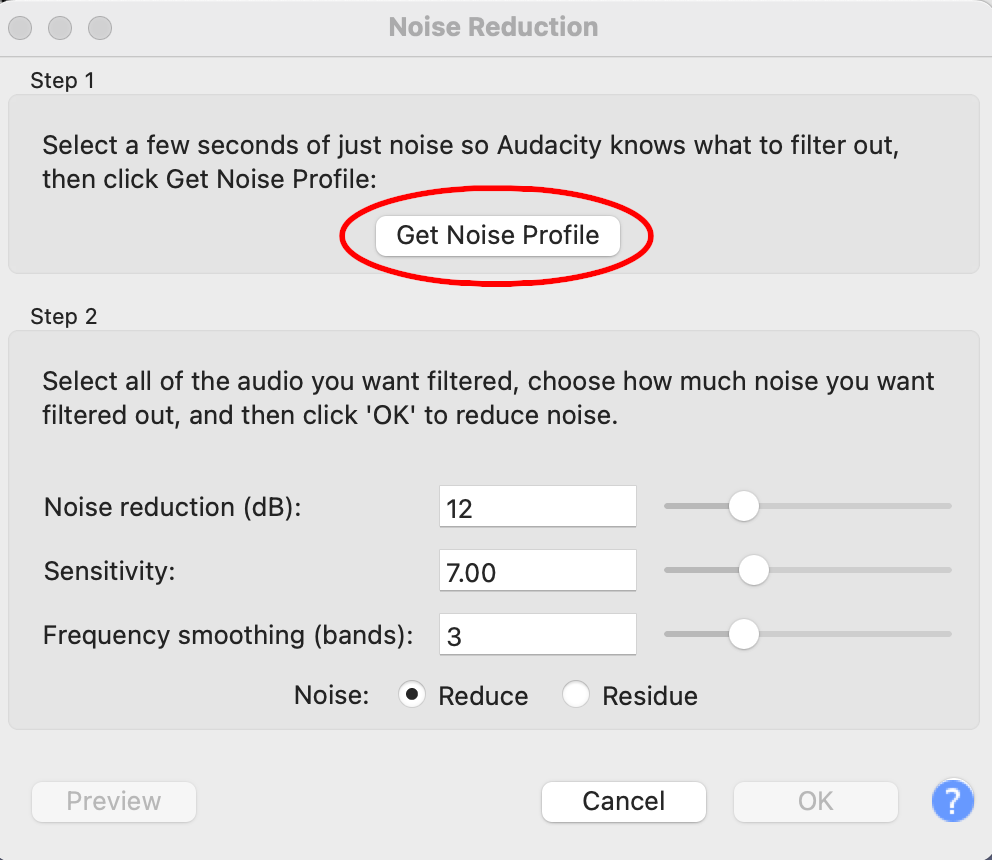
3. Go to Effects > Noise Reduction and click on Get Noise Profile.
4. The window will automatically close. Follow the same path, Effects > Noise Reduction then click OK. Audacity will remember the Noise Profile and will apply the effect.
5. Listen to the audio file. You can undo changes with CTRL+Z on Windows or CMD+Z on Mac if you want to play with the setting in the Noise Reduction window.

Adobe Audition is the audio editing software from Adobe, and it’s included in the Creative Cloud subscription. It’s a very reliable software and easy to use, also thanks to the high-quality support from Adobe and its devoted users.
These are the steps to remove noise with Audition:
1. Import the audio to Adobe Audition.
2. On the Timeline, use the Time Selection Tool to select the section of the track with background noise.
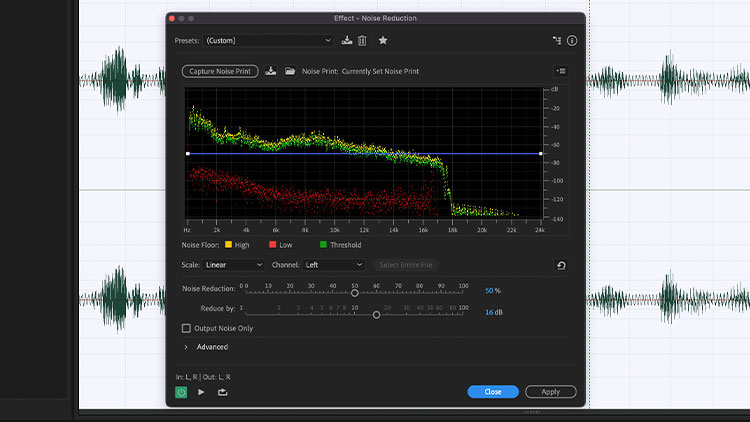
3. Click on Effects > Noise Reduction / Restoration in your menu bar and select Noise Reduction.
4. Click on Capture Noise Print to sample the noise in the track.
5. You can adjust more settings and preview to hear the changes.
6. Click Apply when the background noise has been reduced.

DaVinci Resolve is another video editing software that could easily compete against Sony Vegas Pro. It’s also available for Mac, making it a good alternative for all Apple users.
If you were wondering how to remove background noise using DaVinci Resolve’s built-in tools, follow these steps:
1. Select the audio clip you want to edit in the Timeline.
2. Go to the Effects library and look for Noise Reduction within Audio FX. Drag and drop it to the audio clip in the Timeline.
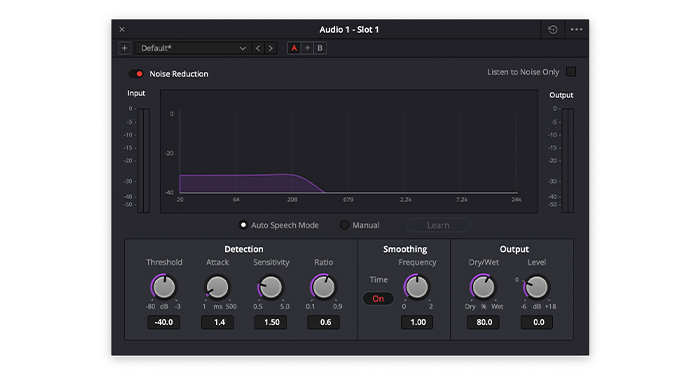
3. The Noise Reduction window will open, and we’ll begin adjusting settings.
4. Click the little switch next to Noise Reduction to turn on the effect and listen to the audio.
5. Here you can manually adjust other settings like Threshold and Attack.
6. If you’re working with speech audio only, you could leave the default settings and mark Auto Speech Mode.
7. You can make further adjustments until the background noise is further reduced.
8. Close the window when you hear noise-free audio.


