JG McQuarrie
Aug 15th, 2022For a free piece of software, one of the remarkable things about Audacity is how powerful it is. There are a host of powerful features that allow producers to work their magic on any kind of sound.
The range of effects in Audacity for sound editing, and the quality of those effects, will often easily match those of more expensive commercially-available rivals, and Audacity is a great example of how good free software can sometimes be.
In this article, we will be exploring one of Audacity’s tools and looking at how to change the pitch of a sound.
Pitch is how high or low something sounds, to put it in the simplest possible terms. Something with a low pitch will have a lot of bass, and something with a high pitch will have a lot of trebles.
This is true for both voice and instruments used in music. A cello has a low pitch, a violin has a high pitch. A bass or baritone voice will have a low pitch, a soprano will have a high pitch.
By adjusting the pitch of something, we change the characteristics of the sound. For example, someone on a podcast may want to have the pitch of their voice lowered so they sound like they have more gravitas.
Or they may want to have the pitch raised so that the voice has a brighter, clearer sound. By changing the pitch, we change the way the sound is perceived.
In order to change pitch in Audacity, we are going to use the Change Pitch setting. This lets you change the pitch with just a few clicks and makes adjusting the parameters simple.
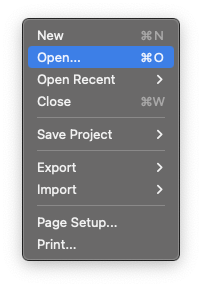
Launch Audacity, then go to File, Open, then search your computer and select the track you want to work on.
Once the file is open, either select the whole track or select the part of the track you want to work on. The entire song or track will change color.
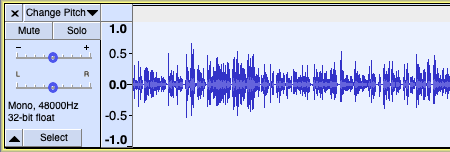
To edit part of the audio, left-click your mouse then drag it so that the part of the audio file you want to work on is selected. The highlighted part of the song will change color and the changes will only be applied to that part of the audio.

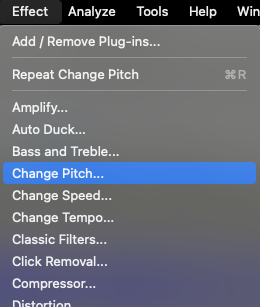
Go to the Effect menu and select Change Pitch.
This will open the Change Pitch dialogue box.
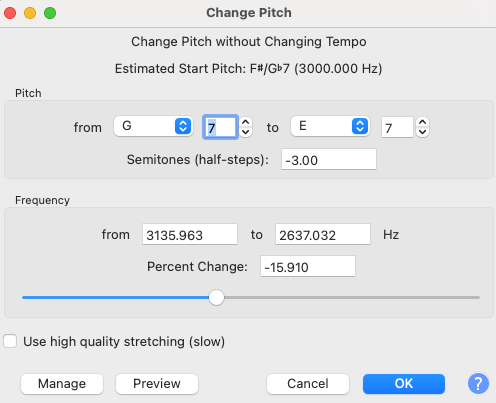
The settings for the Change Pitch tool are as follows:
Every setting will reflect the changes made in another. So for example, if you adjust the frequency setting, the percentage setting will automatically update to let you know how much you have changed things, and the musical note setting and slider will change to match as well.
All changes will always be reflected in all of the settings.
In addition, there are the buttons across the bottom of the box:
Adjust whichever setting you want until you are satisfied with the end result, then press OK to apply the change to your track. The change will be applied to either the whole track or part of it, depending on what was selected.
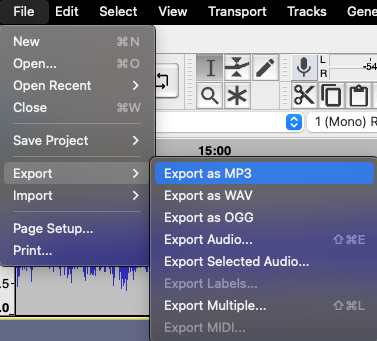
Once you are satisfied with the changes you have made, save your audio file. Go to the File drop-down menu, select the Export option, then choose the file type you require.
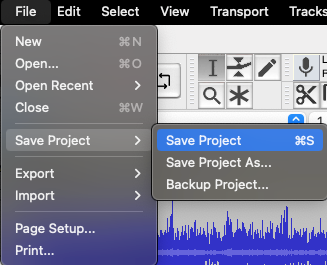
If you are working on a project, you might have multiple tracks in use. For example, a different track for each host on a podcast rather than everyone being on the same track. In this case, you may want to save your work as an Audacity project.
This means that the separate tracks will be preserved so you can return to work on them later. This is different from Exporting, which will merge all tracks together to create a single audio file. However, Audacity projects can only be opened by the Audacity software itself.
To save as an Audacity Project, go to File, then Save Project.
And that’s how you change pitch in Audacity!
Did you like that? If yes, we also recommend you to check out another article, this time it would be about Pitch Correction in GarageBand. Enjoy!
Whether dealing with an instrument or a voice, Audacity makes it simple to change the pitch of your audio to whatever it is you are looking for.
The tool itself is easy to use and spending a little time adjusting the settings will help any budding producer get a feel for the kind of changes that can be made.
In Audacity, this can be achieved by selecting the Use High-Quality Stretching (slow) option mentioned above.
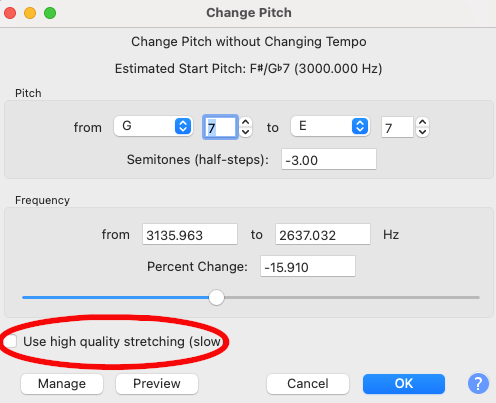
When this box is checked, Audacity will process the changes to your track precisely. However, this also takes significantly more processing power. Depending on how powerful your computer is, this could noticeably alter how long it takes Audacity to apply the effect to your track. This is why it has the word “slow” after it.
If you alter the pitch without using the High-Quality Stretching (slow) option, yes, this will change speed. The amount of change will depend on the parameters you adjust — the more effect that is applied, the more evident the change will be. Audacity doesn’t keep your track the same length by default.
This kind of pitch change is what’s known as a “time-stretching” effect. Normally to get something to sound lower you would slow it down. Imagine a 45rpm single being played on a record player at 33rpm. It will sound slower, but also lower. The reverse is also true as well — if you speed something up it will sound higher.
Using software to achieve this kind of pitch change keeps the track approximately the same length but lowers or raises the pitch without having to slow anything down or speed it up.
This can be imprecise, though, which is why the length of the track can vary. The high-quality stretching option above resolves this.
No. If you have a piece of audio that has the pitch changed it does not change the tempo. If, for example, you had a piece of music in 4/4 time, it would still be in 4/4 times after a change in pitch.
The length of the track may vary, but the tempo does not. When you play the audio back it will be in the same tempo.