T Mango
Sep 19th, 2022GarageBand is a powerful and versatile digital audio workstation (DAW) that’s free for you to download and use. Being an Apple product, you can only use it with Macs, but there are also iOS versions available for iPads and iPhones.
GarageBand is easy to work with: check out our tutorial on How to Make Beats on GarageBand to see how easily you can make great-sounding beats, songs, or loops with GarageBand.
One thing that you may want to do in your GarageBand projects is changing the tempo of a song or track. In this post, we’ll walk through exactly how to do this. We’ll also look at some nuanced ways to change the tempo in individual tracks of GarageBand.
The tempo of a song or project in GarageBand is expressed in beats per minute (BPM) and is set to a default value of 120 BPM.
There are many ways to adjust, manage, and follow tempo in your GarageBand projects, including:
We’ll explore these features, and more, in this post.
Before diving into how to change tempo in GarageBand, it’s worth considering what level of tempo suits the style of music for your project.
BPM guidelines for popular musical styles are shown below.
Here’s how to change the tempo of your whole song or project in GarageBand.
Step 1: Go to the menu bar in your project.
Step 2: Go to the project tempo display, located between the playhead position and the song’s key signature.
Step 3: Double-click on the tempo display and type in the tempo that you want for your project.
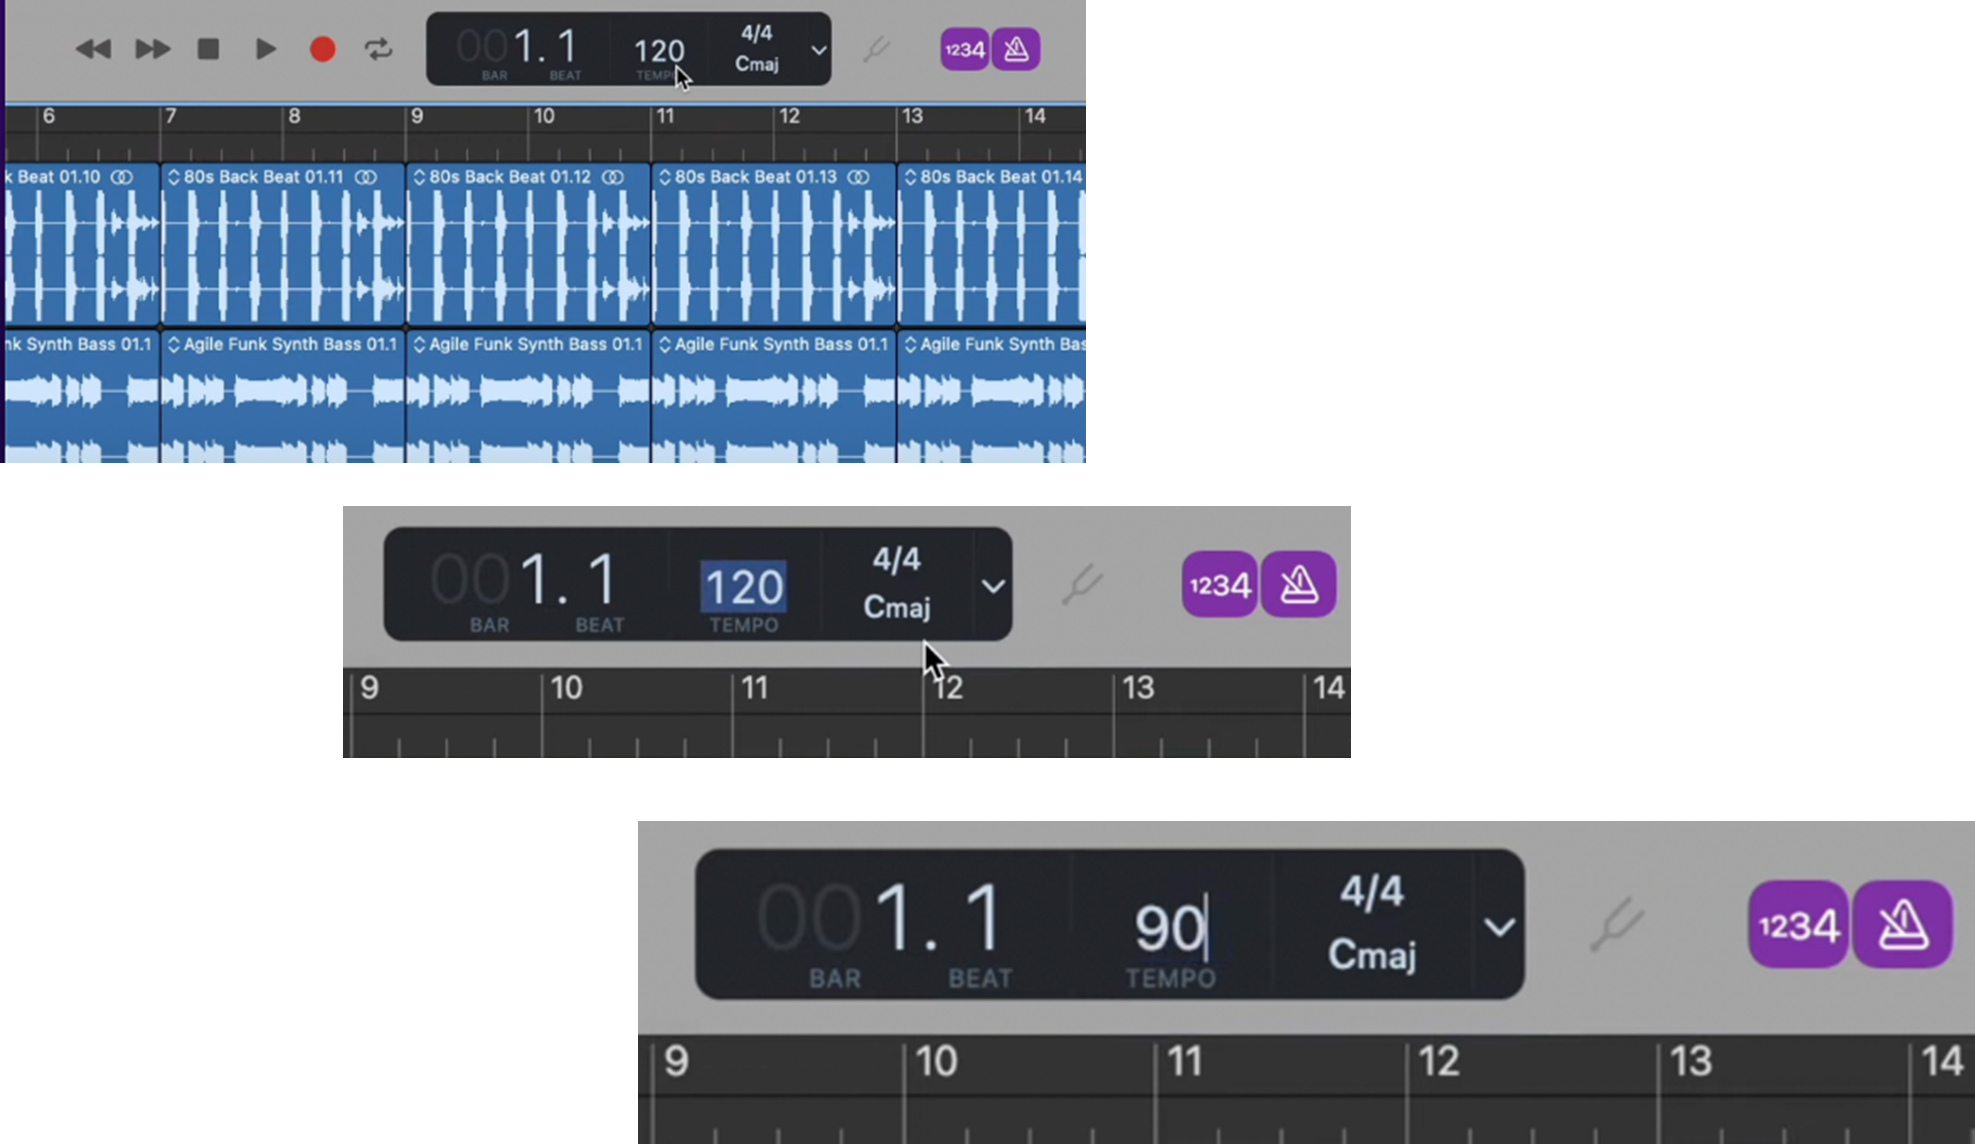

And that’s it! It’s that easy to change the tempo of your whole song or GarageBand project with a simple double click.
Sometimes, you may want to change the tempo of just a portion of your song—to speed up a chorus, for instance, or to slow down a verse. You can do this in your GarageBand project by using the Tempo Track.
Step 1: Go to the menu bar and select Track.
Step 2: Go to the project tempo display, located between the playhead position and the song’s key signature
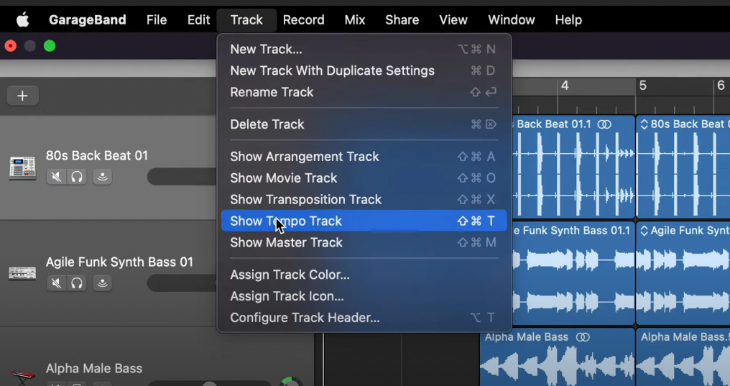
A new track will appear above the other tracks in your project. This is the project’s Tempo Track. A horizontal line shows up—we’ll call this the tempo line—that matches your current song’s tempo.
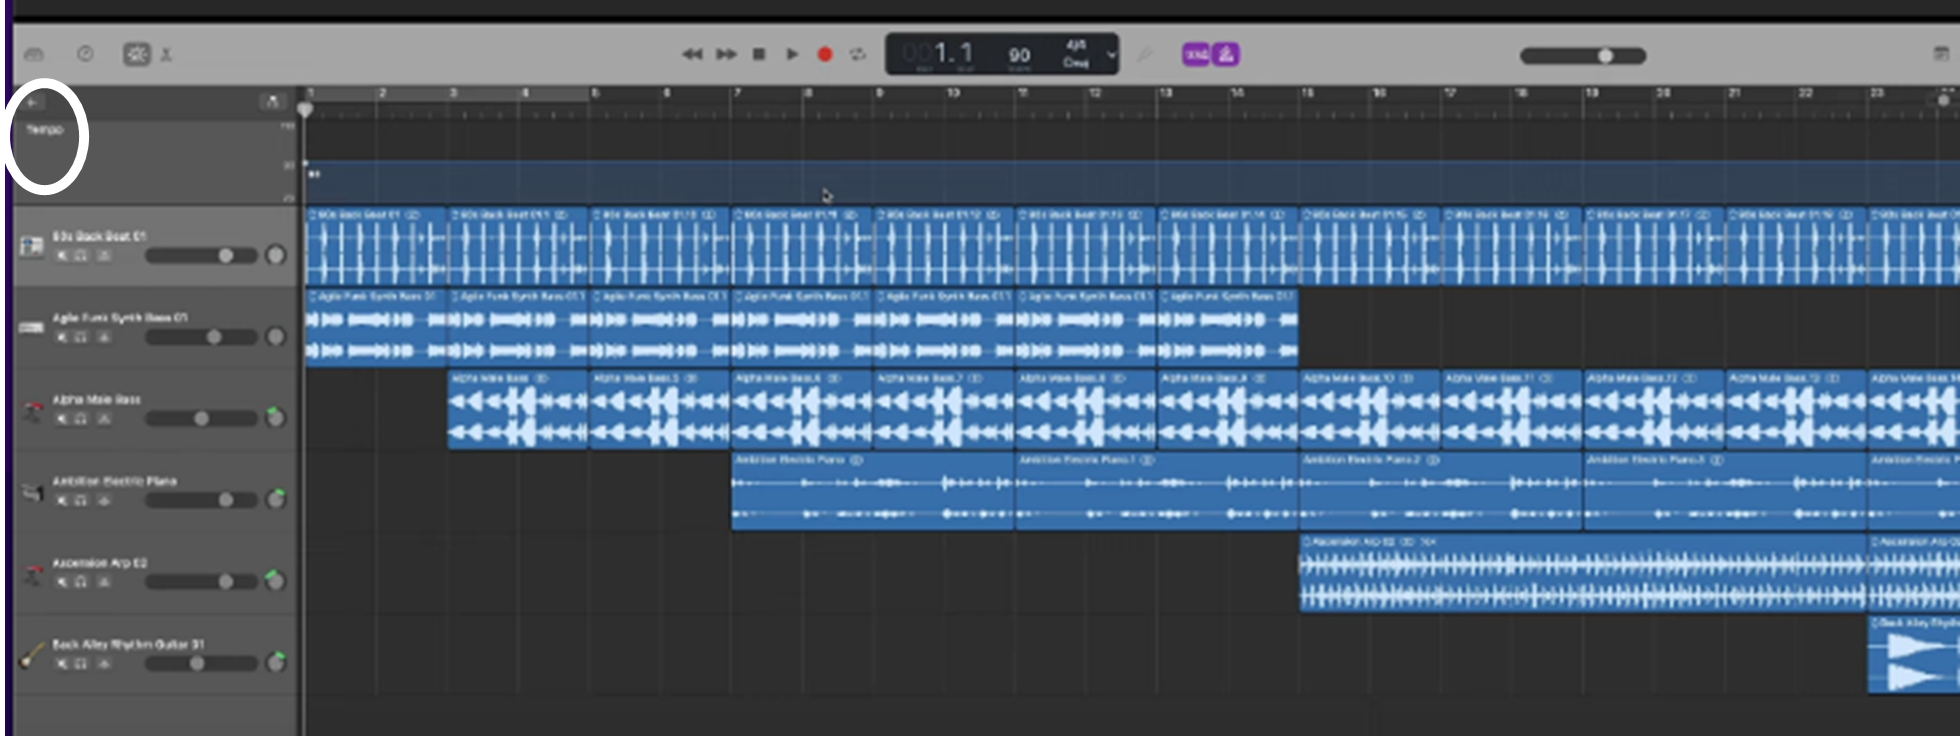
Step 3: Find the section of your song that you’d like to speed up or slow down and go to the corresponding time point on your tempo line.
Step 4: Double-click on your selected time point on the tempo line to create a new tempo point.
You can create as many tempo points as you like on the tempo line. Simply locate where on the tempo line you want to add your tempo point and double click, as described above.
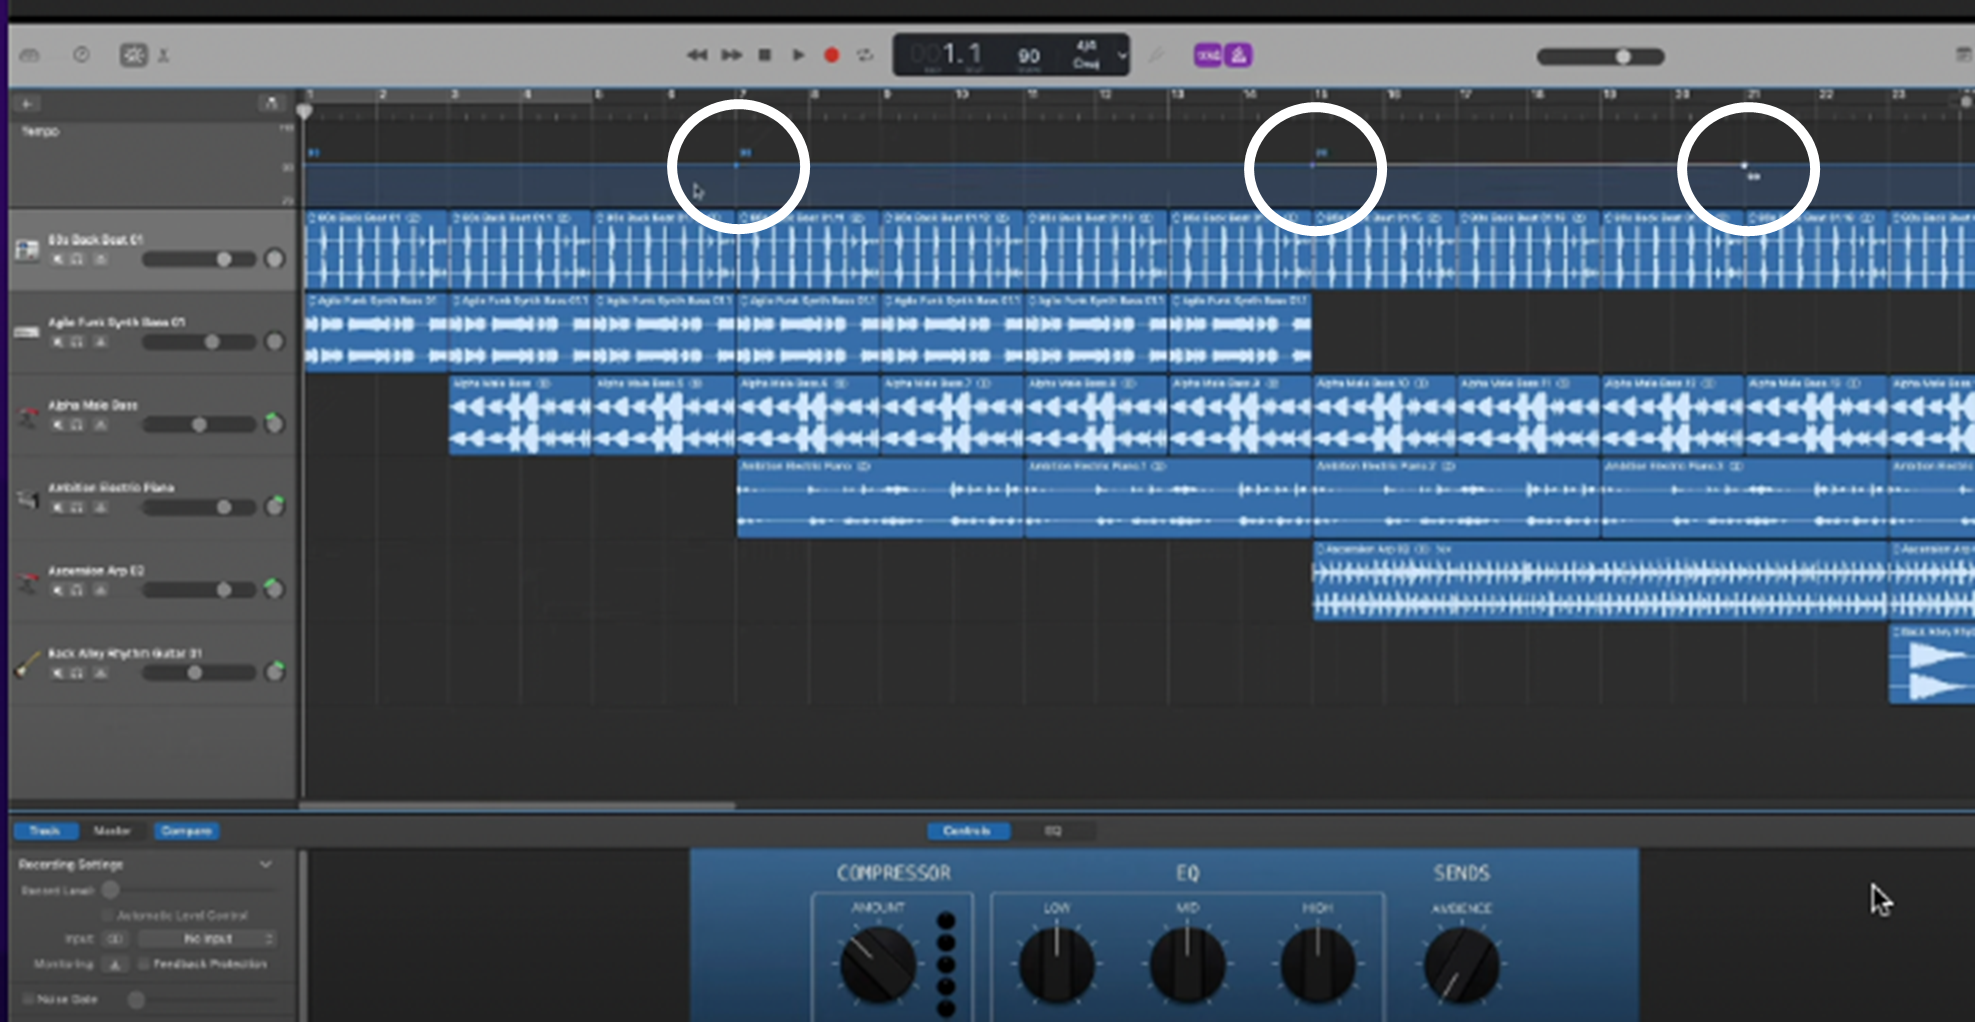
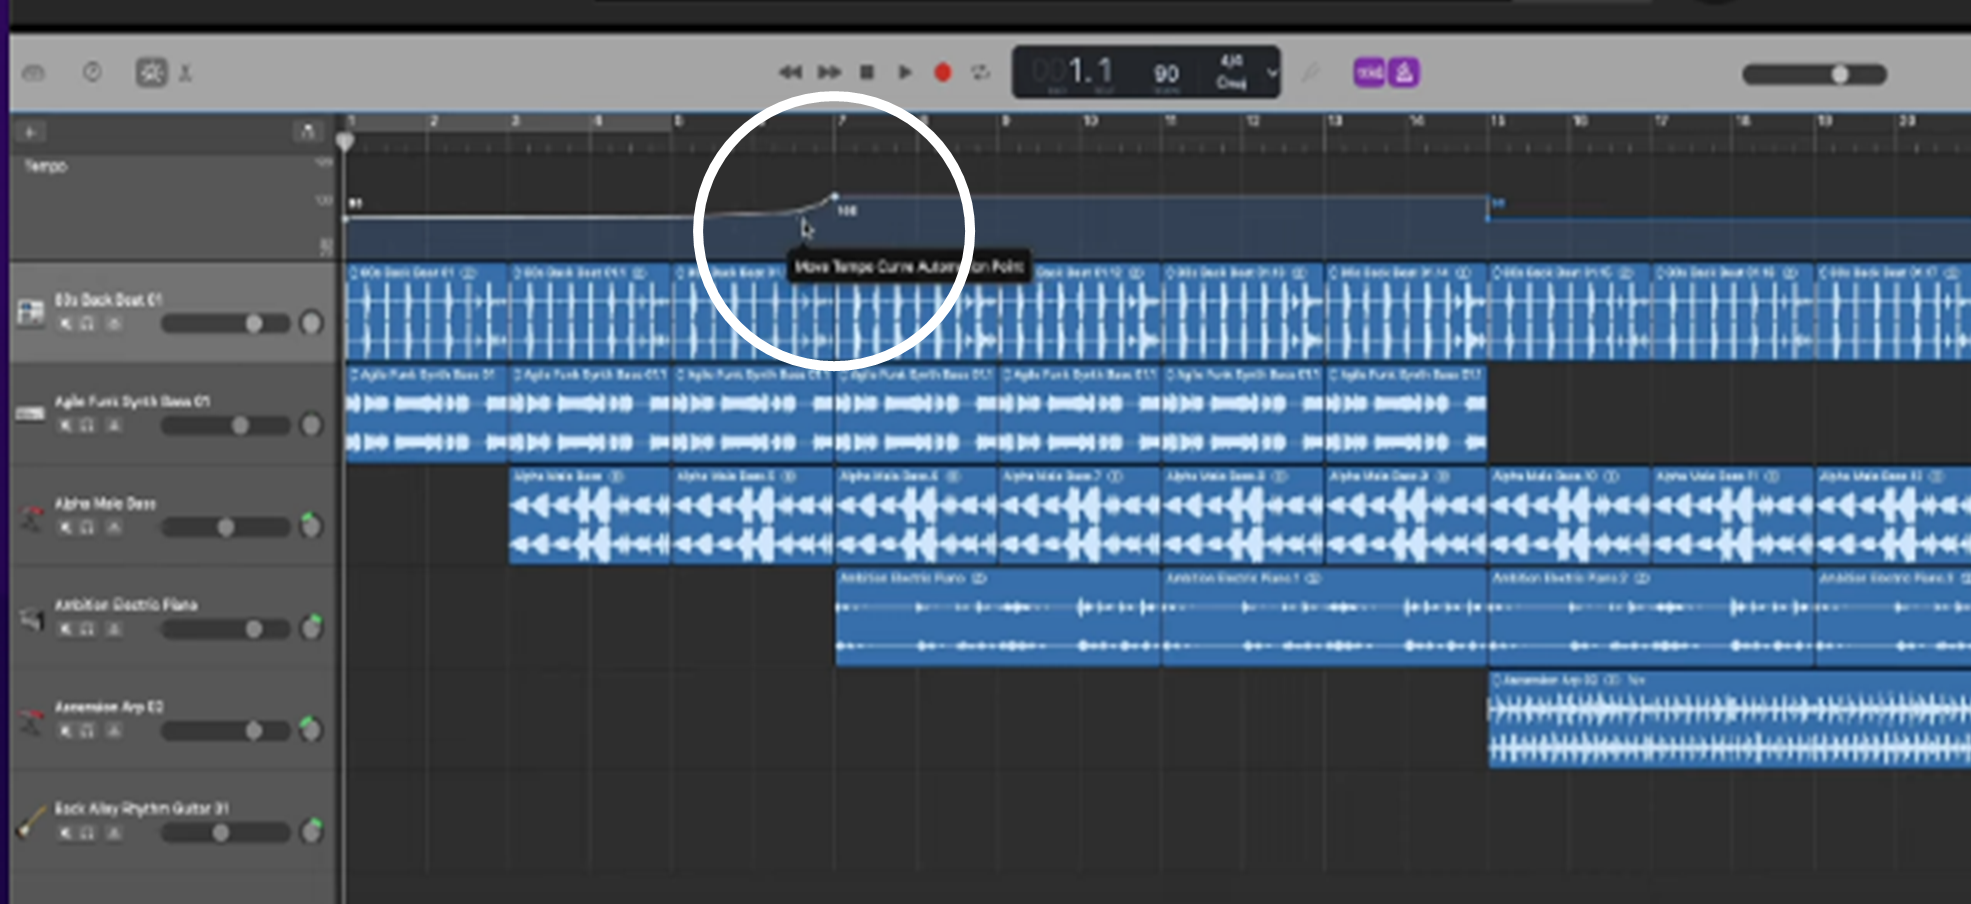
Step 5: Grab and drag the section of the tempo line (i.e., that’s immediately to the left or right of the tempo point) up or down to adjust the BPM of the corresponding portion of your song.
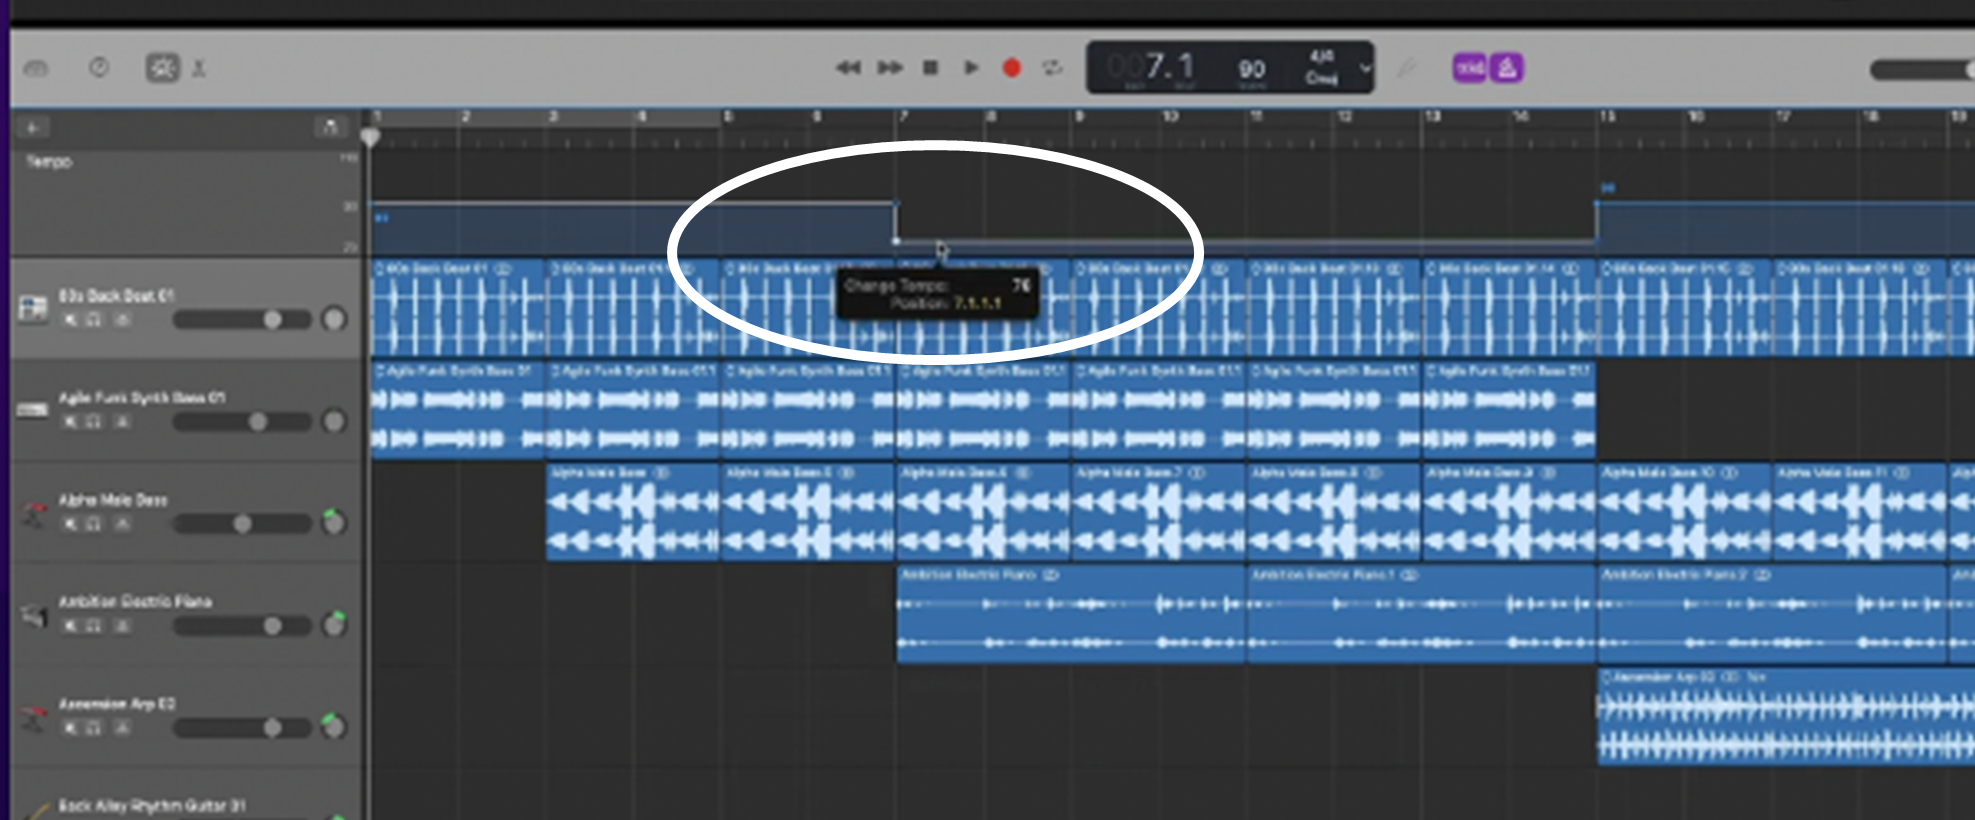
Step 6: If you want to ‘ramp up’ or ‘ramp down’ the tempo of audio regions in your song, grab and drag a tempo point rather than a section of the tempo line.
Step 7: Repeat the process of adding and adjusting tempo points for all the tempo changes that you want for your project.
If you’re familiar with using GarageBand’s volume automation curves, you’ll notice that the above process is similar.
If you’re not familiar with them, volume automation curves allow you to add volume effects to your whole song (using the Master Track) or individual tracks in your song. Check out our tutorials on How to Fade Out in GarageBand and How to Crossfade in GarageBand to see how easily you can do this.
GarageBand gives you a powerful way to change the tempo of audio regions in individual audio tracks by using Flex Time.
You may want to do this, for instance, if you’re using Apple loops or audio recordings and want some nuanced timing variations in the set tempo of the loop or recording.
Flex Time allows you to compress or expand the time between transients in your track by adjusting the timing in a customized way. Let’s look at how to do this.
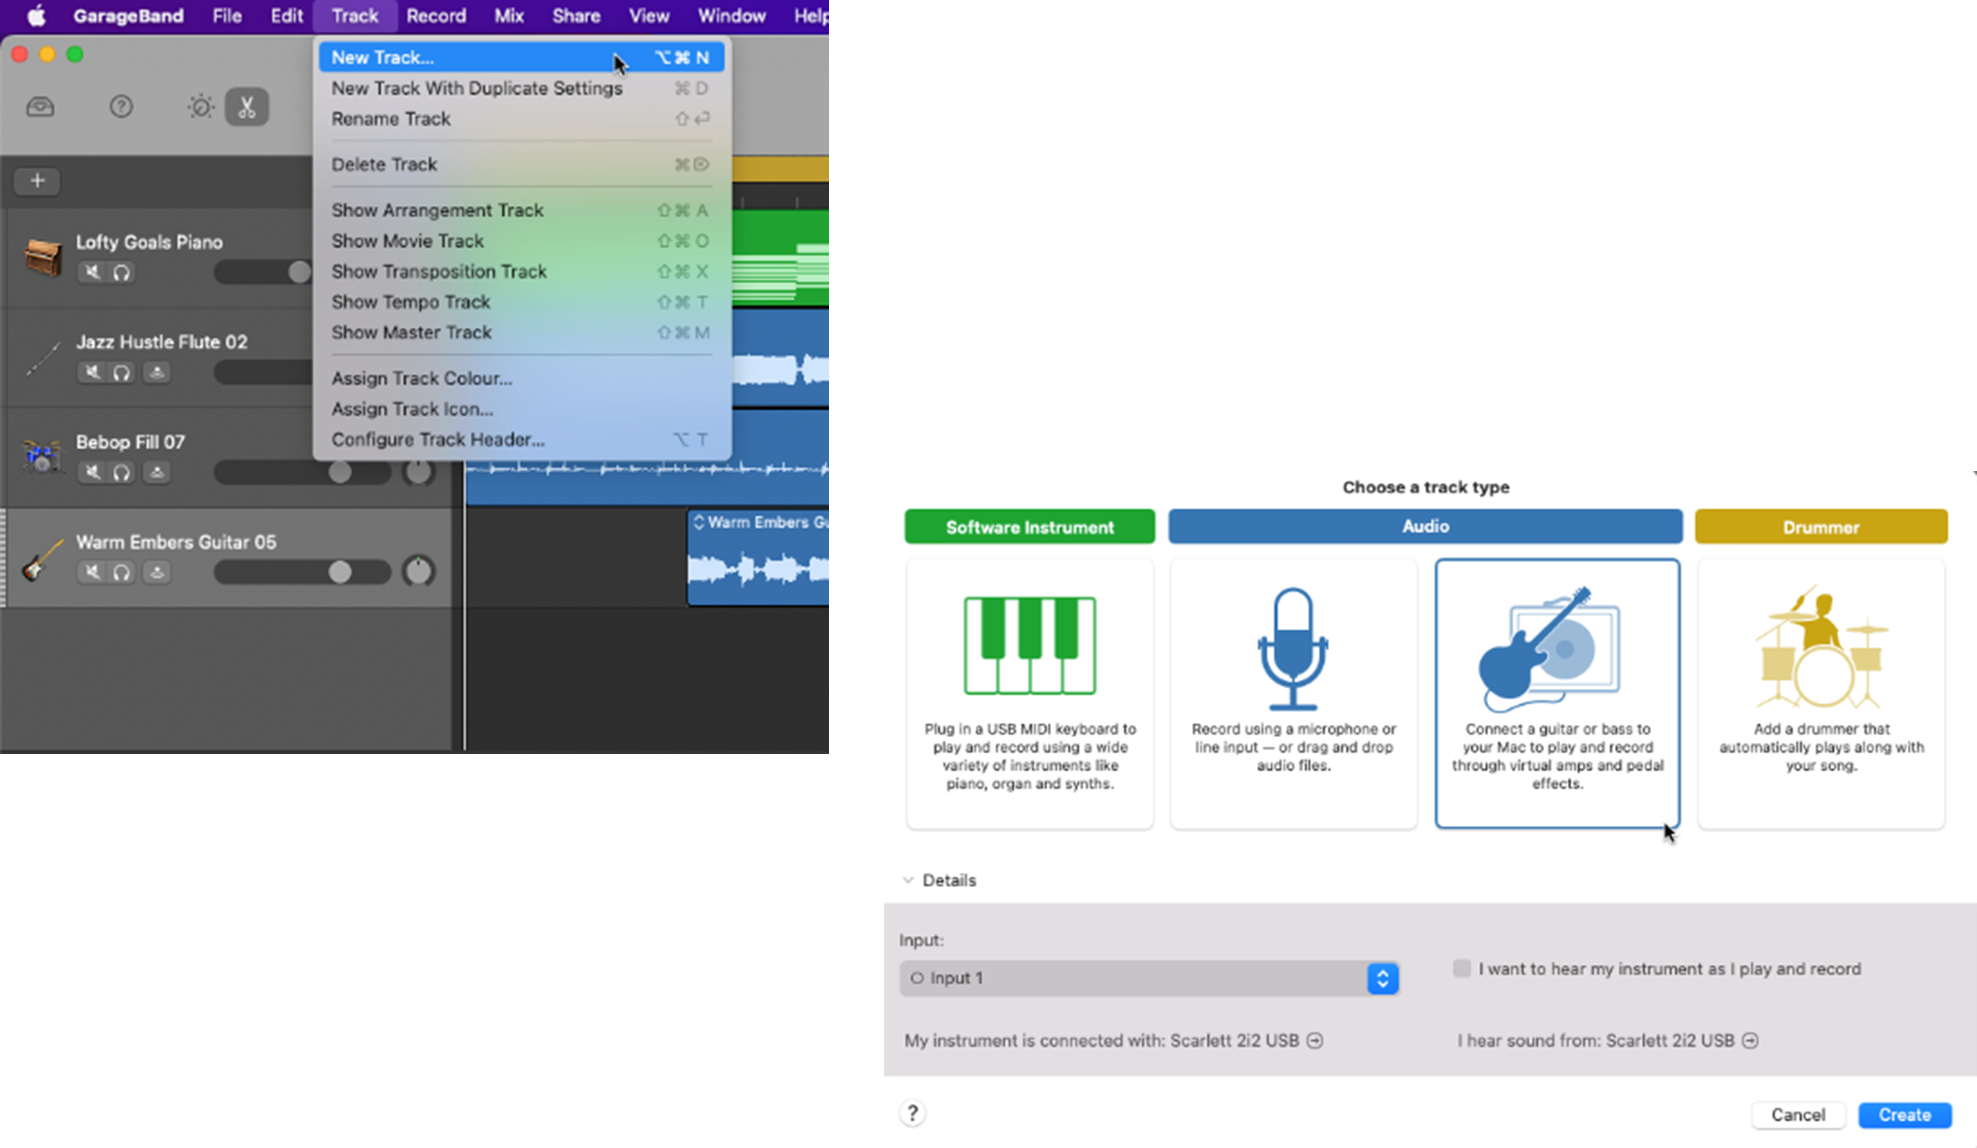
Flex time works for audio tracks, so if you haven’t already got one you can create a new audio track for your audio loop or recording.
Step 1: Select Track > New Track.
Step 2: Select an Audio track as your track type.
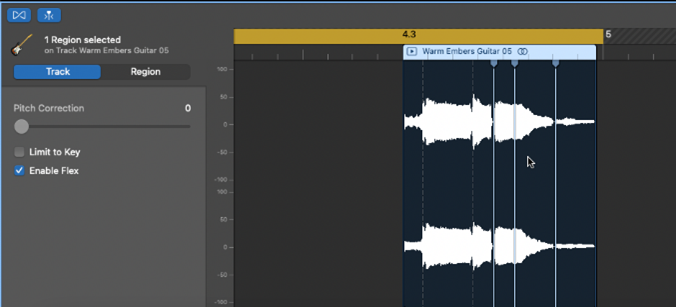
To work with Flex Time in GarageBand, you’ll need to enable it.
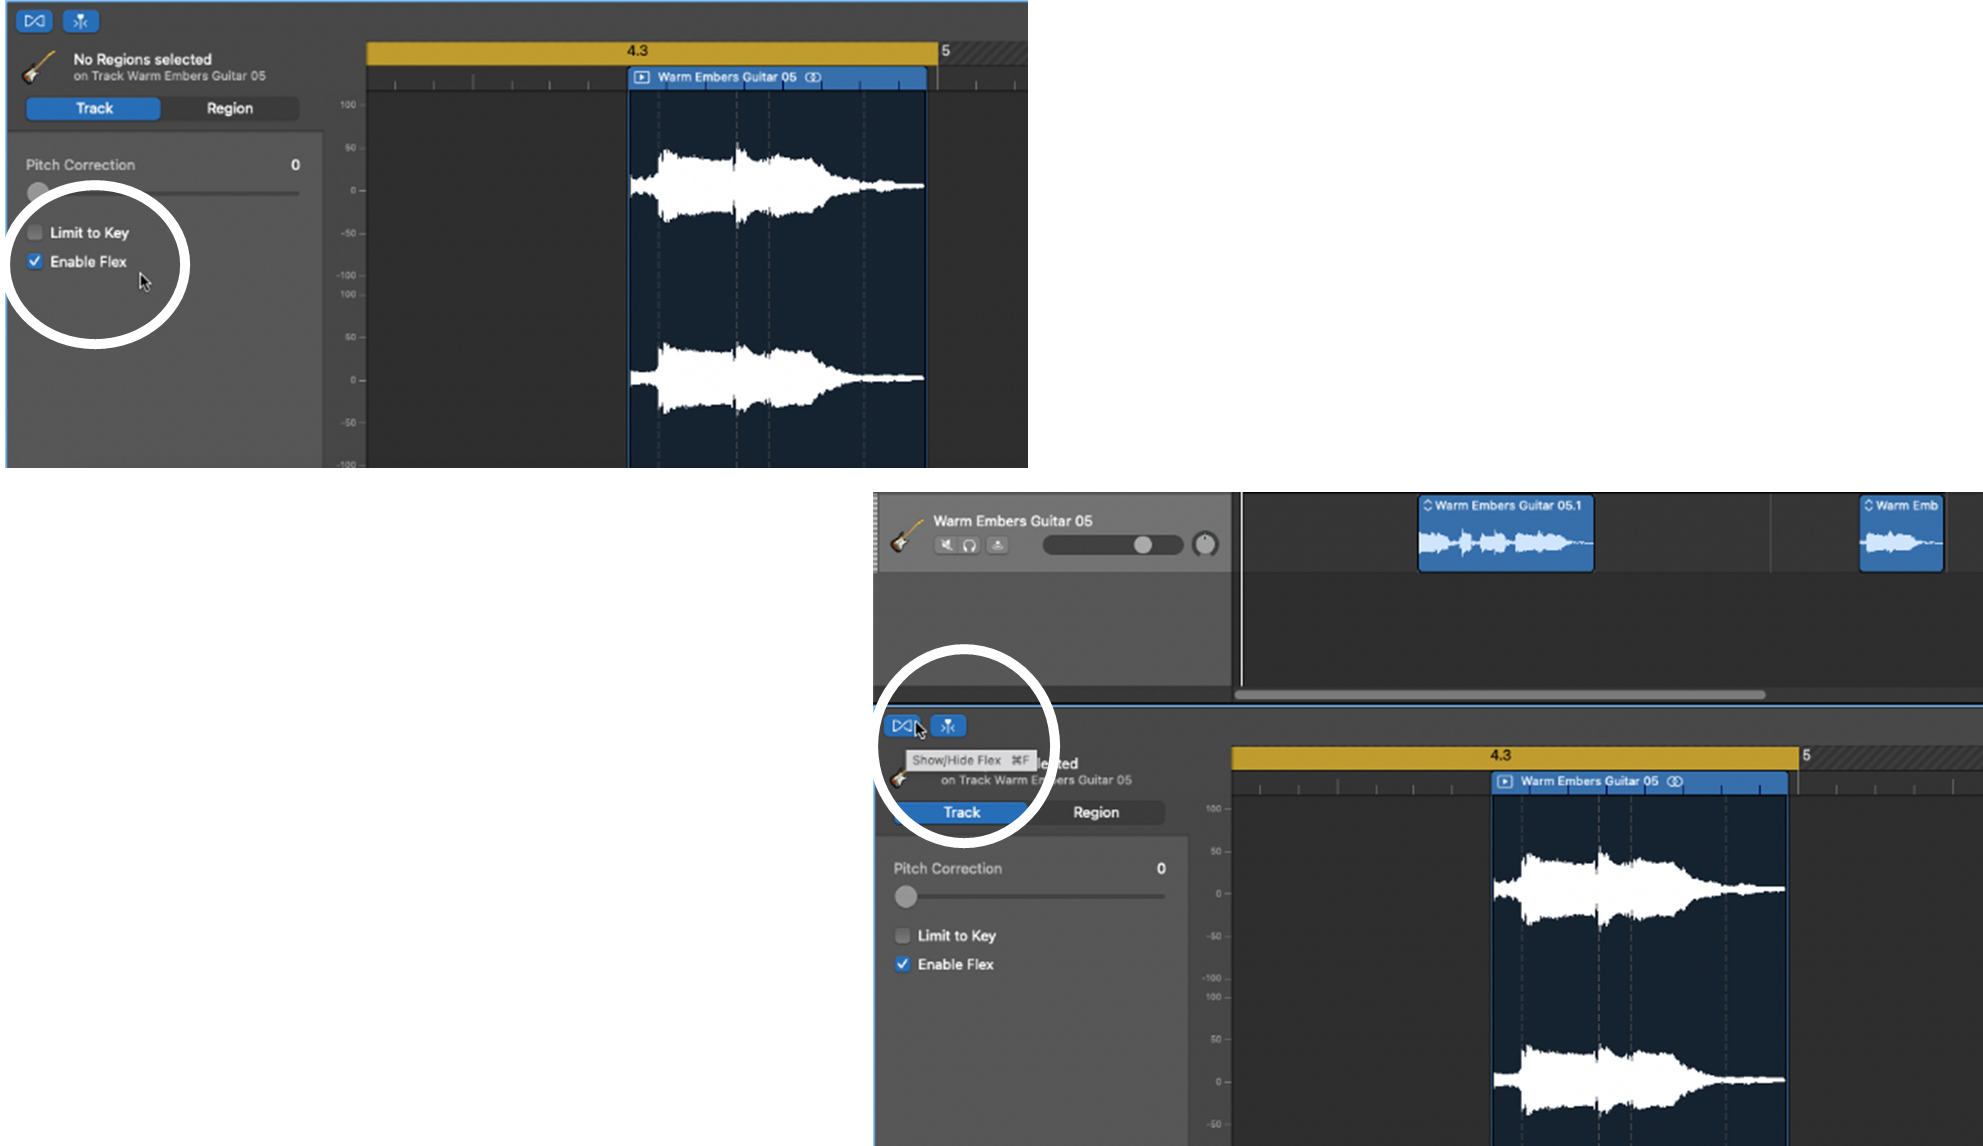
Step 1: Turn on the Audio Editor for your track.
Step 2: Tick the Enable Flex box or click the Enable Flex button in the track’s Audio Editor menu bar.
In the track’s Audio Editor, select the point on the waveform of the audio region that you want to edit.
Step 1: In the Audio Editor, identify the audio region that you want to edit.
Step 2: Click on the point that you want to edit.
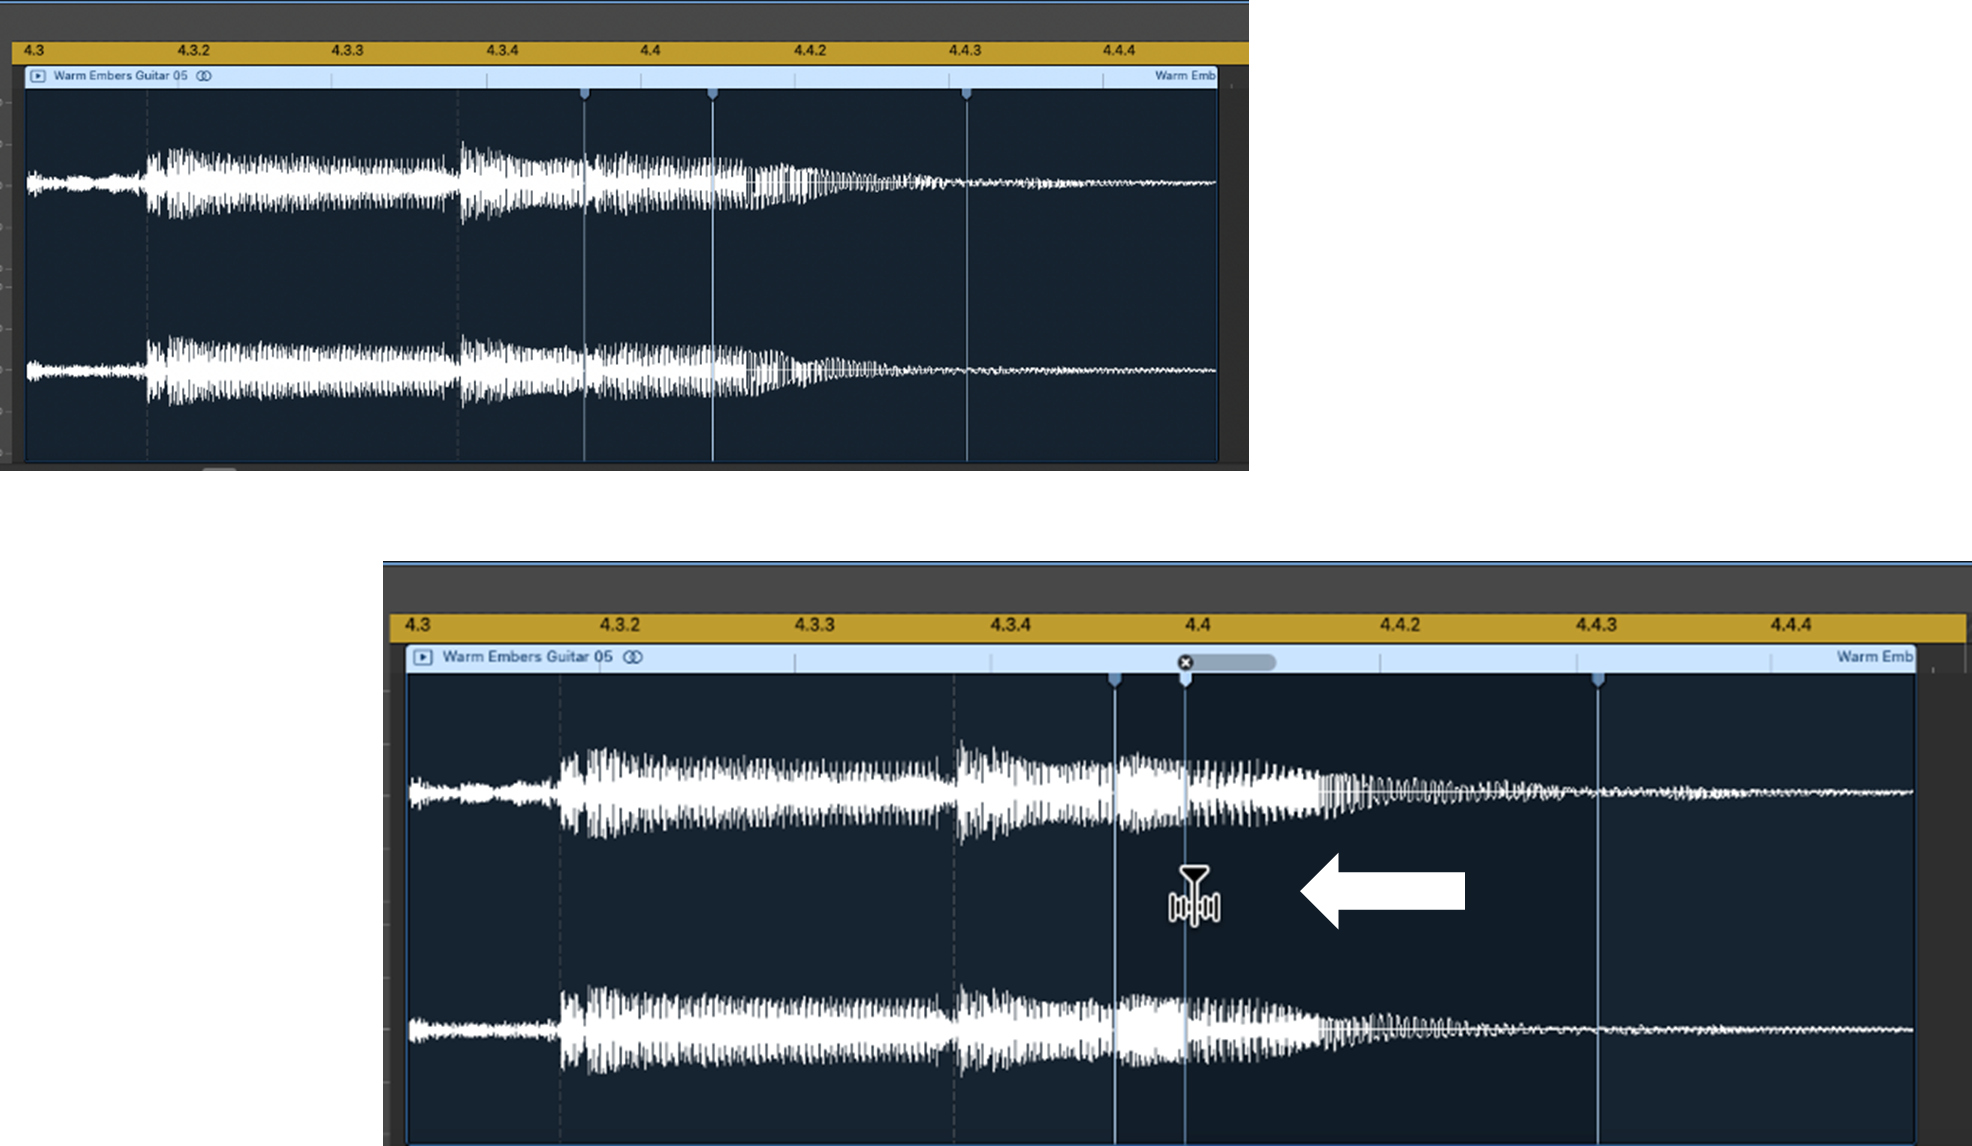
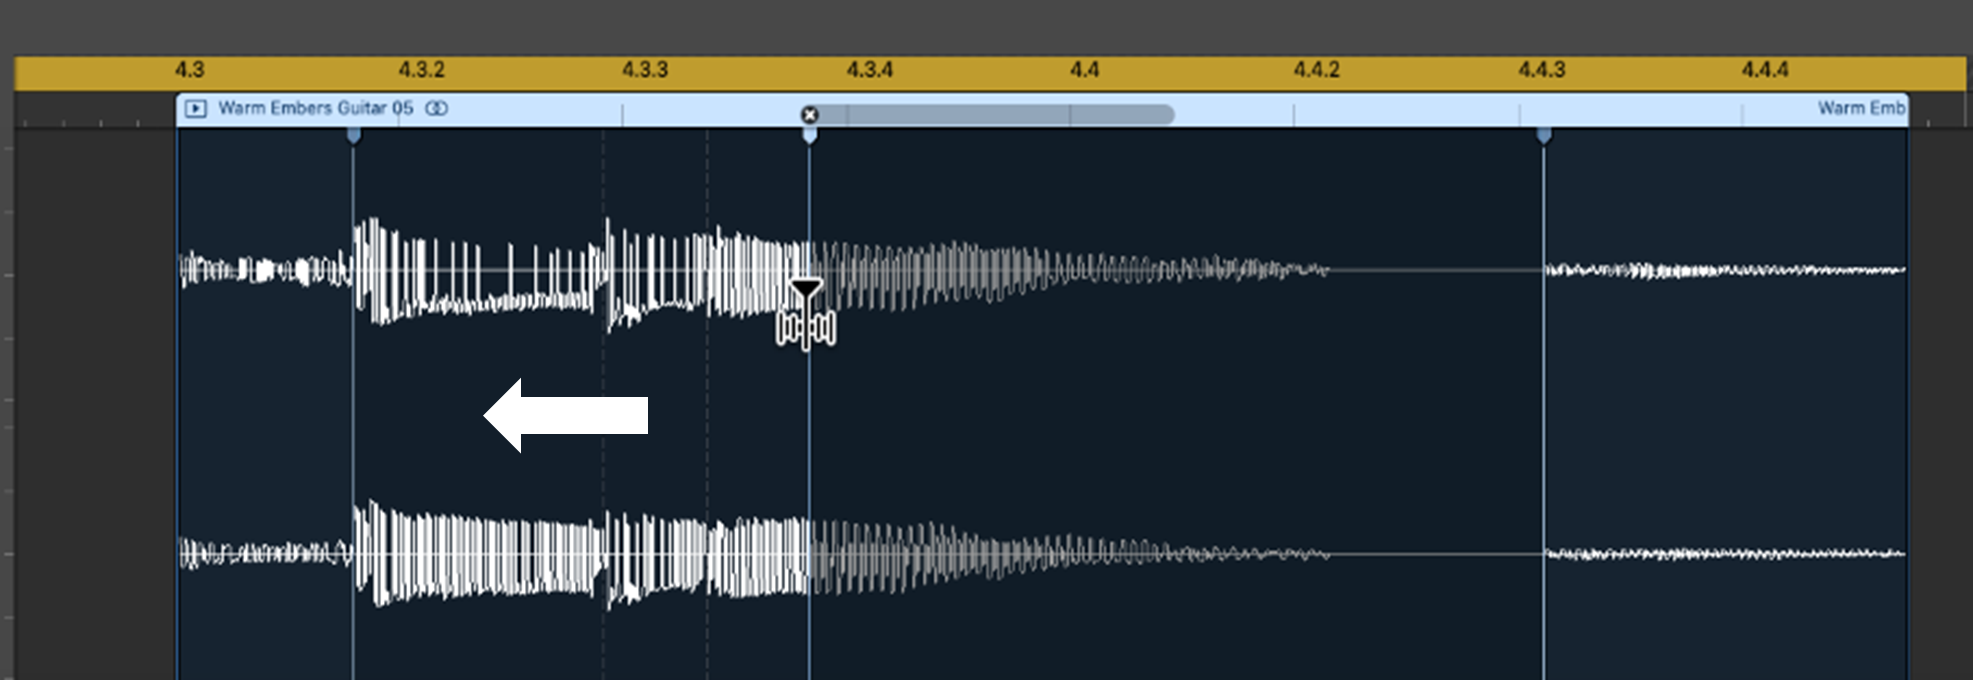
A flex marker will appear at your selected edit point. You’ll also see flex markers to the left and right of your edit point—these mark the location of the transients preceding (i.e., just before) and following (i.e., just after) your edit point.
You can move your edit point to the left or right to time-stretch the audio region around your edit point. Let’s first try moving it to the left.
Step 1: Grab the flex marker at your edit point.
Step 2: Drag the flex marker to the left, but not beyond the preceding transient.
The audio to the left of your flex marker, i.e., up to the preceding transient, will be compressed, and the audio to the right of your flex marker, i.e., up to the following transient, will be expanded.
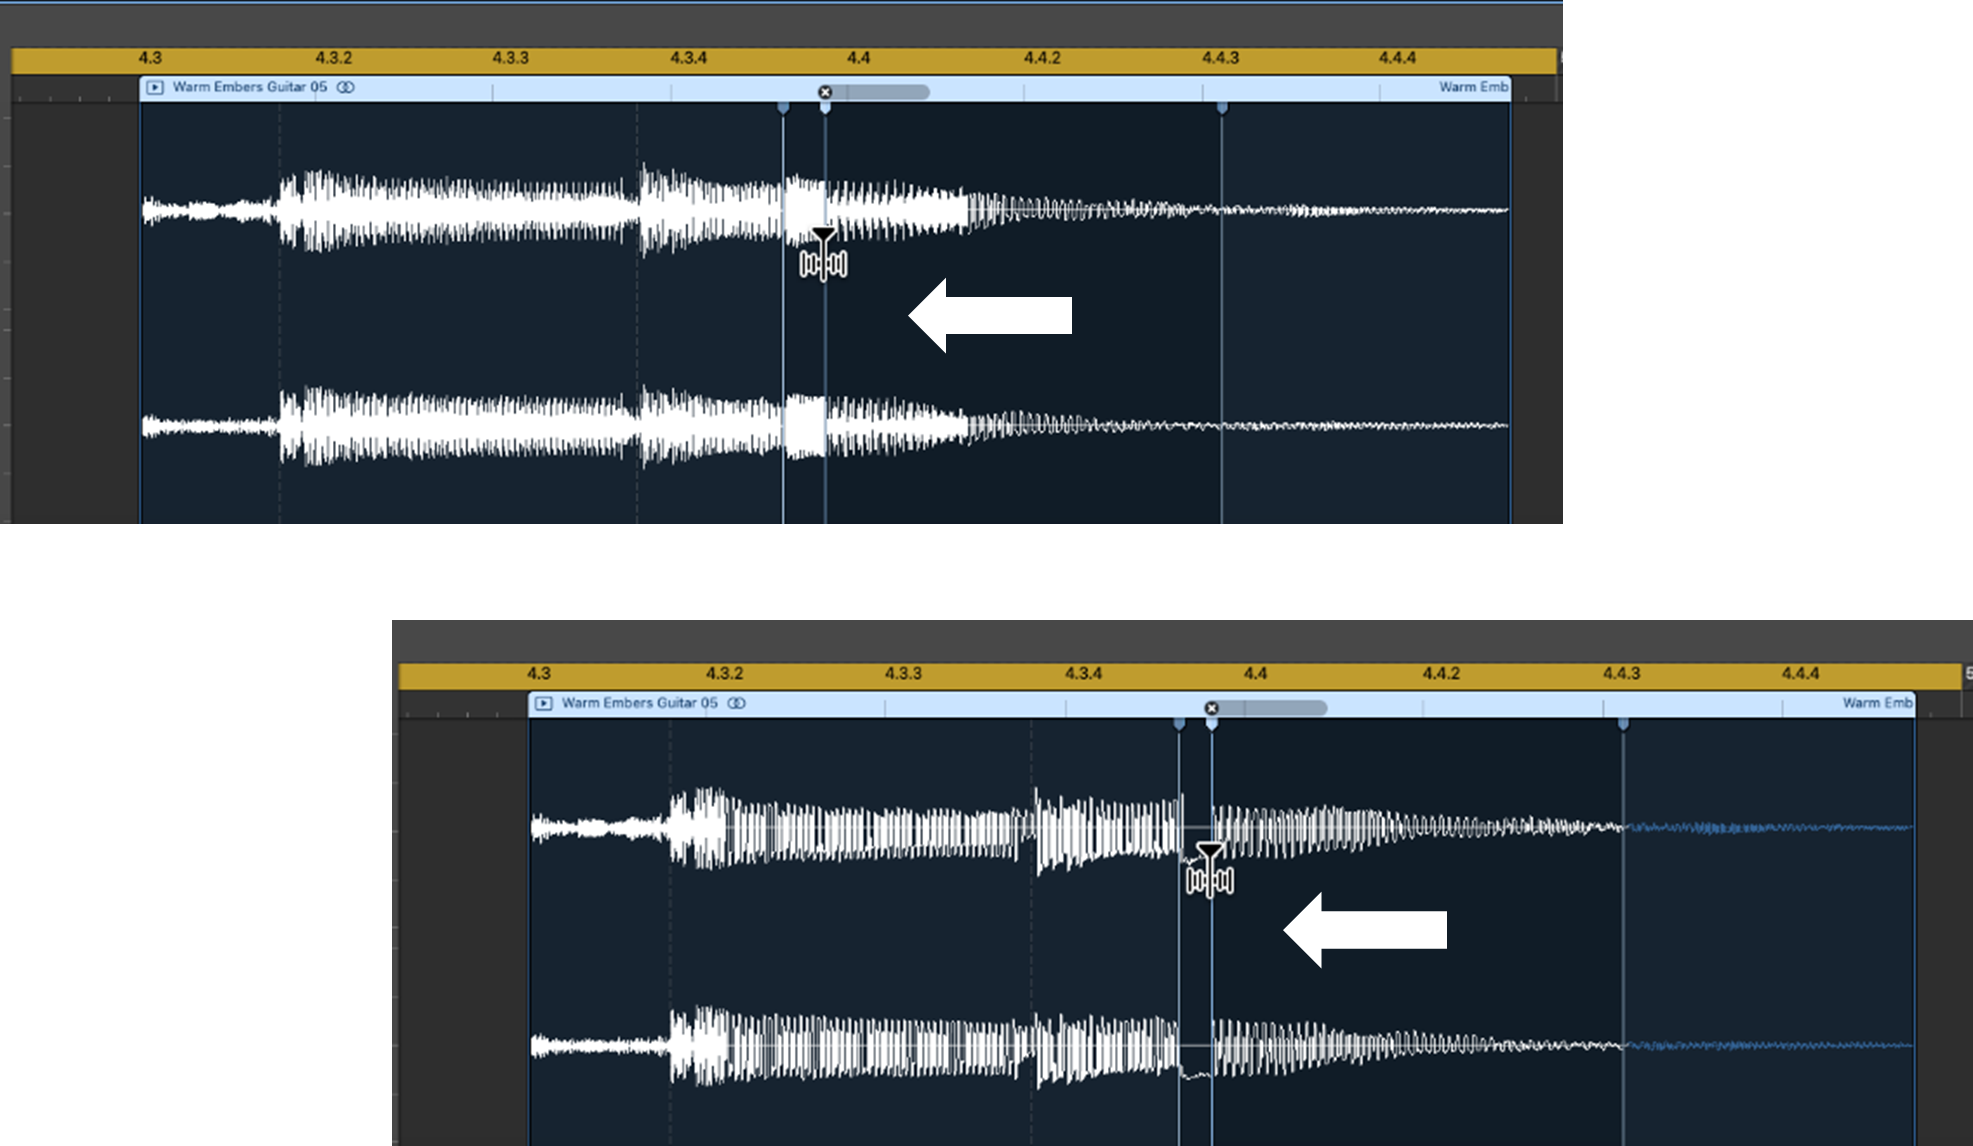
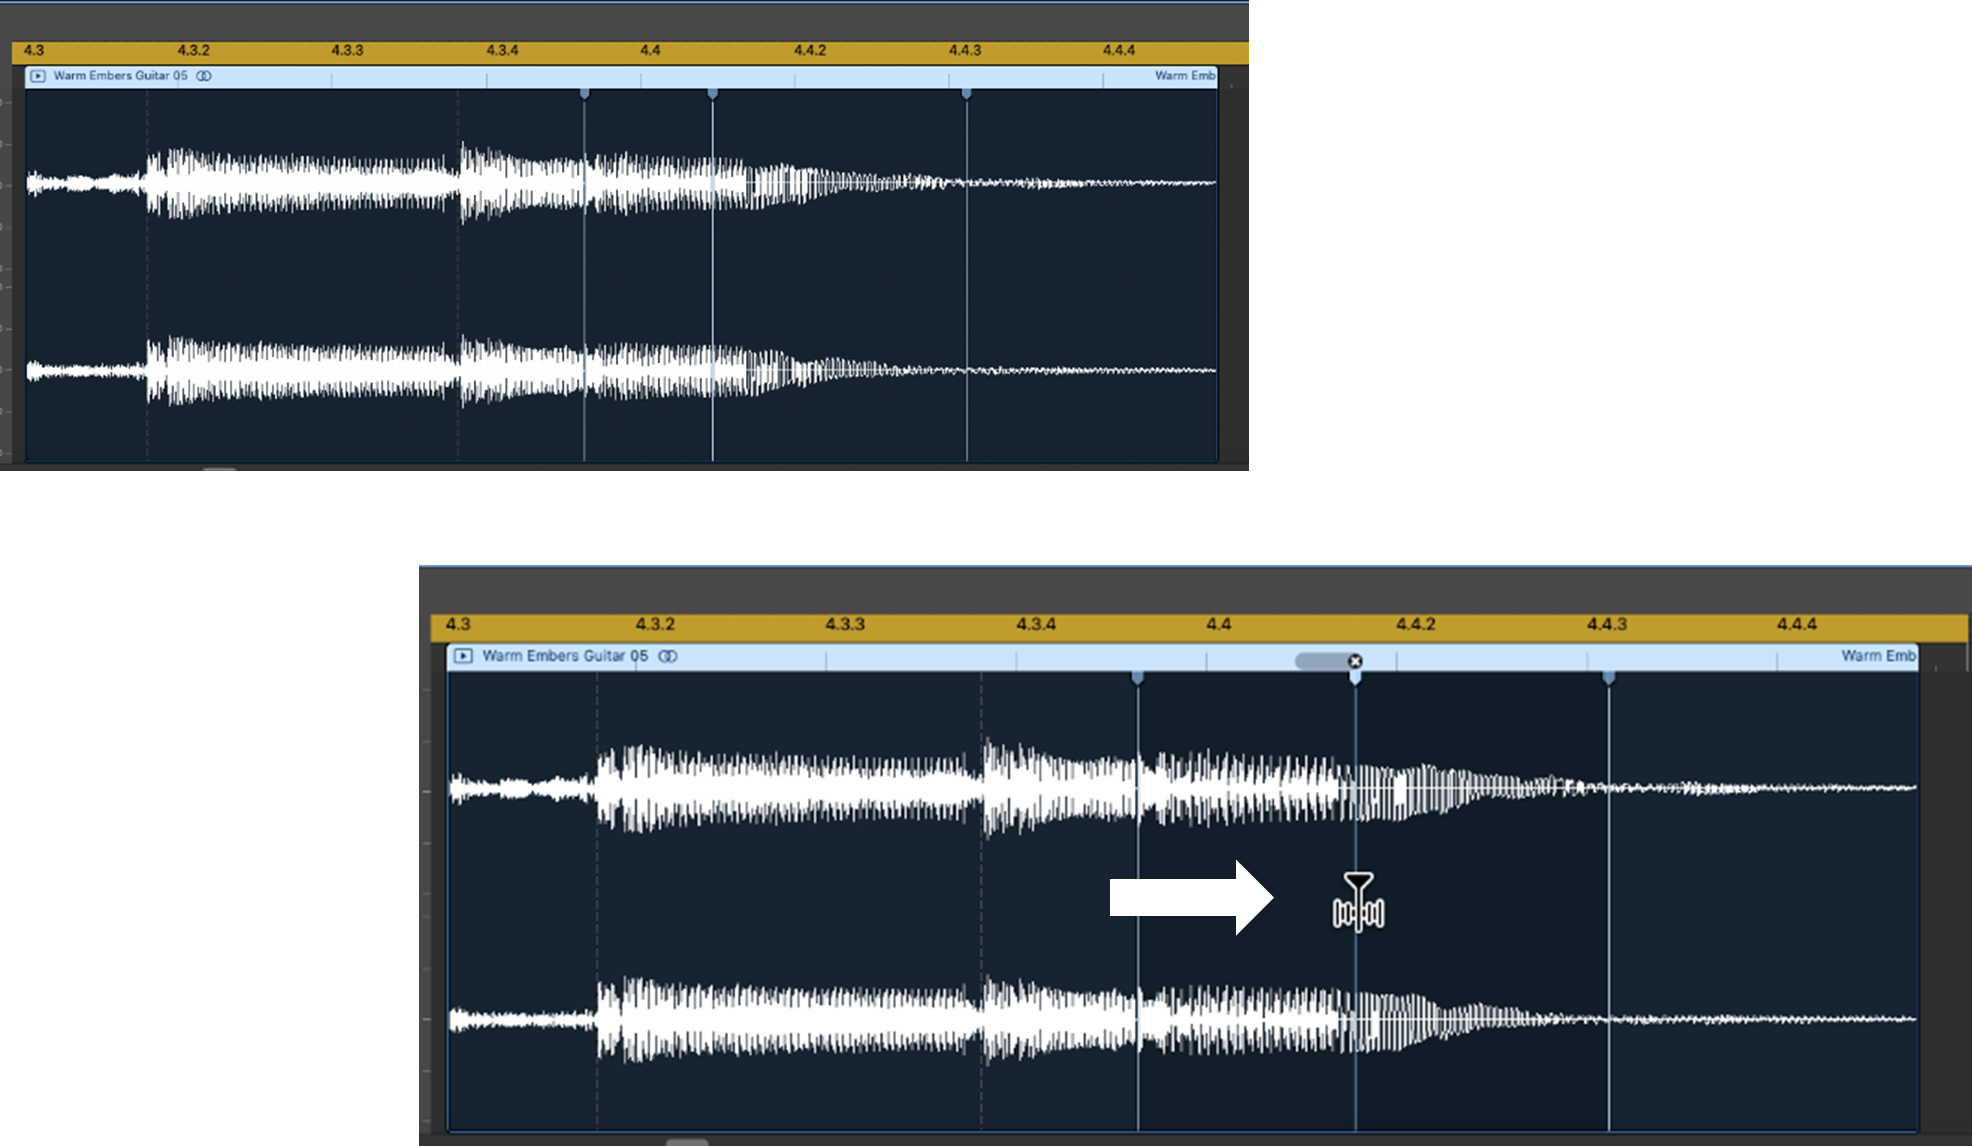
Let’s now try moving the edit point to the right.
Step 1: Grab the flex marker at your edit point.
Step 2: Drag the flex marker to the right, but not beyond the following transient.
This time, the audio to the right of your flex marker, i.e., up to the following transient, will be compressed, and the audio to the left of your flex marker, i.e., up to the preceding transient, will be expanded.

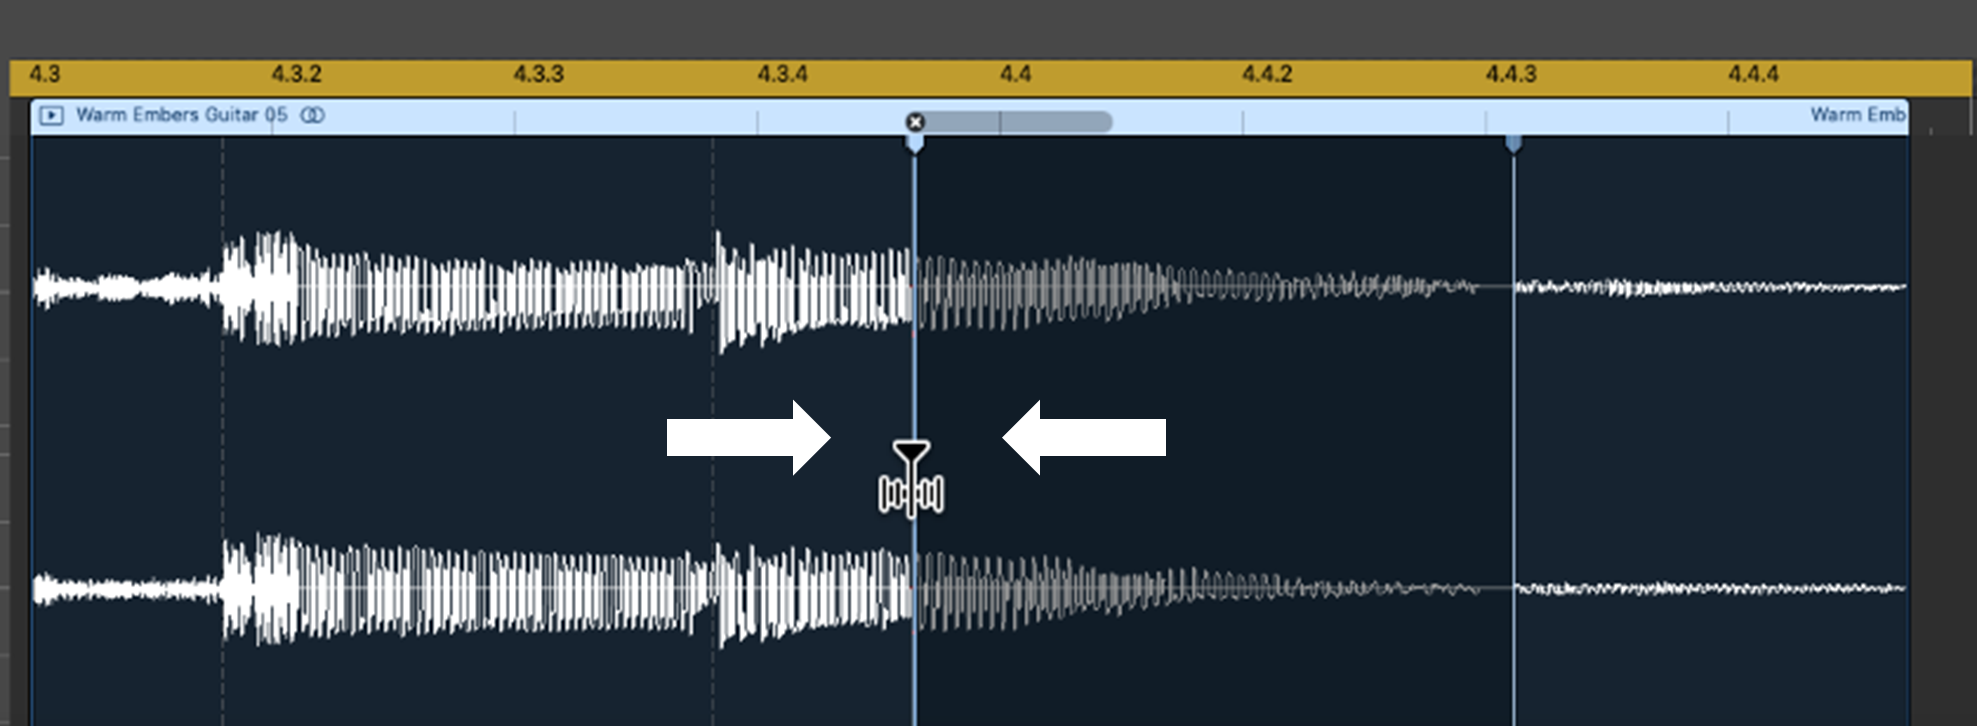
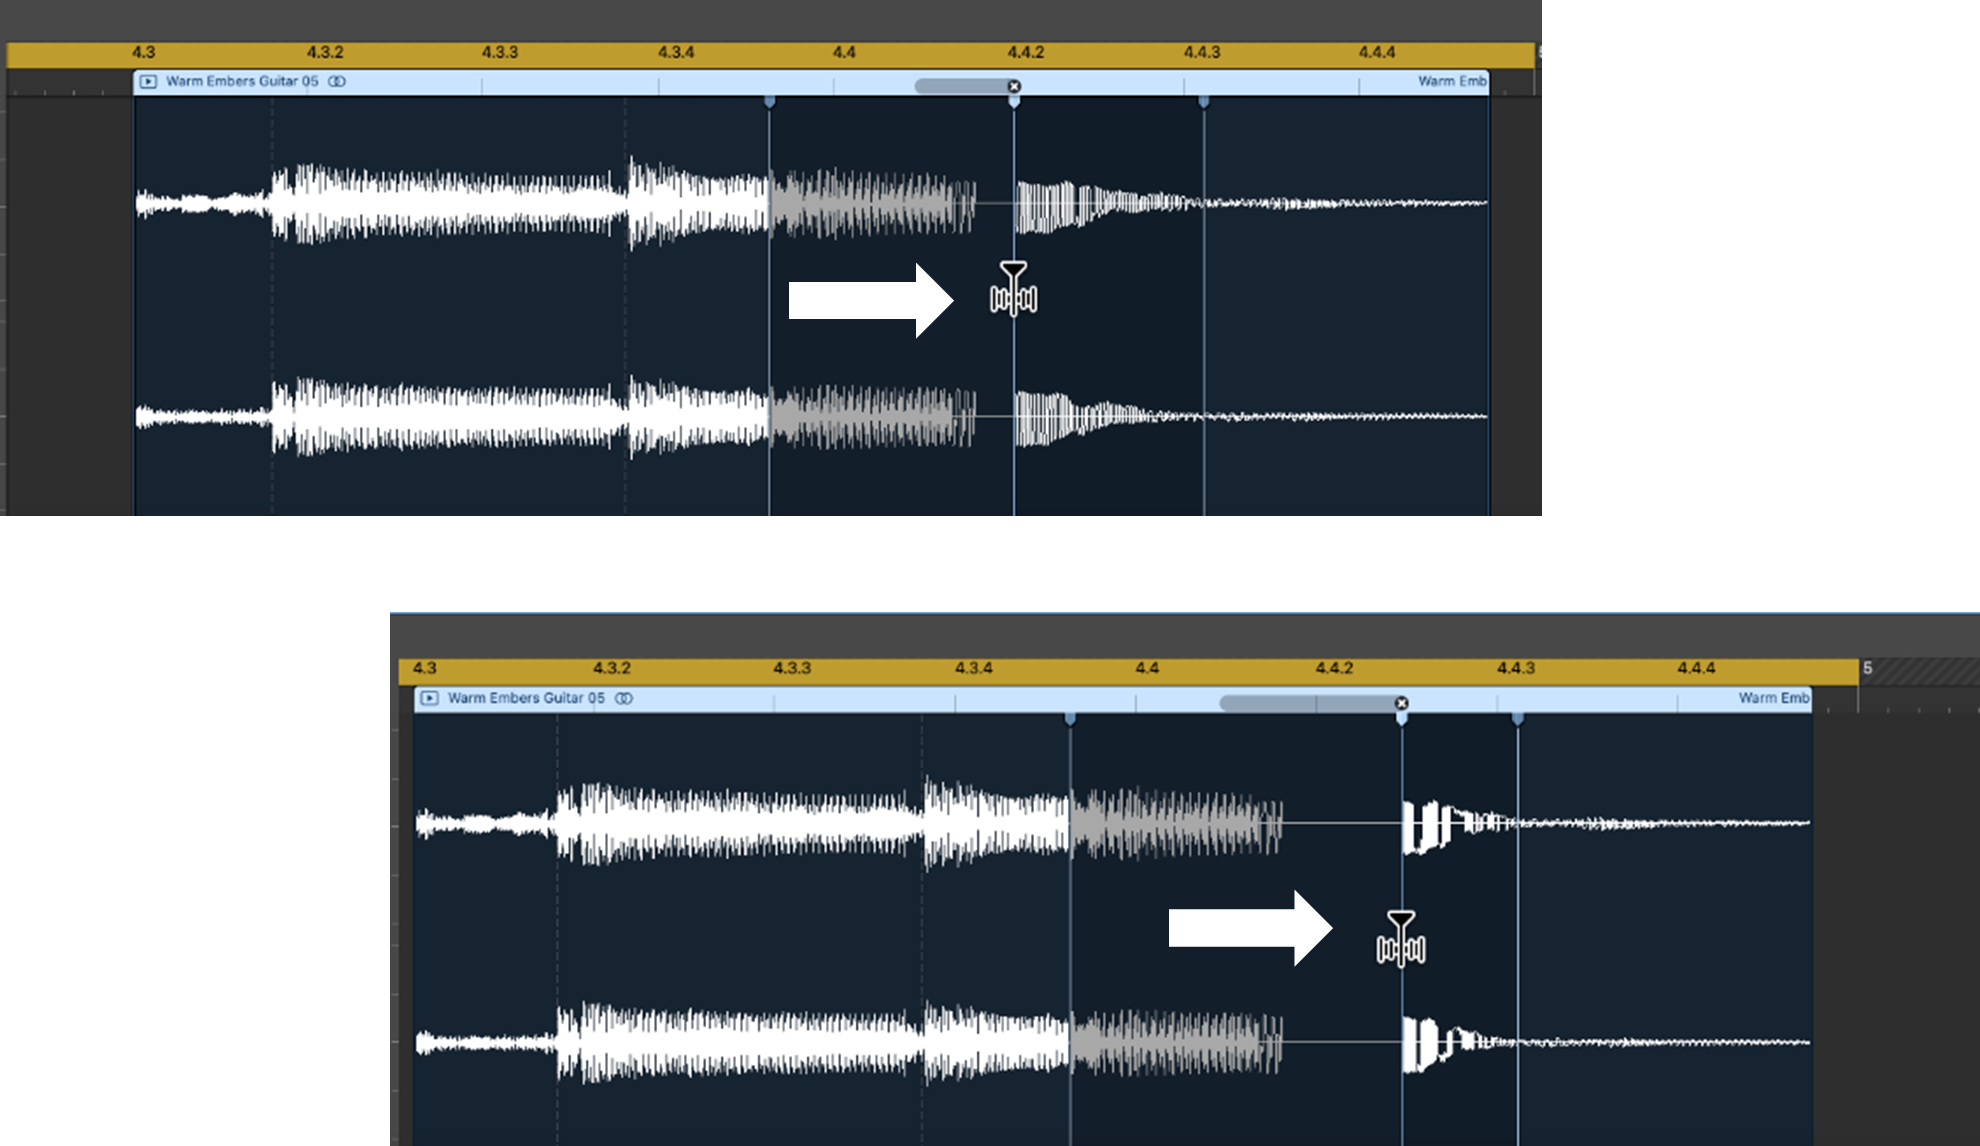
What happens if you move your flex marker beyond the transient that’s on either side of it?
Let’s first consider moving the flex marker to the left and crossing the preceding transient.
Step 1: Grab the flex marker at your edit point.
Step 2: Drag the flex marker to the left.

Step 3: Continue dragging the flex marker to the left and beyond (i.e., crossing) the preceding transient.
The flex marker jumps to the transient marker and allows you to extend the Flex Time editing range to the left.
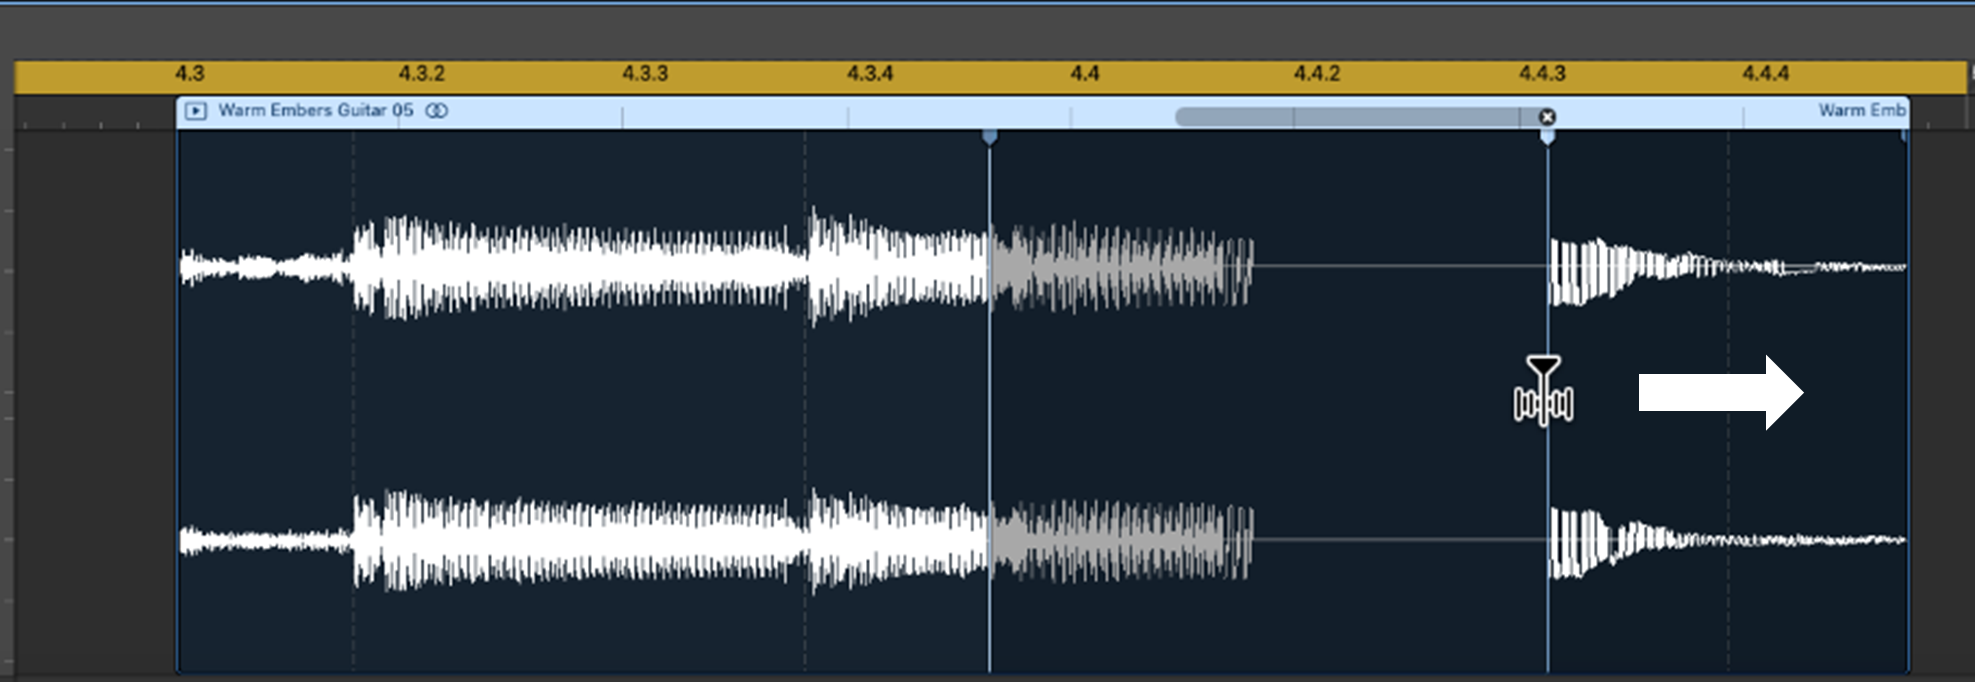
Let’s now consider moving the flex marker to the right and crossing the following transient.
Step 1: Grab the flex marker at your edit point.
Step 2: Drag the flex marker to the right.
Step 3: Continue dragging the flex marker to the right and beyond (i.e., crossing) the following transient.
As before, the flex marker jumps to the transient marker and allows you to extend the Flex Time editing range, this time to the right.
So far, we’ve looked at how to change the tempo of your whole song, slow down or speed up portions of your song (using the Tempo Track), or make nuanced adjustments to the timing of specific audio regions of a track in your song.
Sometimes, you simply want to change the tempo of a single track without affecting the tempo of the remainder of the song (i.e., without affecting other tracks). This may happen, for instance, when you source an external audio loop with a fixed tempo that’s different from the tempo of your song—when you use the external loop as a track in your song, its timing will be out of sync.
Unfortunately, this isn’t straightforward to sync in GarageBand—but it can be done, with a workaround hack, as follows (credit to the crew at Studio Hacks):
Step 1: Open a new project in GarageBand and drop your external loop into a new track.
Step 2: Select the external loop and click CONTROL + OPTION + G—this converts your external loop into a form that’s compatible with Apple loops.
Step 3: In the Audio Editor for your converted loop, tick the Follow Tempo & Pitch box (if not already ticked.)
Step 4: Add your converted loop to your Apple loops library (i.e., drag and drop it into your library.)
Step 5: Go back to your main project and add your converted loop as a new track (i.e., drag and drop it from your Apple Loops library.)
Your converted (external) loop should now follow the tempo of your main project, regardless of your external loop’s original tempo.
In this post, we’ve stepped through how to change tempo in GarageBand for your whole song or for portions of your song. We’ve also looked at nuanced changes to the timing of audio regions of a track (using Flex Time) or changing the tempo of a single track. With these options in GarageBand, whatever your style of music, it’s easy to find your groove by setting the right tempo!


