T Mango
Sep 13th, 2022Whether you’re into hip hop or other styles of music, it’s easier to make beats if you have GarageBand.
GarageBand is one of the most popular free digital audio workstations (DAWs) available for making music today. Being an Apple product, it only works with Macs (and iOS devices if you’re using the GarageBand app) and not with Windows computers.
Although free, GarageBand is powerful, versatile, and great for making beats. Both amateur and professional musicians use it—music industry professionals sometimes ‘sketch’ their early musical ideas using GarageBand.
In this post, we’ll show you how to get started with music production and how to make beats on GarageBand — once you know the process, your only limitation will be your imagination!
You make beats on GarageBand by following the process of basic music production:
This process works for any style of music, not just for good hip hop beats which is a genre often associated with making beats. And it doesn’t need to be in the above order—you can lay down your drum beat, for instance, before your other instruments, and your vocals can be added earlier or later as well.
At a minimum, for making beats you’ll need a Mac with GarageBand installed. If it isn’t already installed, it’s easy to download GarageBand from the App Store (using your Apple ID).
GarageBand is also available for iOS (i.e., the GarageBand app for iPhones and iPads)—while this post focuses on GarageBand for Macs, the process is similar for the iOS version of GarageBand.
If you’re using physical instruments or live vocals, it helps to have an audio interface. This isn’t essential, since you can connect directly to your Mac (with suitable connectors), but using an audio interface usually results in a better recording. Most music producers, even amateurs, use audio interfaces.
In the following post, we’ll step through the process of making music (i.e., beats) on GarageBand. And remember, whether you’re creating hip-hop beats or other music, you can follow the same process.
Keep in mind that there are several ways to make beats on GarageBand. Today, we’ll look at one approach and create an 8-bar musical project to illustrate the process. Once you know how to do this, like music artists the world over, you can engage in your music production in as many creative ways as you like.
The first thing to do is to start a new project in GarageBand:
Step 1: From the GarageBand menu, select File > New.
Step 2: Choose to create an Empty Project.
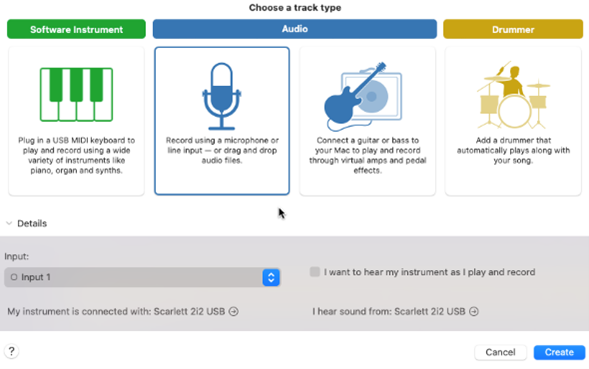
Step 3: Choose an Audio instrument as your track type (e.g., guitar or bass).
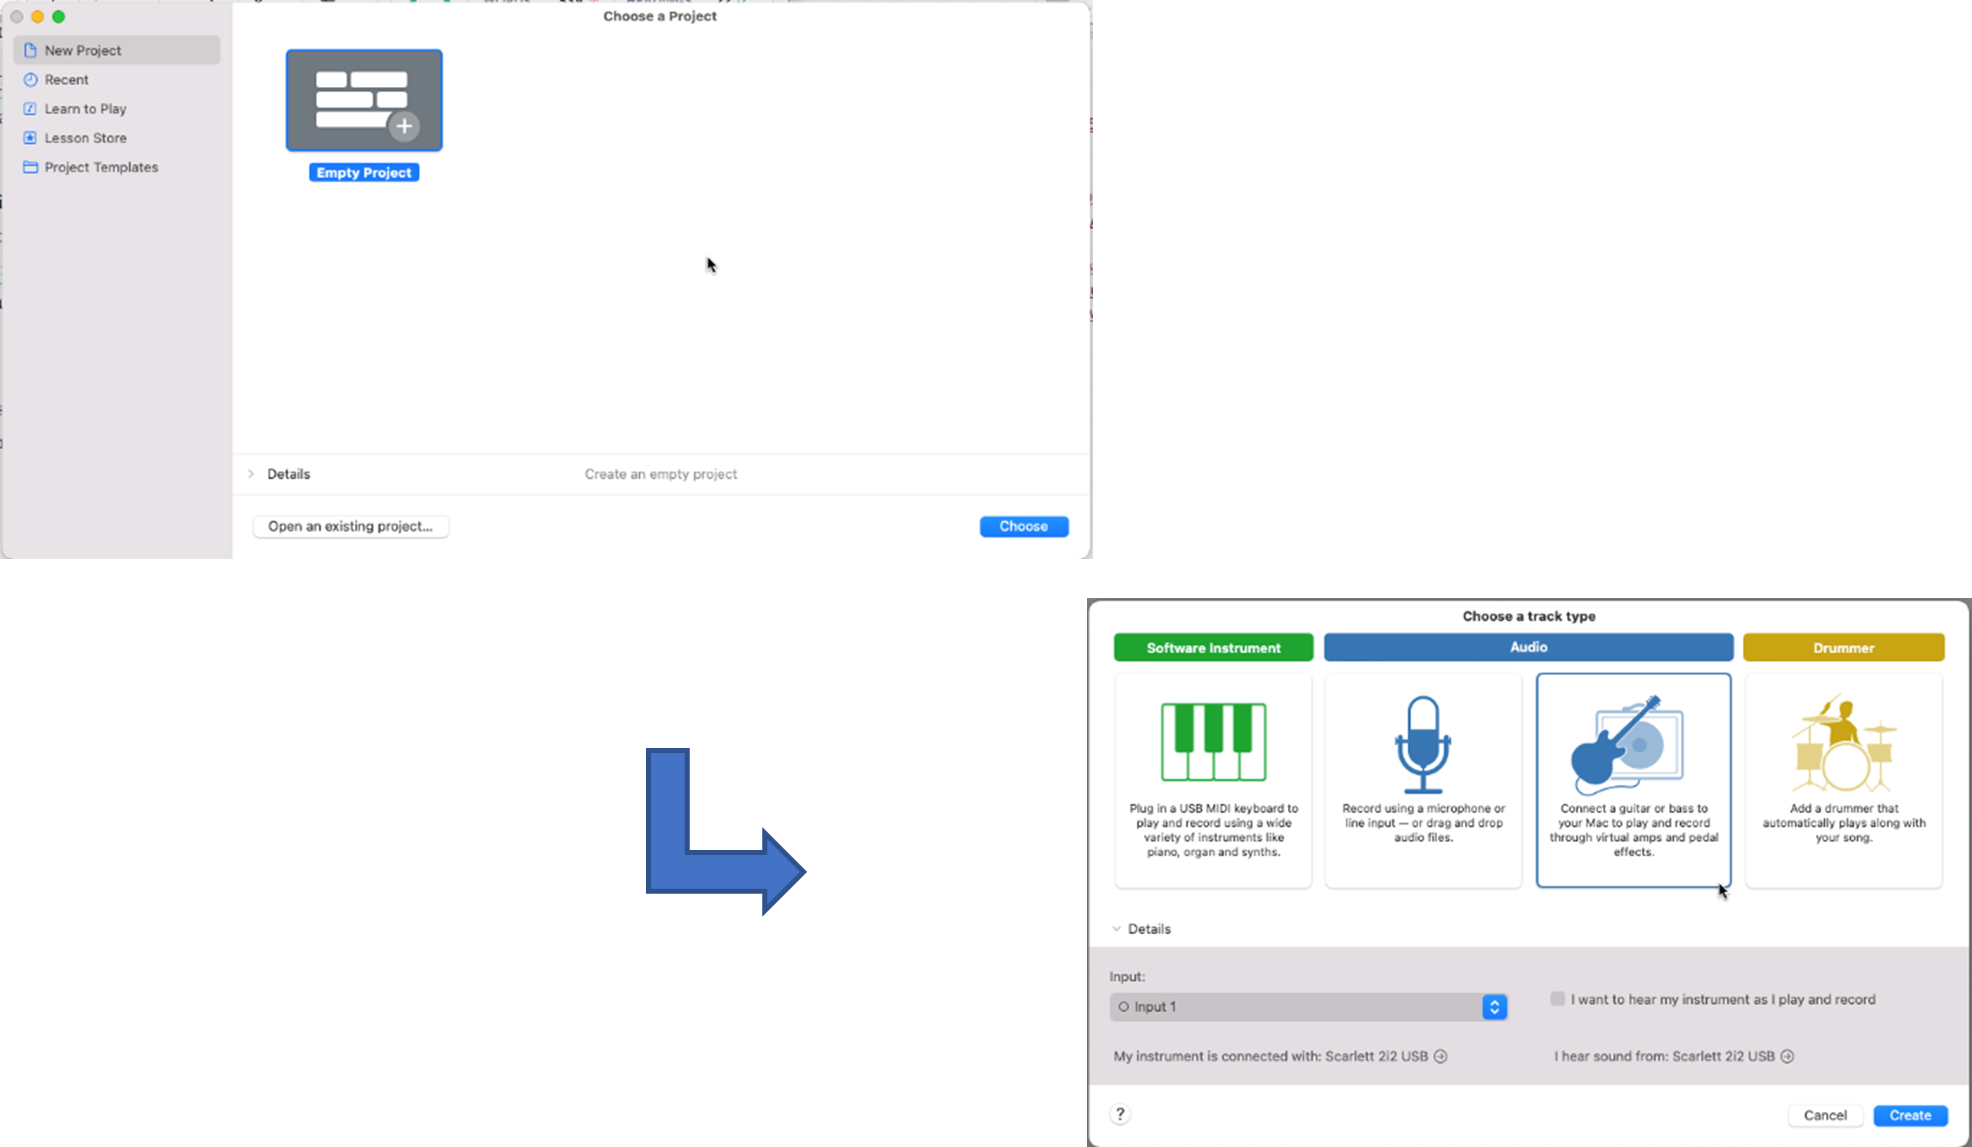
We’ll start by creating an audio track, i.e., using audio instruments. You could also start with software instruments or a drum track.
When you’re creating an audio track, you have a few options:
We’ll use Apple Loops for our first track.
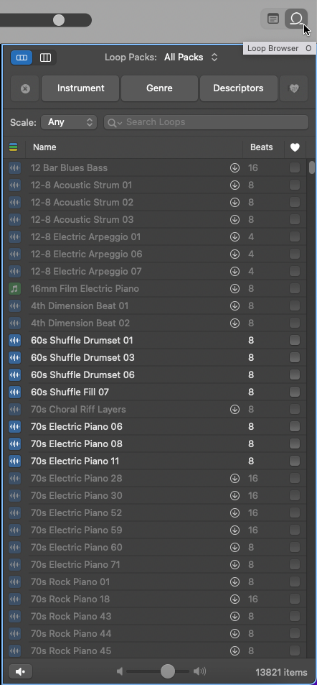
There are thousands of Apple loops that you can choose from, spanning a variety of instruments and genres—we’ll choose a groovy synth loop to get us started.
Step 1: Select the Loop Browser by clicking the icon in the top-right area of your workspace (the icon looks like the ‘loop of a hose’.)
Step 2: Browse the loops using the Loop Packs menu and select your loop.
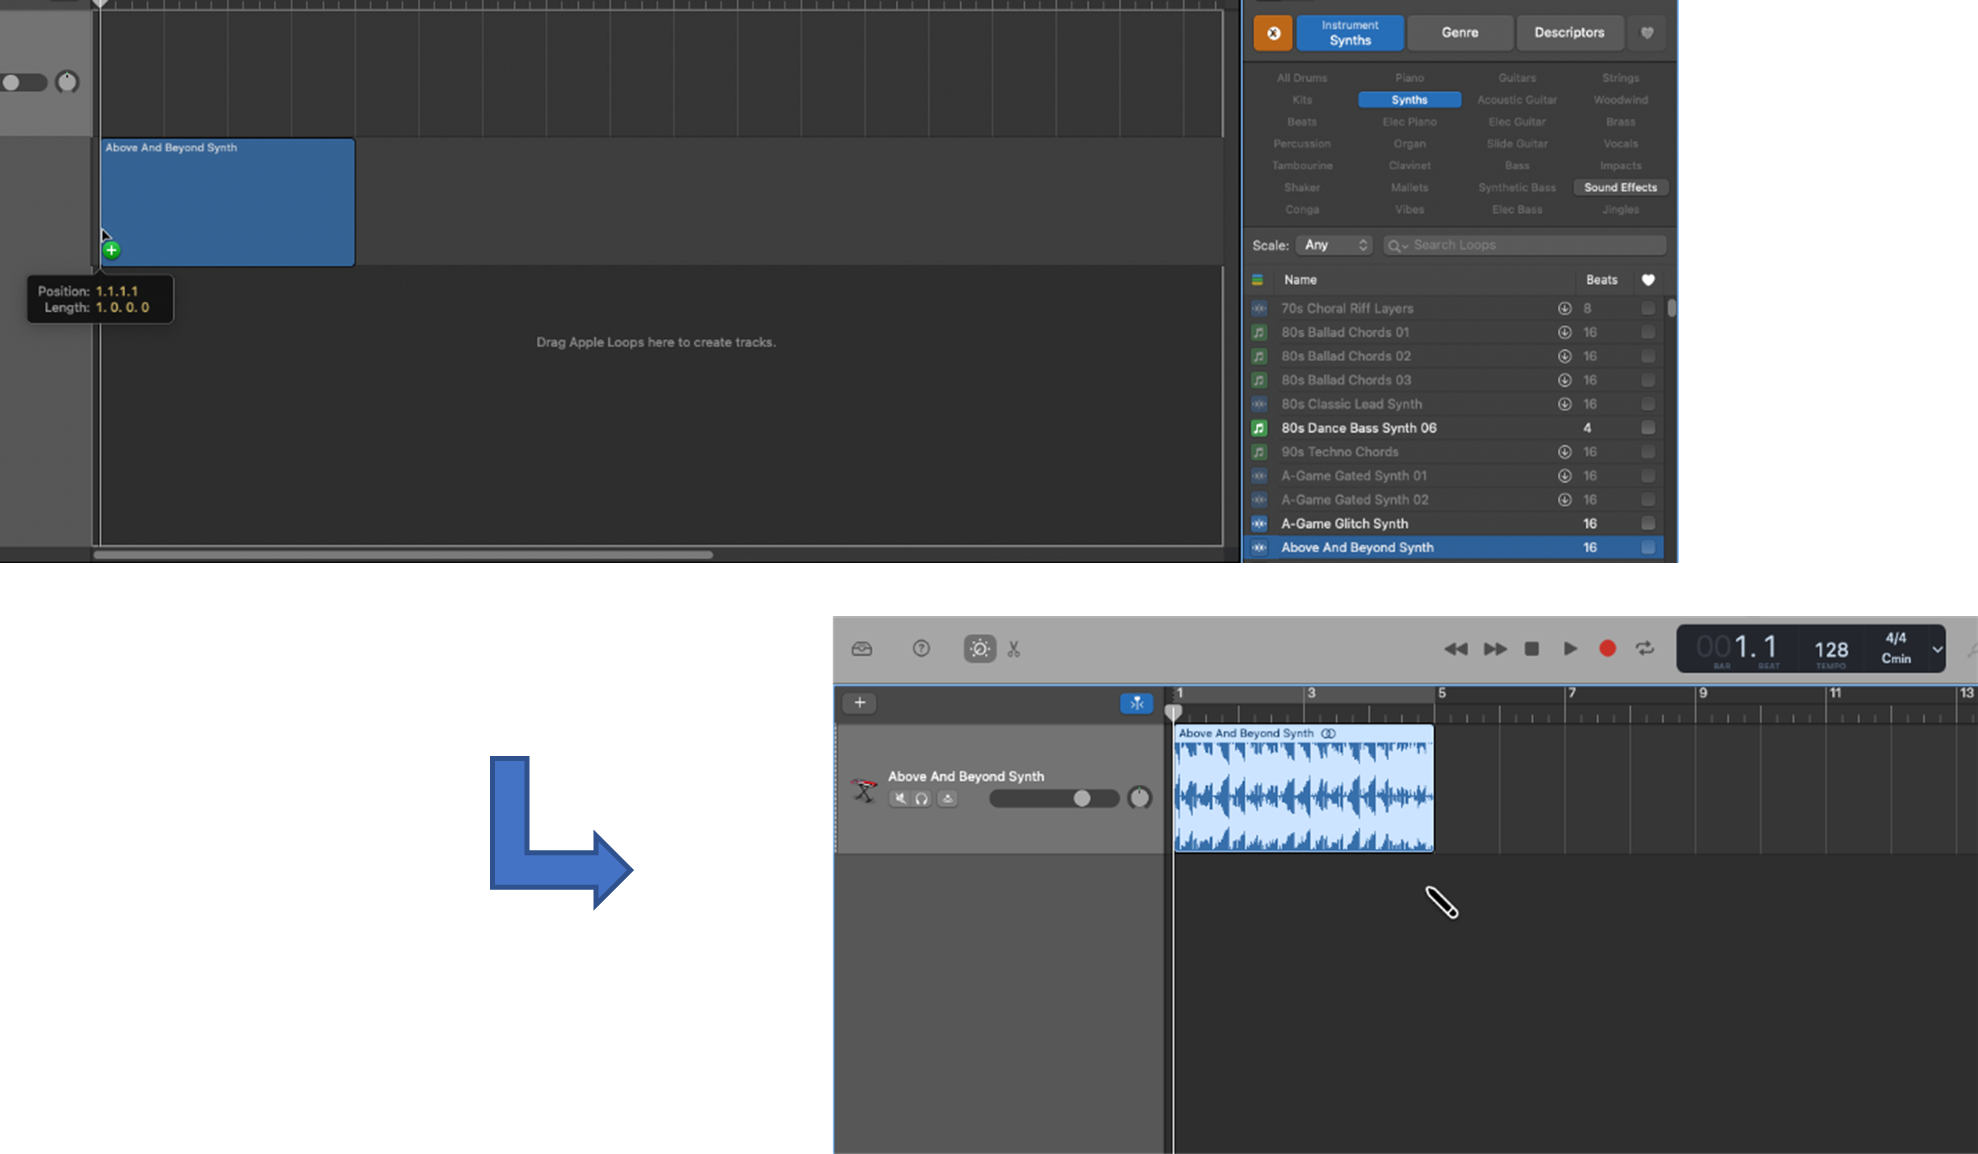
Create a new audio track by dragging and dropping your selected loop in the Tracks Area.
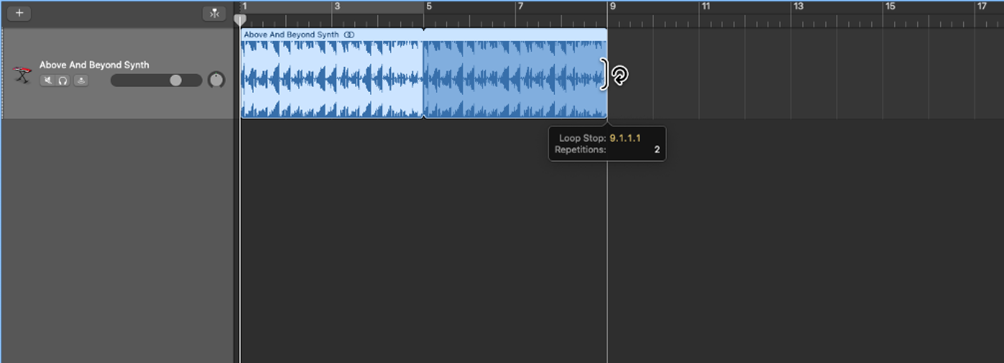
You can also extend the loop by grabbing its edge and dragging it (e.g., make it 8 bars in length rather than 4 bars, by duplicating the 4 bars) and you can set up the loop to play on repeat.
And there you have it—we’ve created our first track and have a great 8-bar loop to work with!
Let’s add another track, this time using a software instrument.
Step 1: Select the + icon at the top of the Track Header region to add a new track.
Step 2: Choose to create a Software Instrument.
A new software instrument track will be added to the Tracks Area.
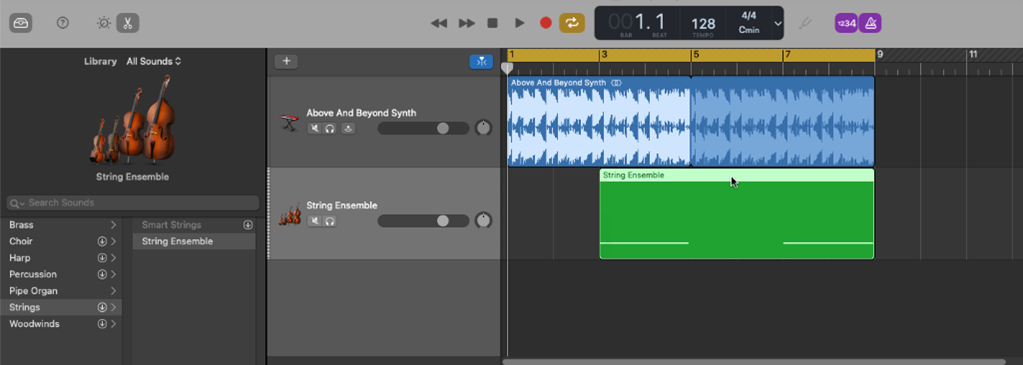
Step 3: Select a software instrument from the sound library.
Your software instrument will be assigned to your new track. We’ll choose the String Ensemble for our project.
We’ll now record music to our new track using MIDI.
MIDI, or Musical Instrument Digital Interface, is a communication standard for transmitting digital music information. It was developed in the 1980s by major synth manufacturers including Korg, Roland, and Yamaha.
MIDI allows you to record the information about the music played, i.e., the notes, timing, and duration (not the actual sound waves), and trigger a range of MIDI instruments (including software instruments).
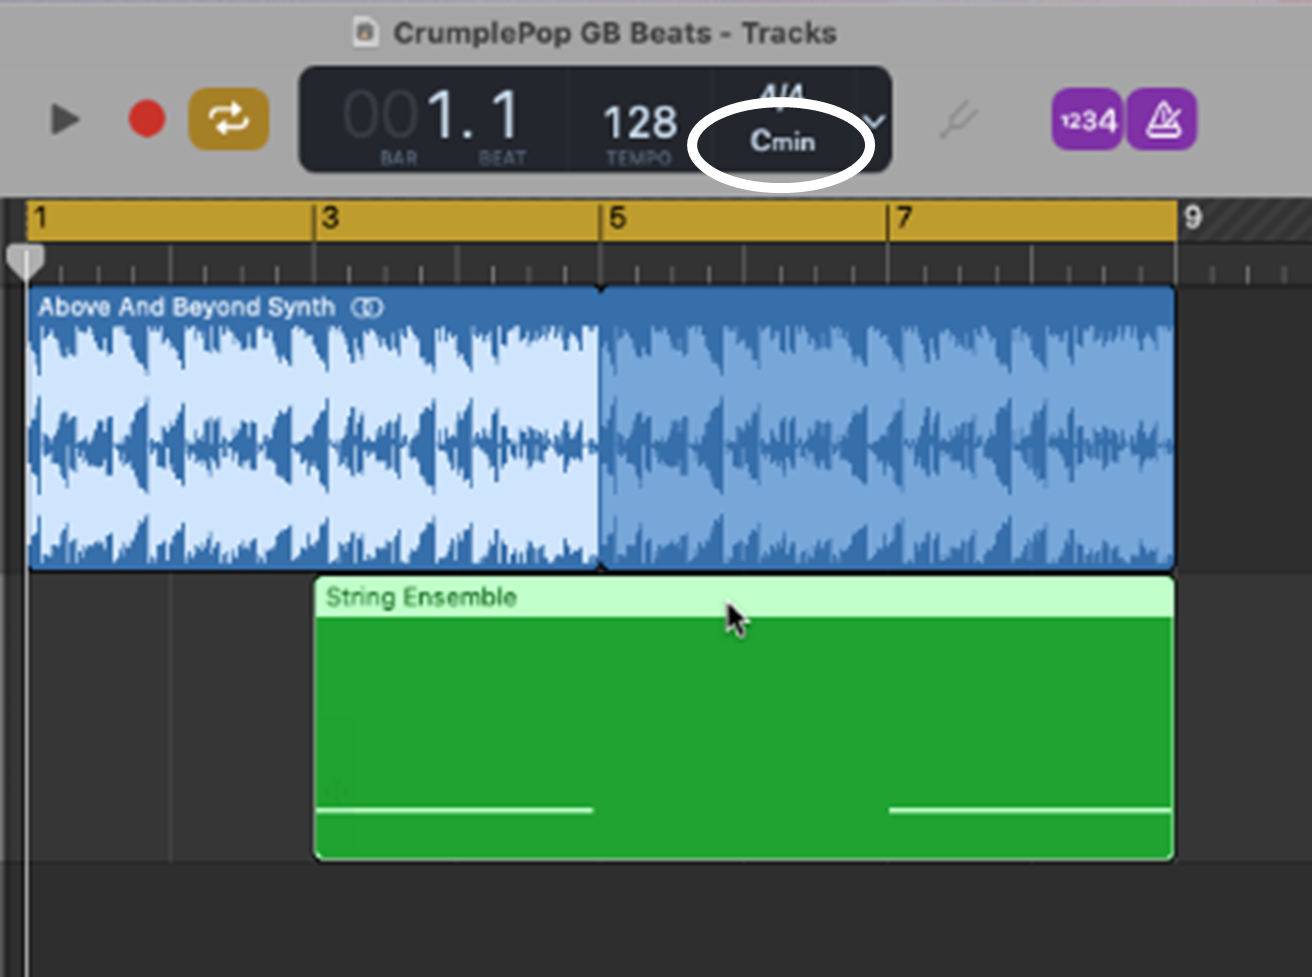
Notice that the key of our project is Cmin—GarageBand has automatically set our project to this key based on the loop used in the first track.
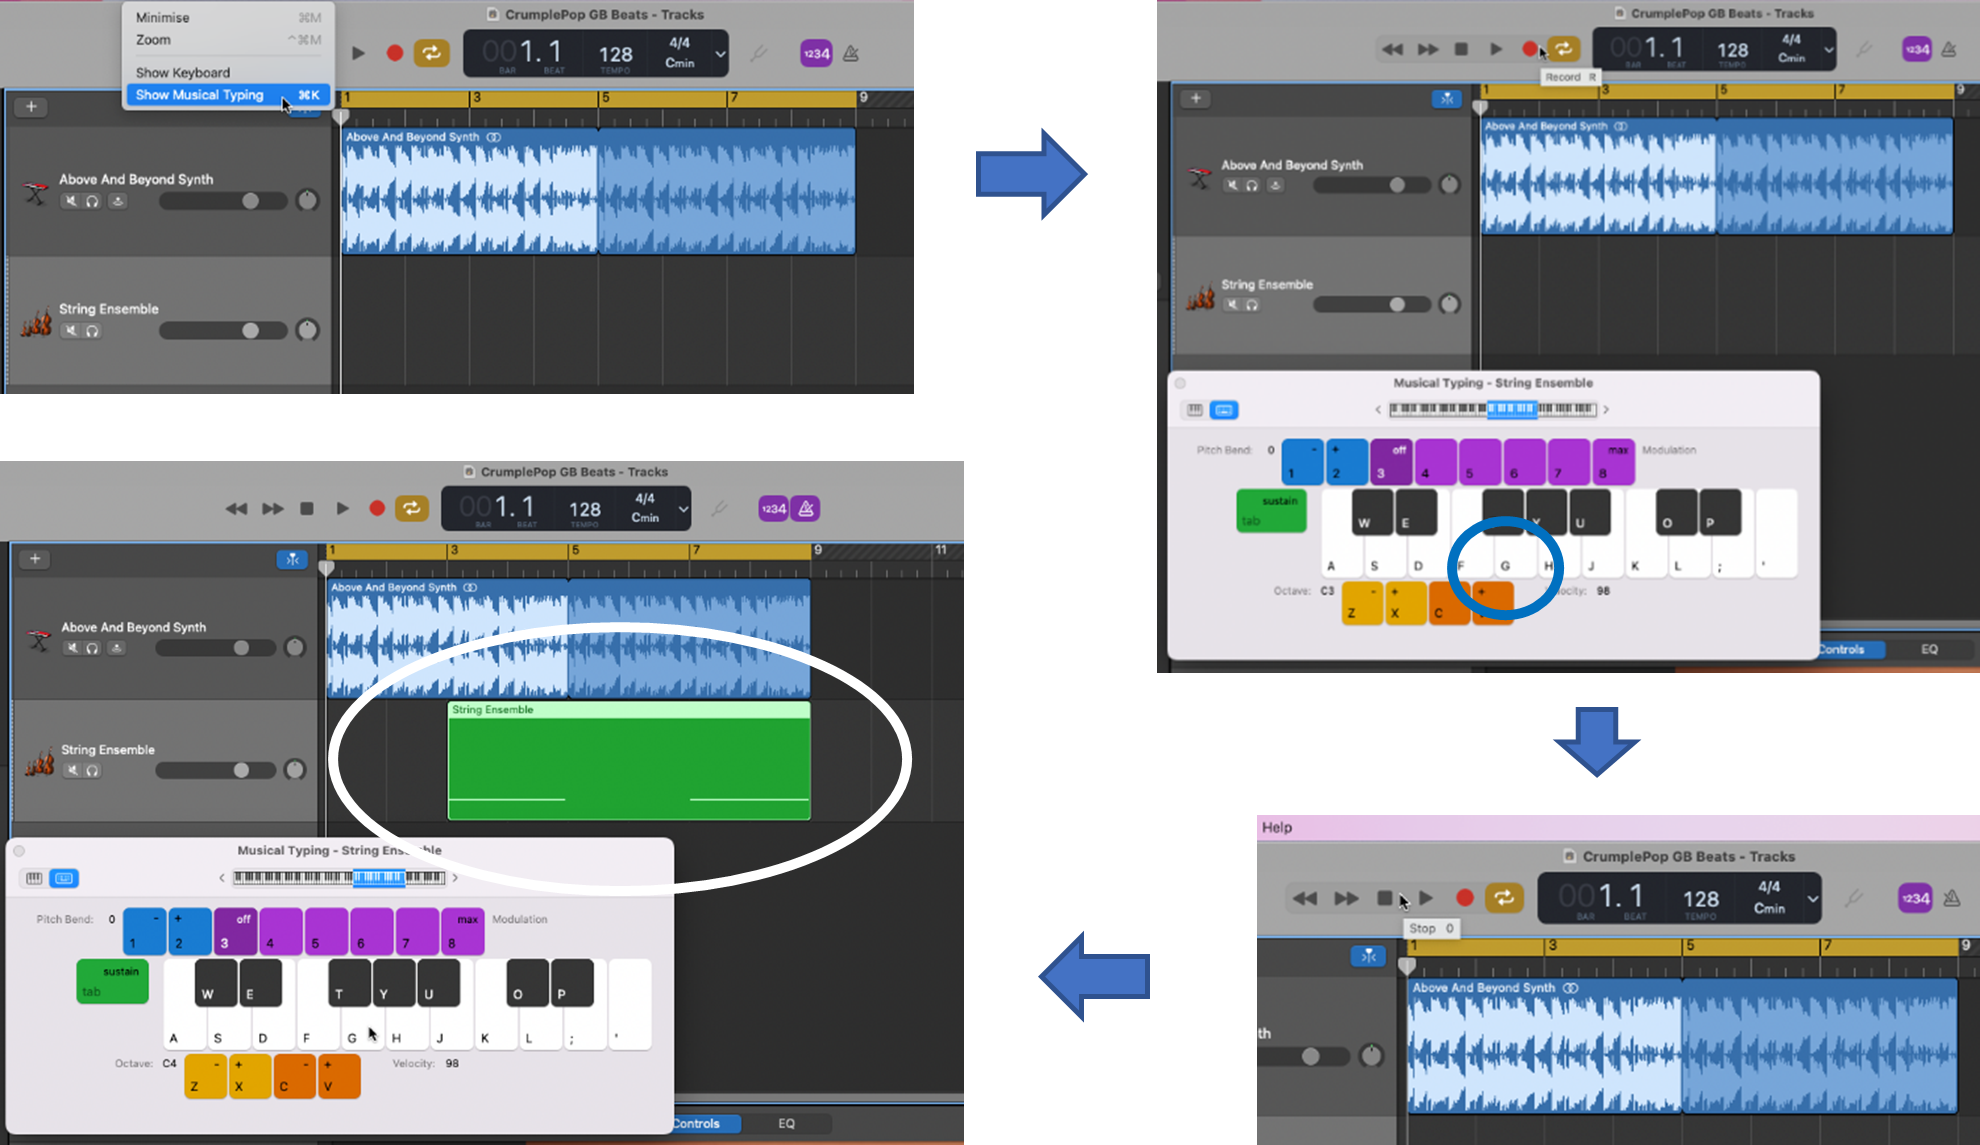
We can add notes or chords to our second track by either playing and recording them (i.e., using a MIDI keyboard, some other type of MIDI controller, or musical typing with your Mac keyboard).
In our case, the loop is already quite busy, so we’ll simply add a bit of a ‘riser’ note using our software strings in bars 3 to 4 and 7 to 8 of our project. We’ll do this using musical typing and recording live MIDI notes.
Step 1: Select a 4-beat count-in (optional).
Step 2: Set up your MIDI input device (i.e., the Mac keyboard in our case.)
Step 3: Start recording your notes.
Step 4: Stop recording once you’ve finished playing your notes.
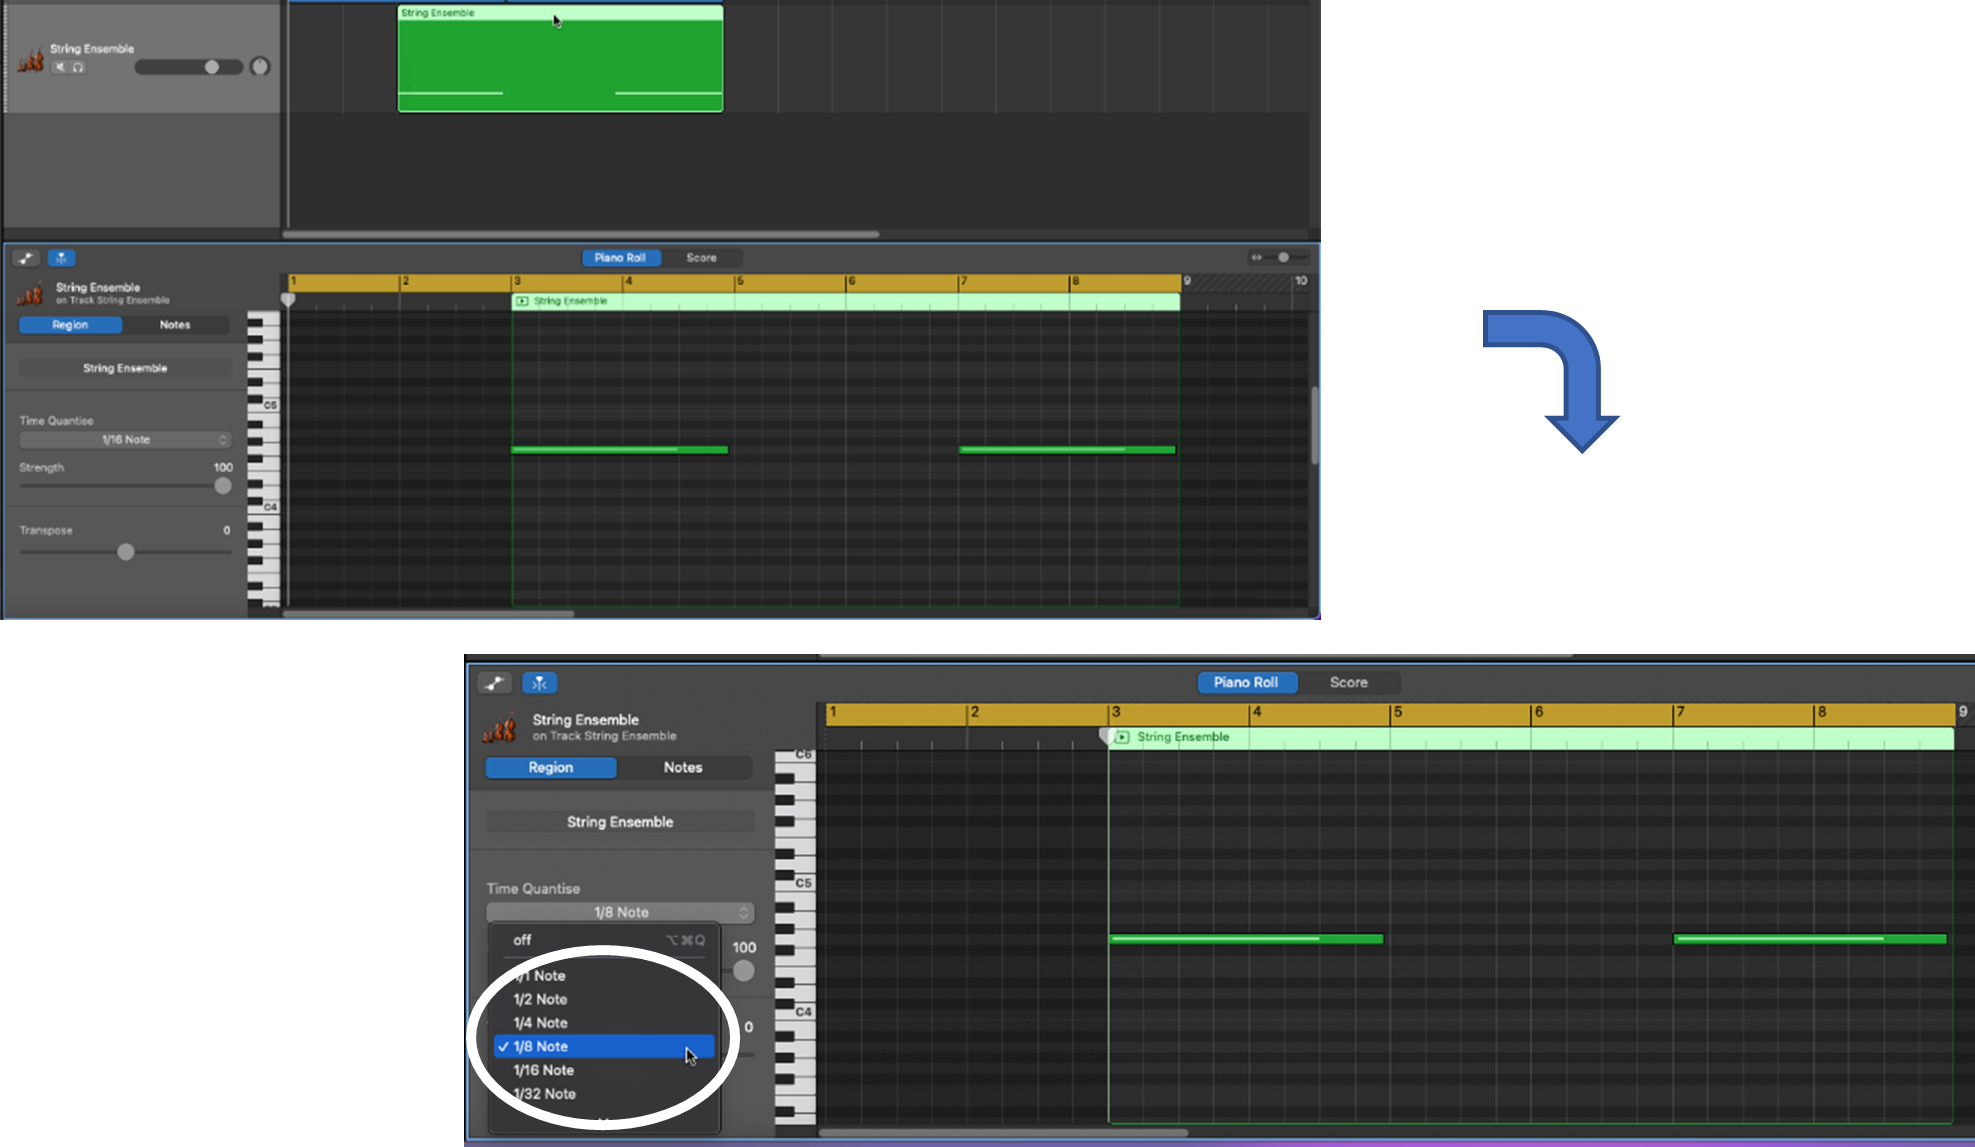
Once you’ve finished recording, you can see your notes (i.e., the MIDI information associated with the notes that you played) and check their pitch, timing, etc., in the piano roll.
Step 1: Double-click the top of your track region to show the piano roll.
The piano roll maps out the timing and duration of the notes that you played. Take a look at it and listen to your track—if you’re happy with it, there’s nothing more to do. If you want to edit the notes, however, it’s easy to do in the piano roll.
In our case, my timing was a bit off, so I’ll fix it by quantizing the notes.
Step 2: Edit your notes (optional).
The track that we’ve just recorded was made with a software instrument using MIDI. As noted, you can also record using a physical instrument such as a guitar.
Remember that MIDI is a way of recording (and transmitting) musical information about the notes played. When you record a physical instrument using a DAW, you’re recording actual audio (i.e., sound waves) created by the instrument. The audio will be digitized so that it can be recorded, stored, and edited by your computer and DAW.
So, there’s a difference between MIDI and digital audio, although they’re both ways to record, store, and edit digital music data.
Let’s record some guitar. We could either add bass lines (using a bass guitar) or guitar chords (using a rhythm guitar). Today, we’ll just add a simple guitar chord.
Step 1: Connect your guitar to GarageBand.
Step 2: Select the + icon at the top of the Track Header region to add a new track. (Shortcut: OPTION+COMMAND+N)
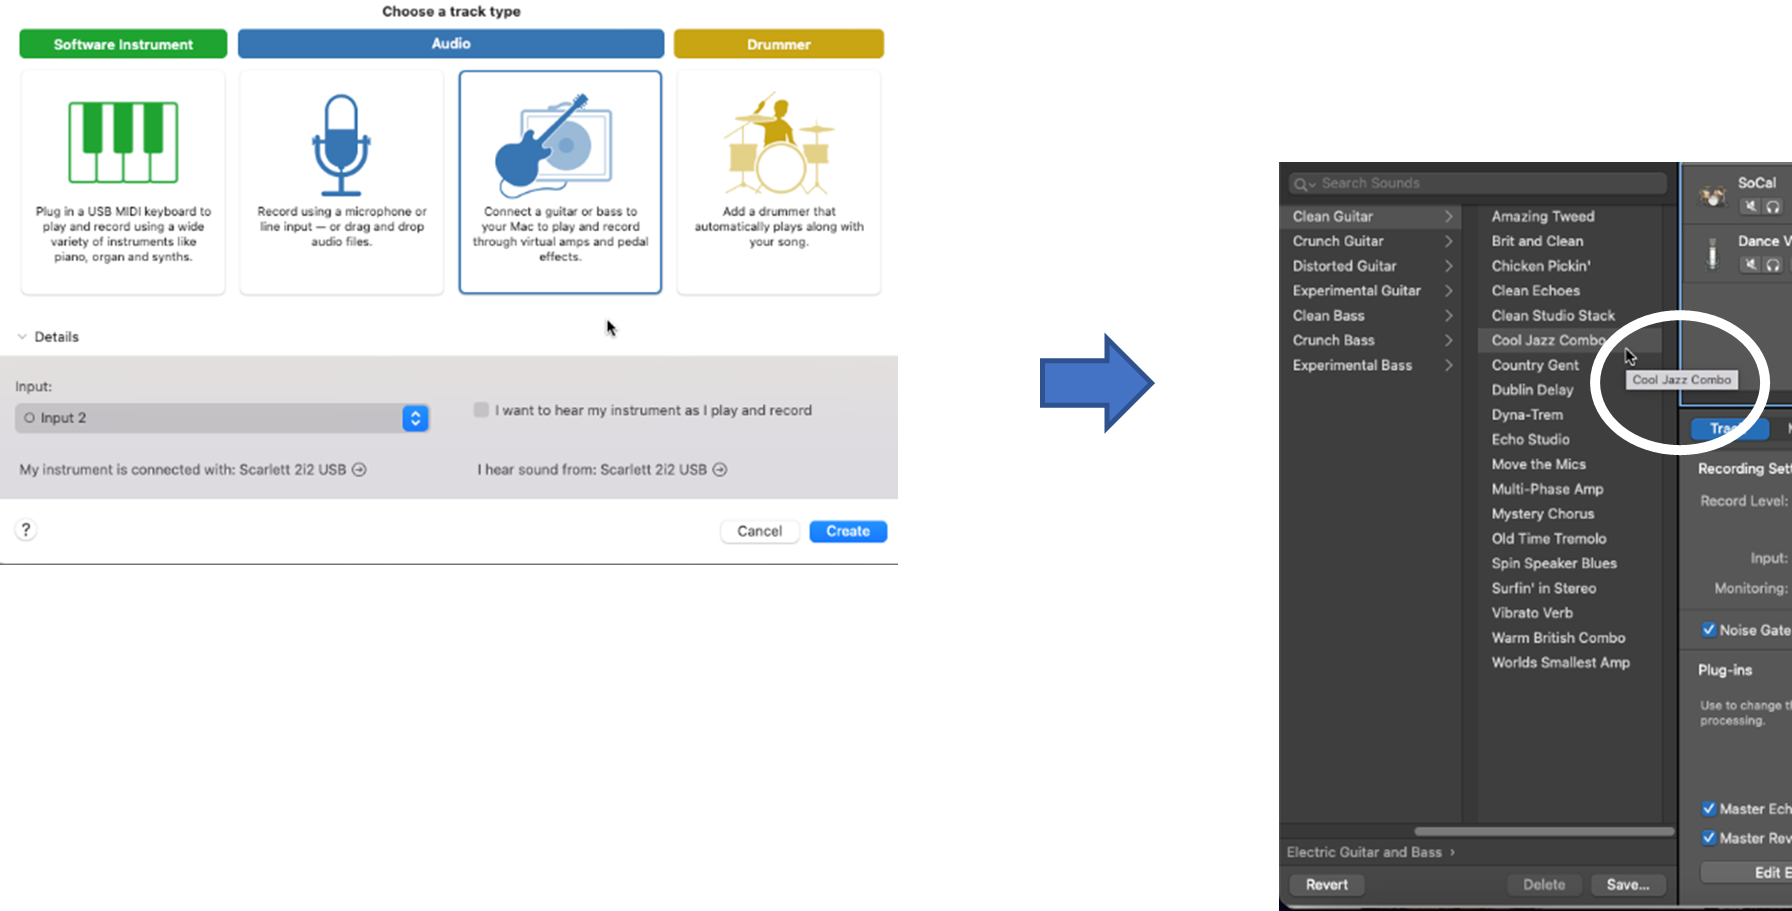
Step 3: Choose to create an Audio track (with the guitar icon.)
Step 4: Set up your audio track’s controls.
I’ll use the Cool Jazz Combo amp sound with its preset patch.
We’ll now record music to the track using a guitar. I’ll play a single Gmin chord (which is in the key of Cmin) in bars 3 to 4.
Step 1: Start recording your notes.
Step 2: Stop recording once you’ve finished playing your notes.
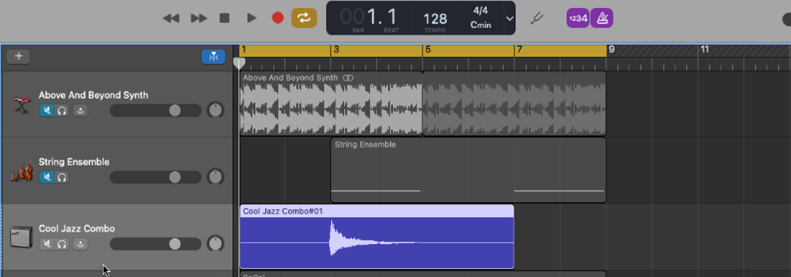
You should see the waveform of what you’ve just played in your newly recorded guitar track.
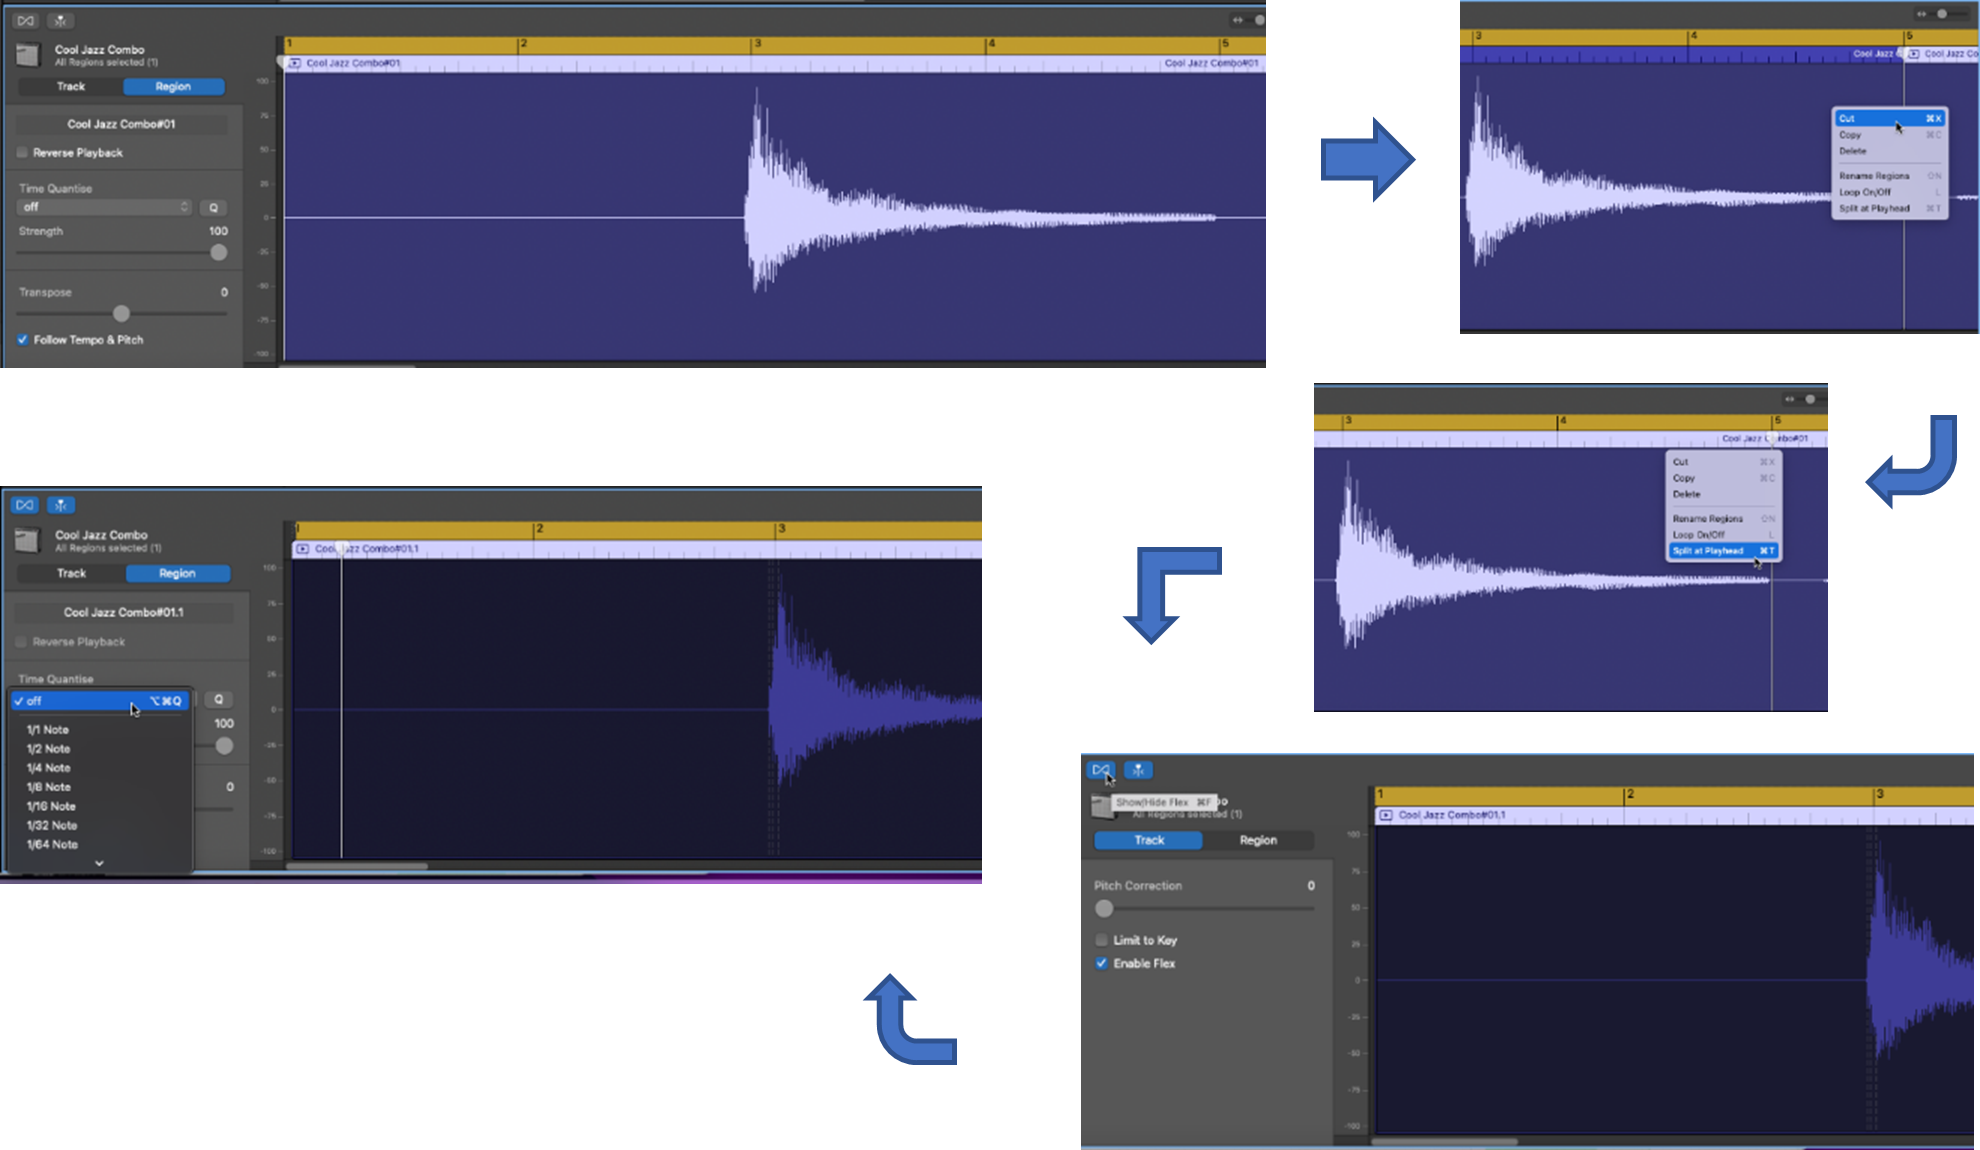
Step 3: Edit and quantize your track (optional).
We now have three tracks—the first with a melodic Apple loop, the second with a single note ‘riser’, and the third with a simple guitar chord.
There are many artistic choices that you can make, of course, and it’s entirely up to you how many tracks you add and what instruments you use. Our project is quite simple, but it serves to illustrate the process.
Let’s now add a fourth track—a drummer track. Clearly, this is a very important track if you’re making beats!
In GarageBand, you have a few options for adding drums:
For our project, we’ll take the first option—choose a virtual drummer. This is a quick and easy way to add drums to a GarageBand project while allowing you to adjust the feel, loudness, and individual drums used (i.e., kick drum, snare, hi-hats, etc.).
Step 1: Select the + icon at the top of the Track Header region to add a new track. (Shortcut: OPTION+COMMAND+N)
Step 2: Choose to create a Drummer.
A new drummer track will be created and you’ll automatically be assigned a Drummer and several drum parameters, including the Beat Preset and default settings for style, loudness, and the parts of the drum kit that are used.
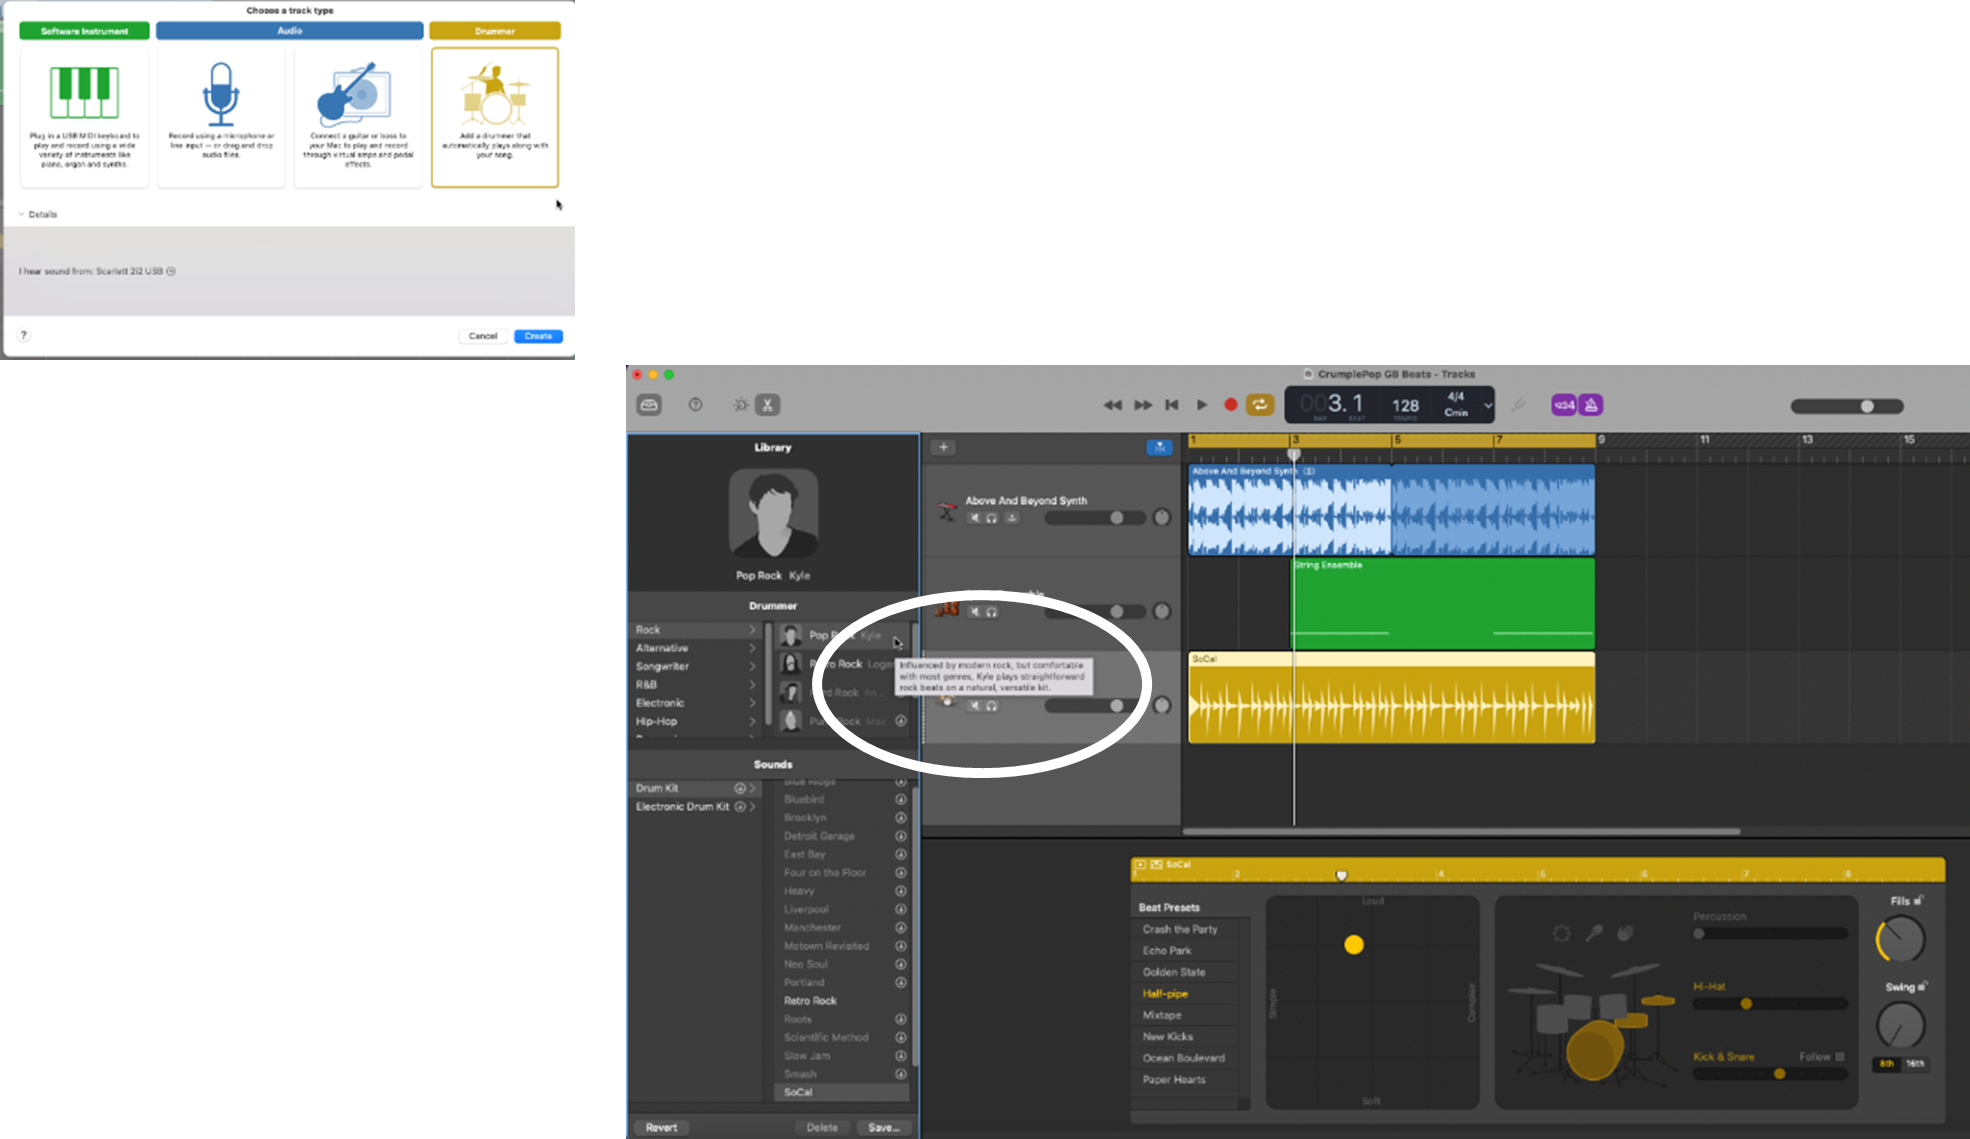
Step 3: Select your Drummer (optional).
If you’re happy with the Drummer that you’ve been assigned, you can omit this step.
Step 4: Edit your drum parameters (optional).
Again, if you’re happy with the drum parameters that you’ve been set up with, you can omit this step.
In my case, I was assigned Kyle as my drummer—he uses a Pop Rock style. I’m ok with this, so I’ll retain him.
I’ve also been set up with a SoCal drum set—I’m ok with this too and will retain it.
As for the drum parameters:
As you can see, there are various ways in which you can adjust the rhythm, style, feel, drum set, individual drums used, and the timing of your drum track—all this with easy-to-adust, click-and-drag settings!
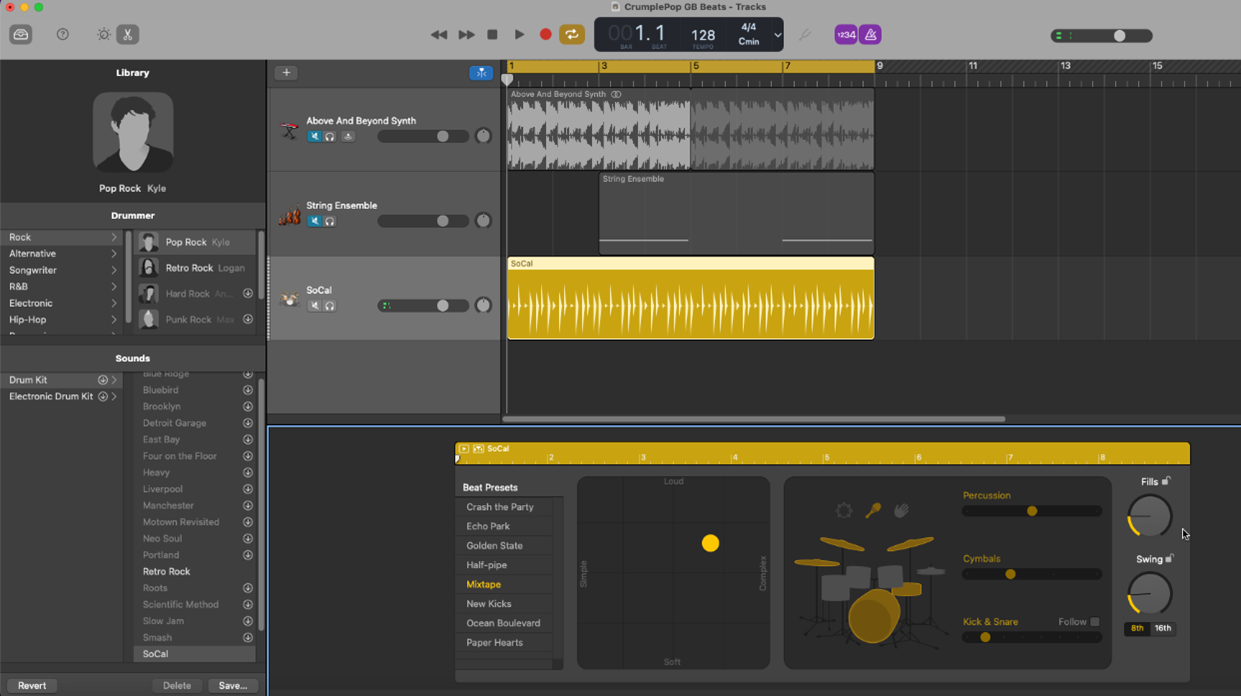
As you can see, GarageBand gives you a great deal of flexibility in creating drum tracks, whether for hip hop, other styles of drum-centric music, or any musical style.
We’re now ready to add a vocal track! This is optional, of course, depending on your artistic choices and whether you want to include vocals when you’re creating beats.
Step 1: Select the + icon at the top of the Track Header region to add a new track. (Shortcut: OPTION+COMMAND+N)
Step 2: Choose to create an Audio track (with the microphone icon).
A new audio track will be added to the Tracks Area.
With a vocal audio track, you have a couple of options for adding audio:
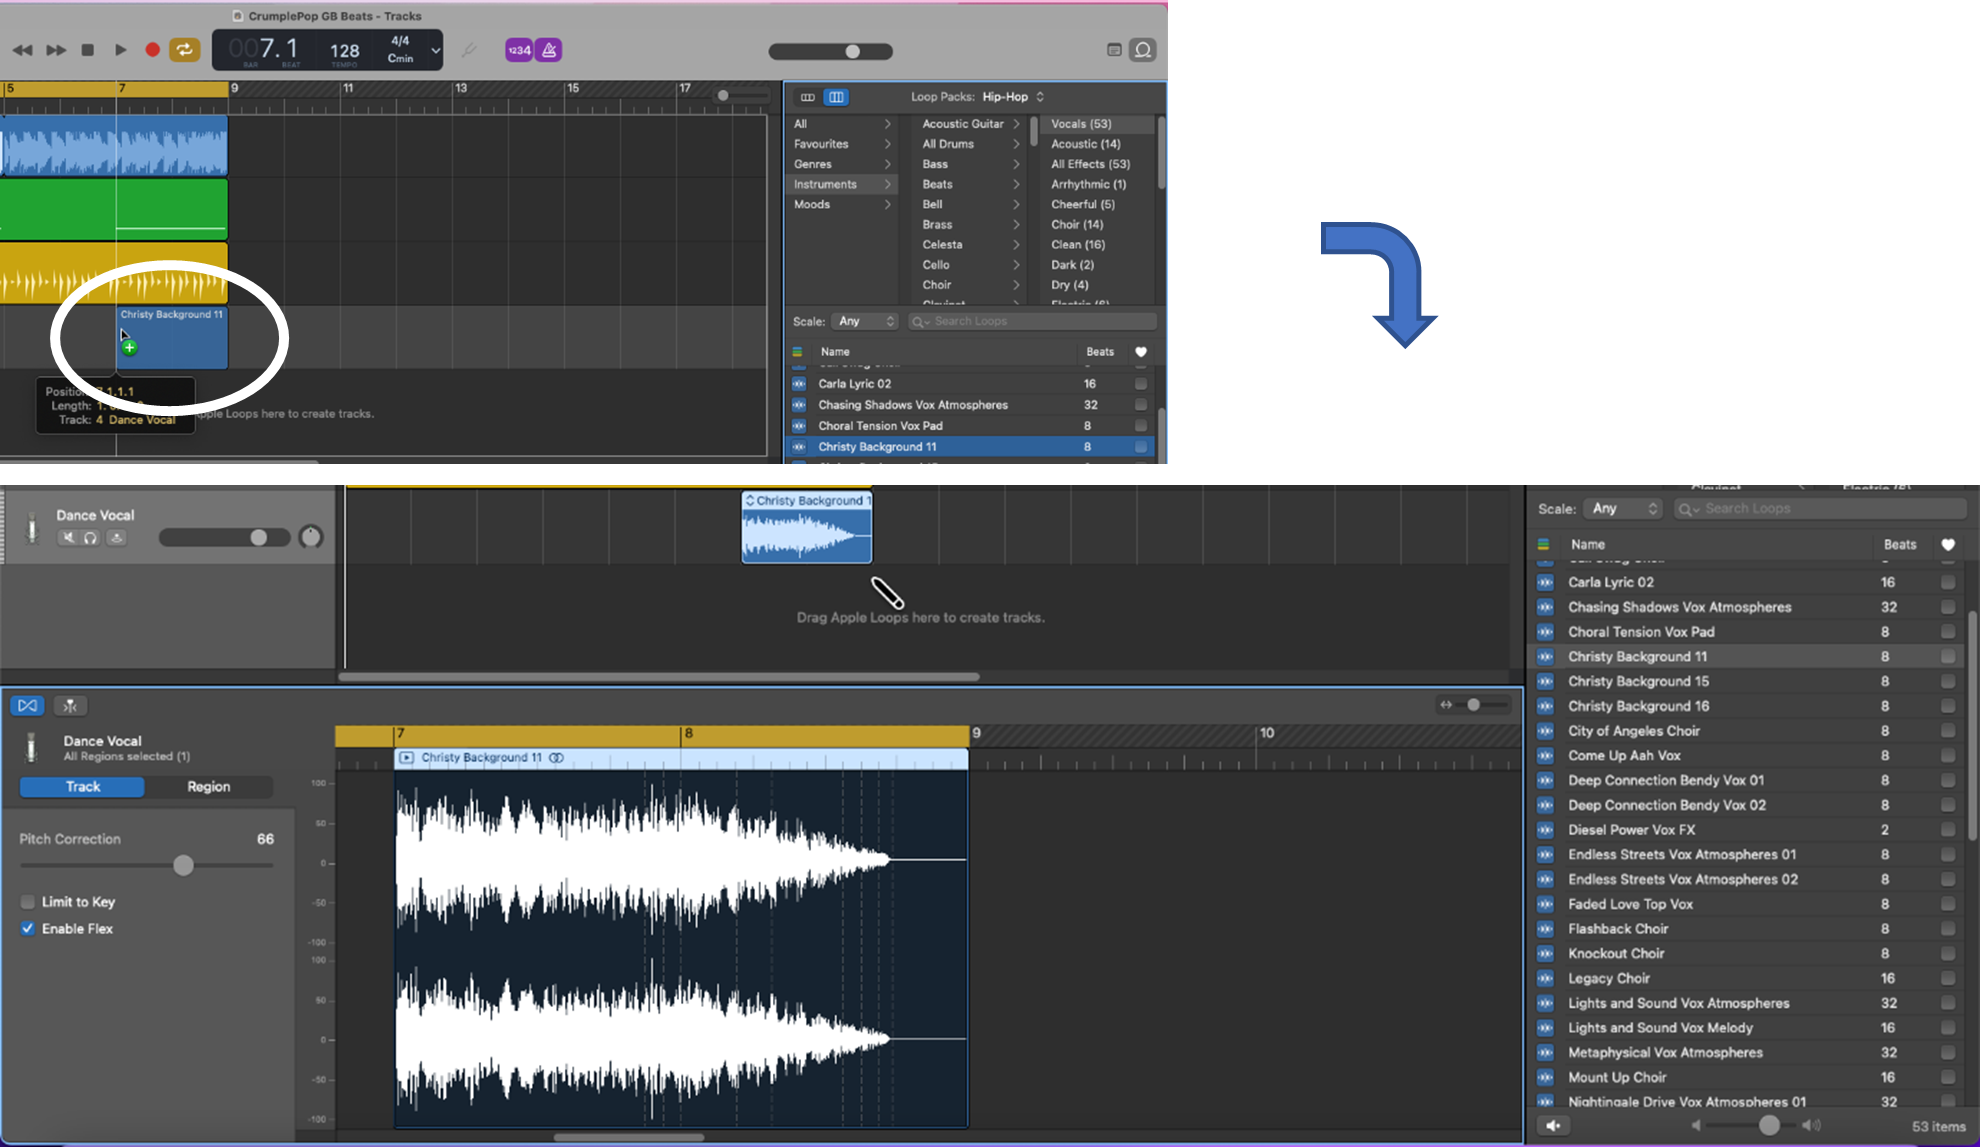
We’ll use an Apple vocal loop.
Step 3: Select the Loop Browser (click the icon in the top-right area of your workspace.)
Step 4: Browse the loops using the Loop Packs menu and select a vocal loop from the Instruments sub-menu.
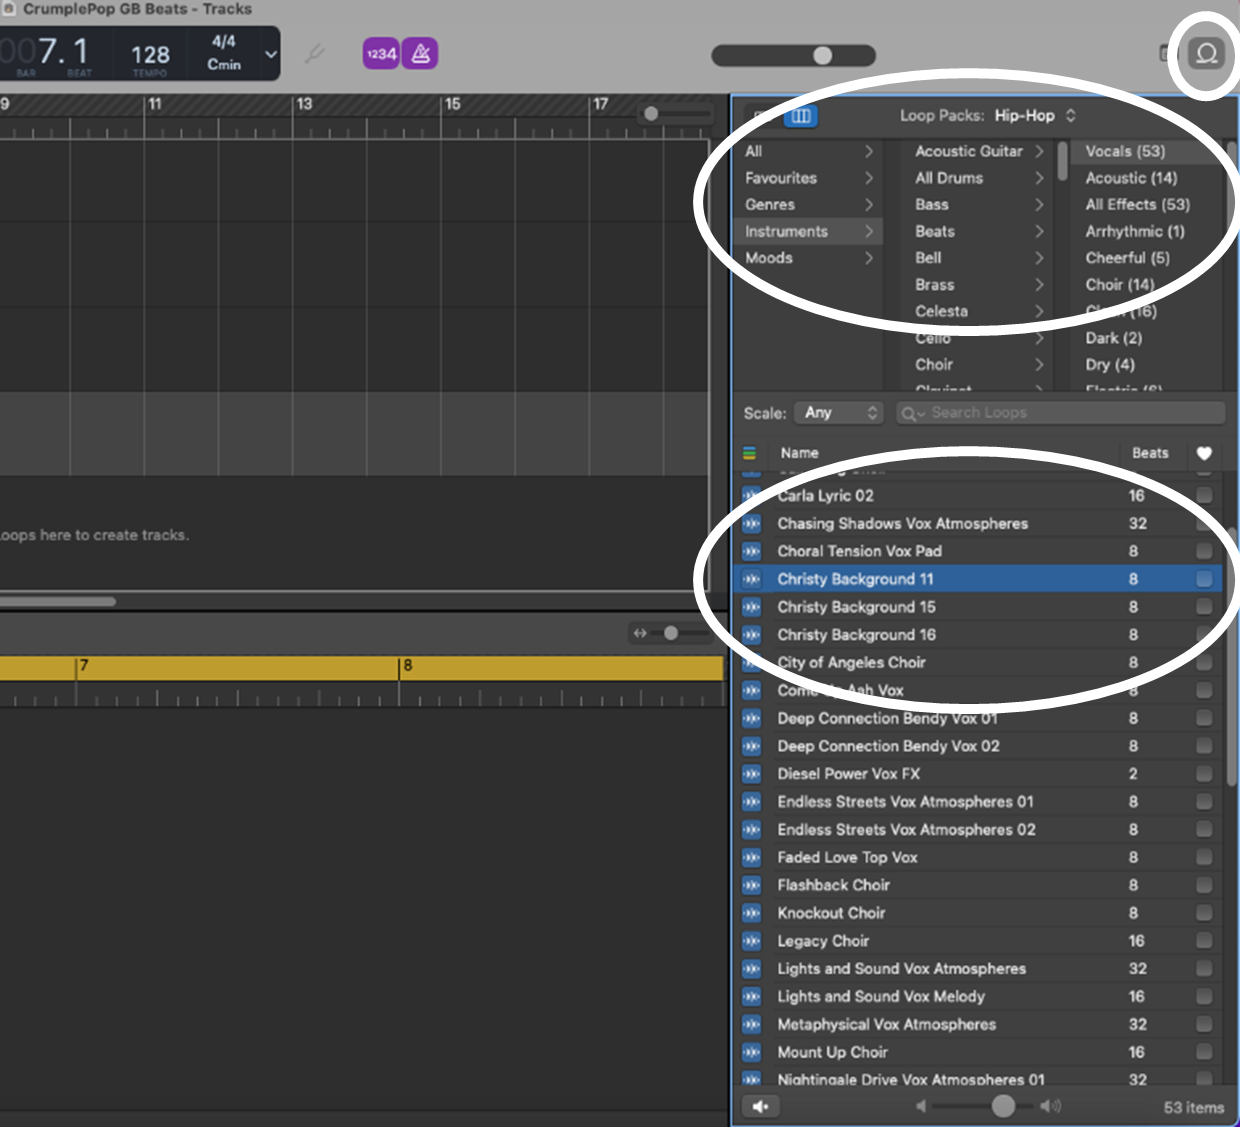
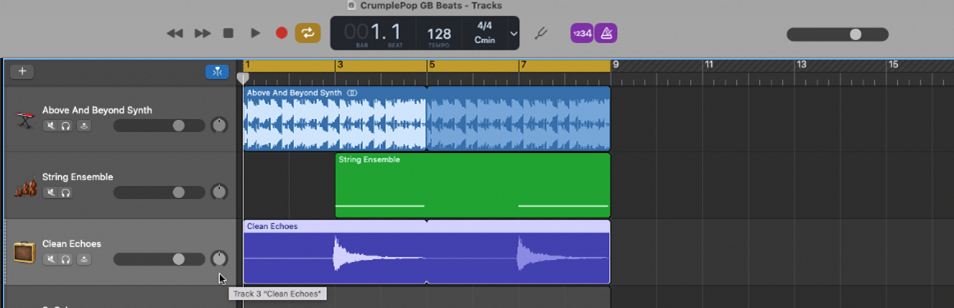
Not all of the Loop Packs include vocals—we’ll choose the Hip Hop Loop Pack, which does include vocals, and select the ‘silky’ voice of Christy (i.e., Christy Background 11). This adds a nice, soulful vocal element to the end of our loop.
A new audio track will be created with your selected loop.
Once you’ve recorded all of your tracks, you’ll need to balance them out in the mixing stage. Then, you’ll bring them together in the mastering stage.
The primary objectives of these stages are:
Mixing and mastering are as much art as they are science and there’s no definitive right or wrong way to do them—experience and judgment help, but most of all, you should focus on making your project sound the way that you want it to sound. You should also eliminate any obvious flaws that are making your project sound terrible!
The first stage of your mix is to set the volume and pan of each track. In GarageBand, you control the volume and pan of individual tracks by changing their settings in each track’s header region. To start, they’ll be set to default values, e.g., 0 dB volume and 0 pan.
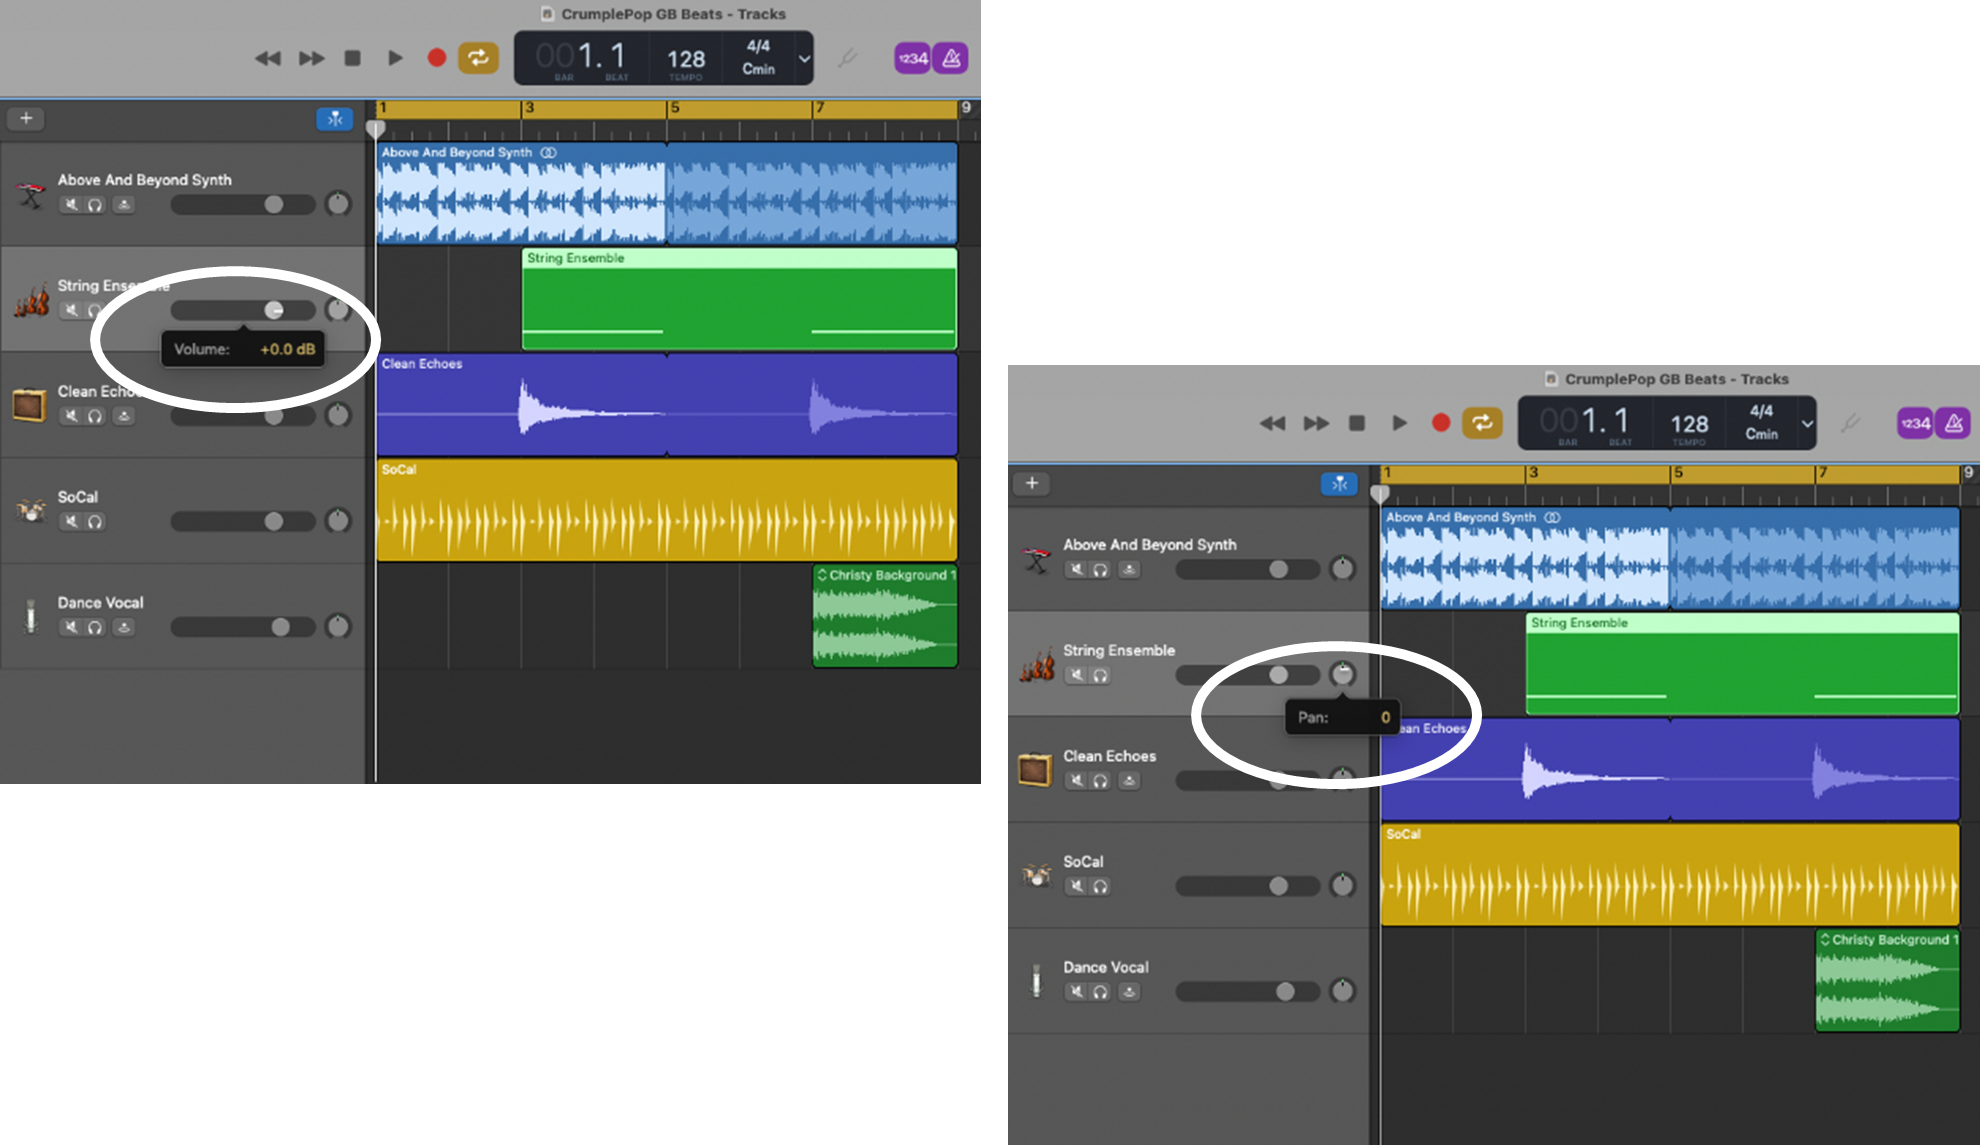
To adjust the volume and pan of a track:
Step 1: Select the track’s header region.
Step 2: Slide the volume bar to the left (lower volume) or to the right (higher volume).
Step 3: Set the pan by rotating the control counter-clockwise (pan to the left) or clockwise (pan to the right).
Adjust the volume and pan of each of the tracks so that when they all play together, you’re happy with how it sounds. Remember, this is an exercise in relative differences in volume and pan so that the whole arrangement sounds good to you.
In our case, I adjusted the guitar track down in volume and to the left in the pan, the strings track up in volume and to the right in the pan, and the vocals down in volume. Everything else is ok, and when the tracks are all played together it sounds good.
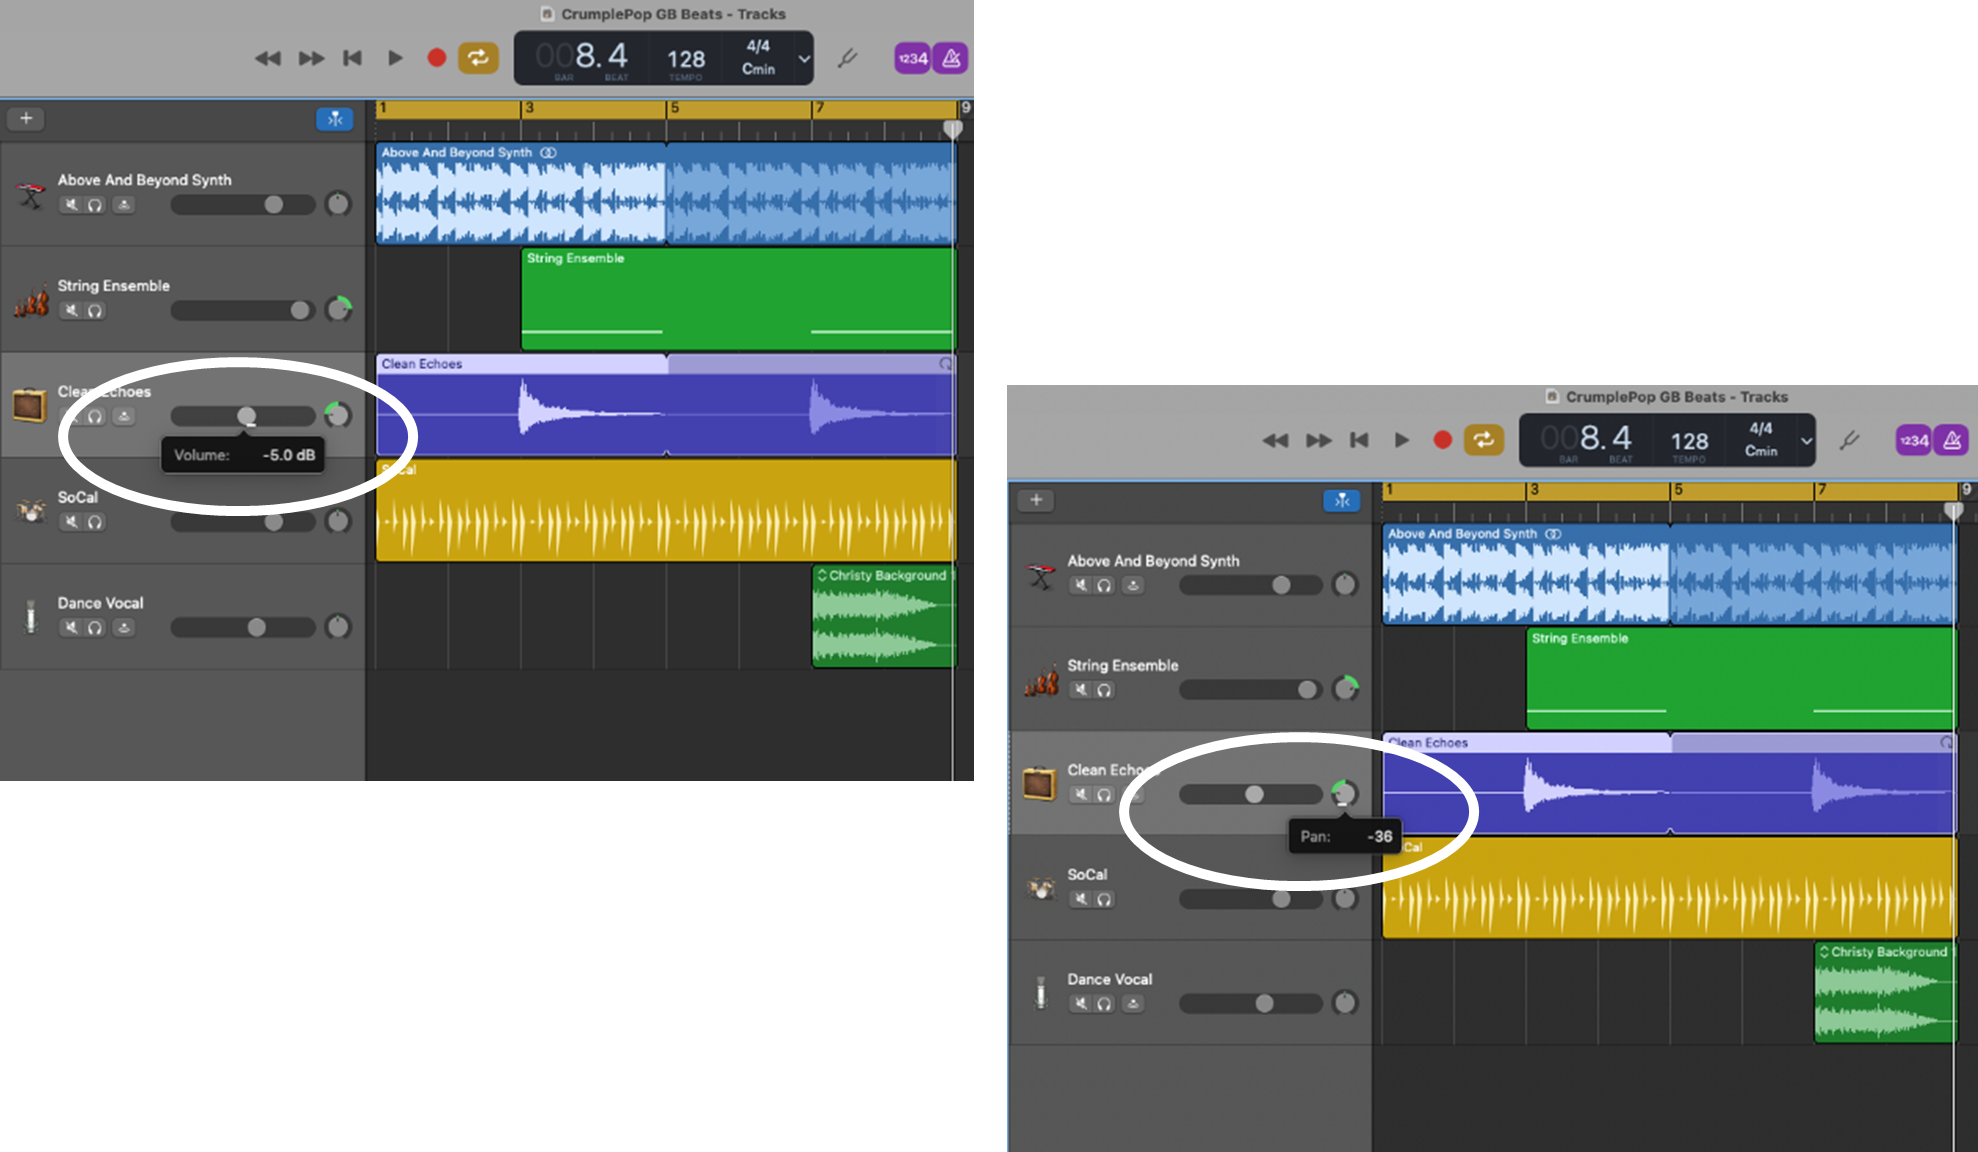
Remember, there’s no right or wrong here, adjust these settings until you’re happy with the way it all sounds.
You can also add effects to your tracks:
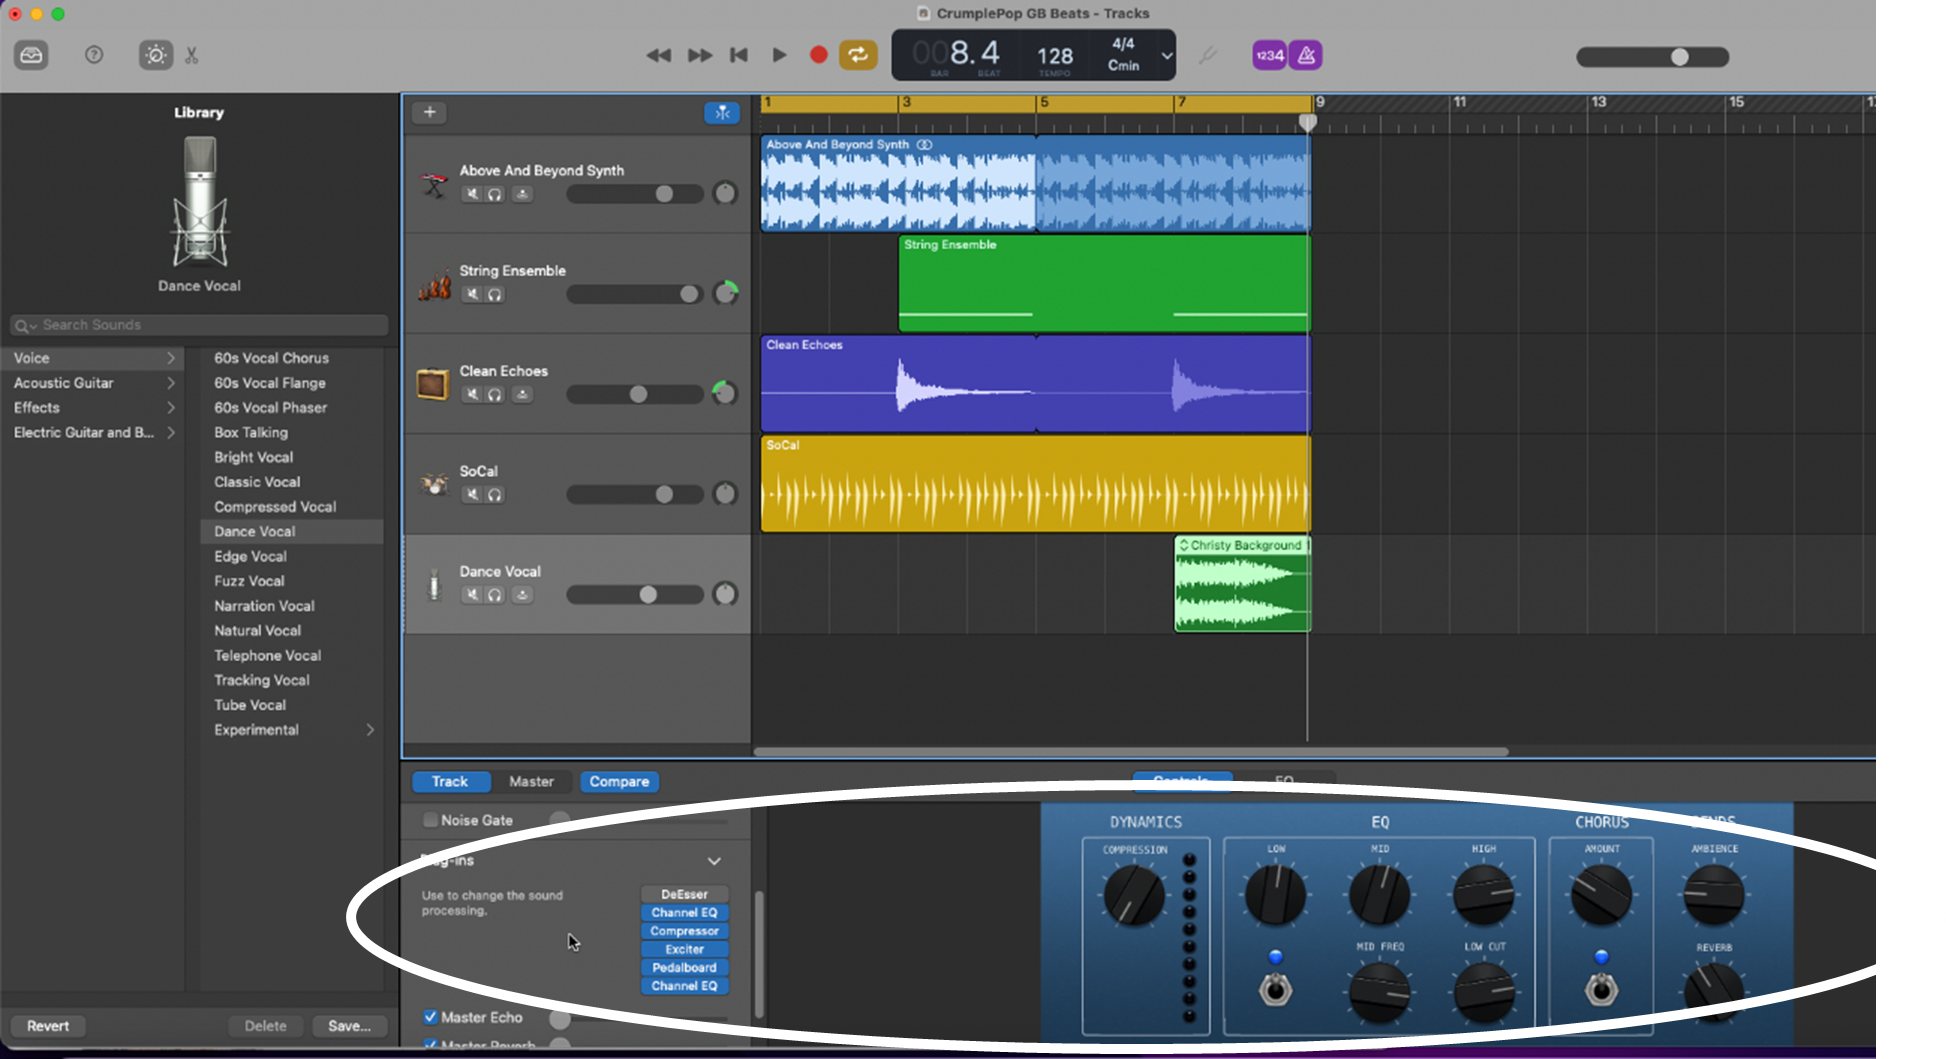
In our case, the preset effects patches sound good, so we won’t change anything.
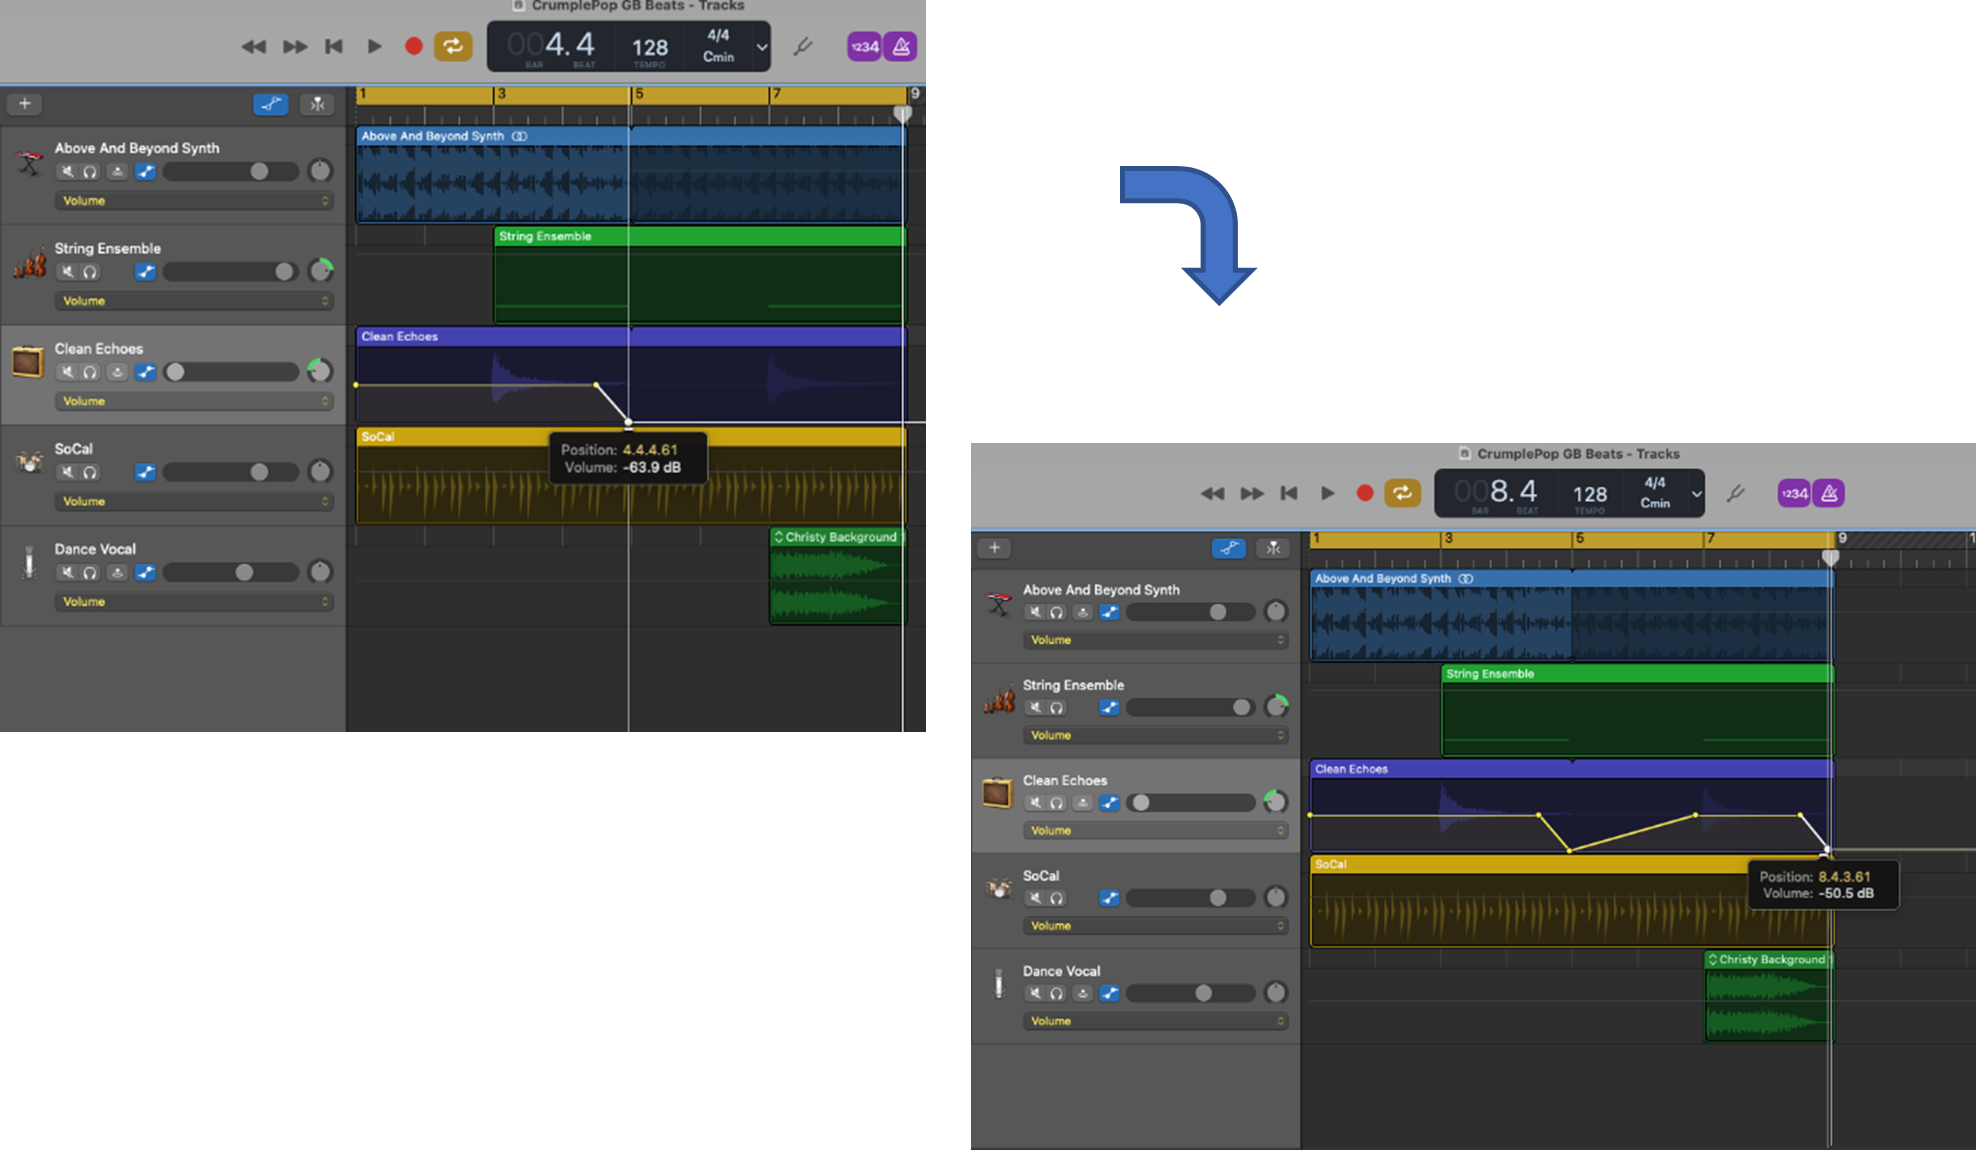
One more thing that you can do in GarageBand is fade in and out individual tracks or crossfade between tracks. This is useful when:
Fades and crossfades are easy to do in GarageBand. For our project, I’d like the guitar chord to fade out so that it doesn’t create a ‘pop’ when it loops. The steps to do this are:
Step 1: Show automation for your tracks by selecting Mix > Show Automation (or pressing A).
Step 2: Select Volume from the automation sub-menu.

Step 3: Create volume points and adjust the fade levels to your liking.
Fades and crossfades are great tools in GarageBand. We breezed through them above, but you can learn how to use them properly with step-by-step instructions by checking out How to Fade Out in GarageBand or How to Crossfade in GarageBand.
We’re nearly done! All that remains is to master your project.
Step 1: Show the master track by selecting Track > Show Master Track. (Shortcut: SHIFT+COMMAND+M)
Step 2: Select the Master Track header.

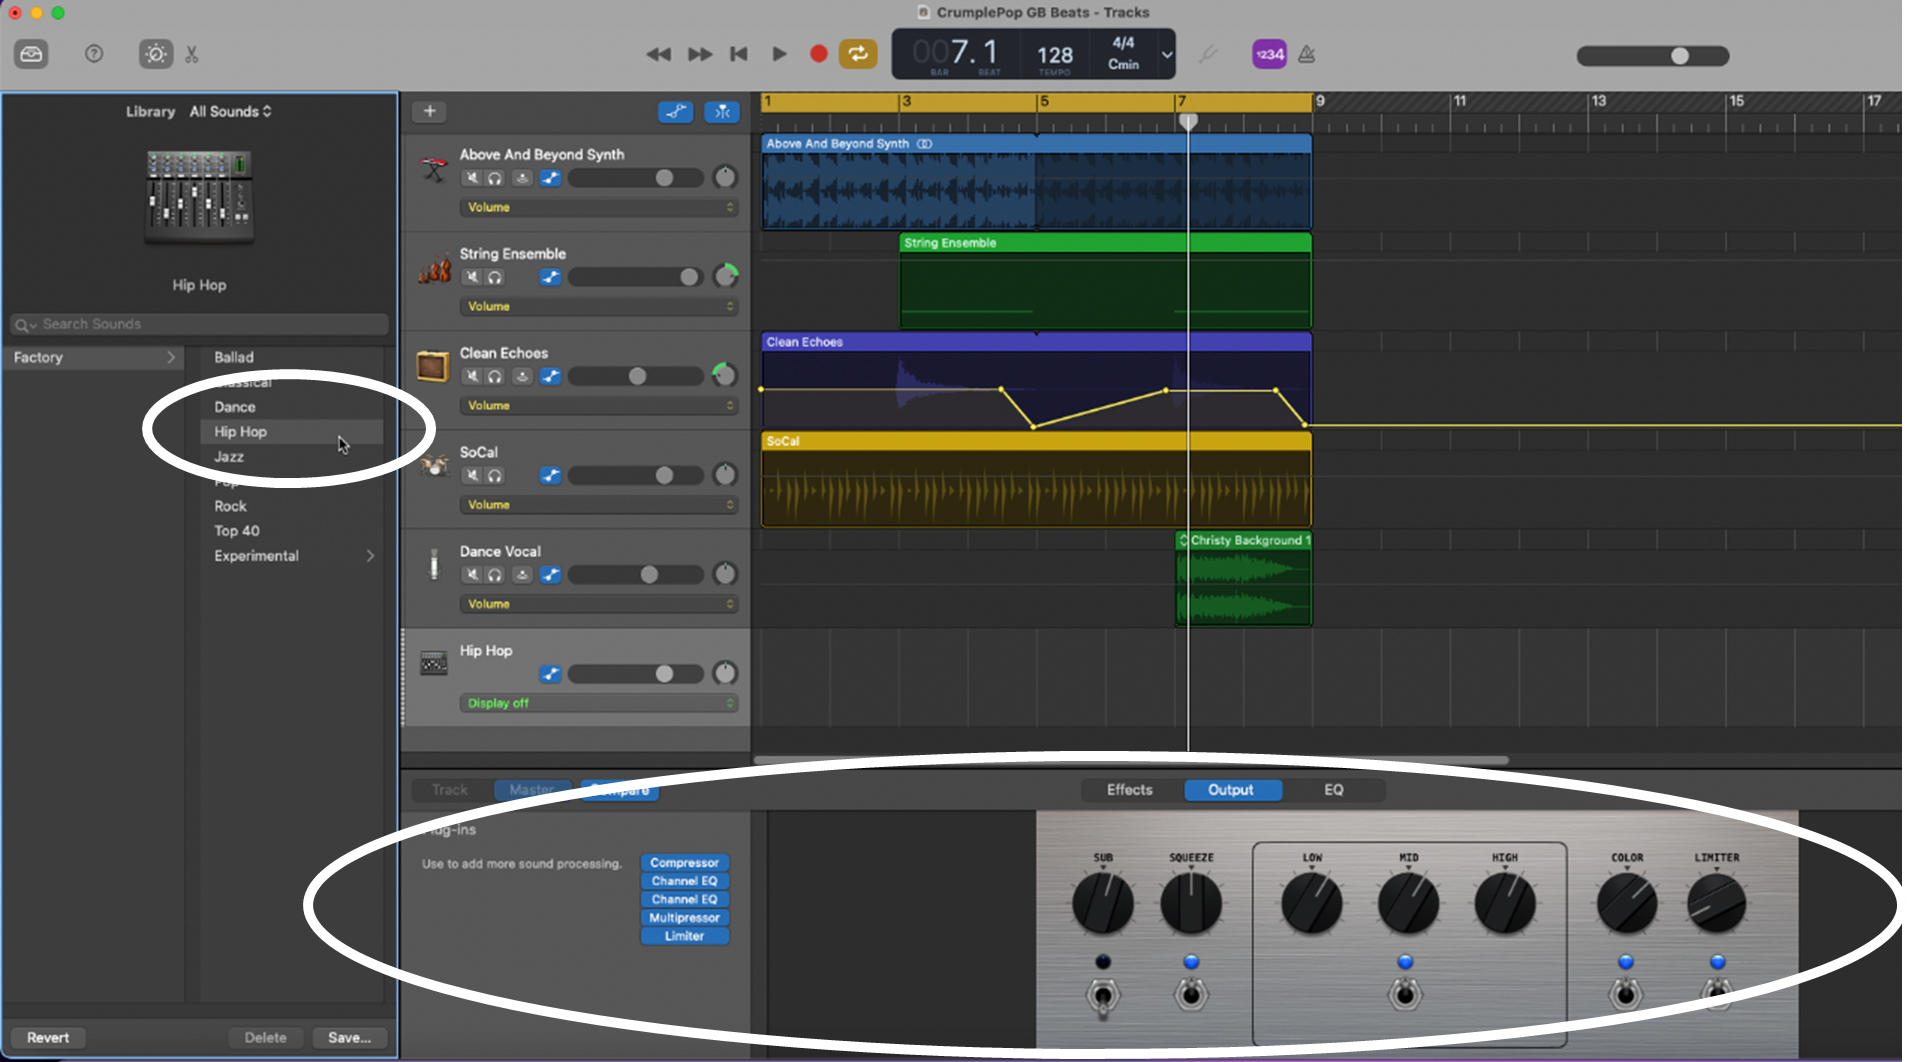
Step 3: Select one of the preset master patches that include EQ, compression, limiting, and plug-ins.
Step 4: Adjust the individual settings of the patch to your liking (optional).
In our case, I’ll select the Hip Hop preset master patch. I’m happy with the way it sounds, so I won’t adjust any of its settings.
When you’re mastering a project, remember that you can adjust the master patch settings if you wish, but also remember that mastering is about making subtle changes, not big changes (don’t adjust the EQ by more than +/- 3 dB in any band, for instance).
You should get as close as you can to your preferred sound during the mixing process—mastering is just for the finishing touches.
When in doubt, choose a preset mastering patch that sounds good and stick with it!
In this post, we created a simple 8-bar loop to show you how to make beats on GarageBand.
Whether you’re making a hip-hop beat or any other type of music, it’s easy to make beats, loops, and songs on GarageBand, as we’ve just seen.
So, if you’re a budding musician or DJ who’s wanting to get into music production, GarageBand is free, powerful, and easy to use—get to it!