JG McQuarrie
Dec 05th, 2022
Whether you are recording video, audio, vocals, podcasts, or something entirely different, hiss is a problem that can rear its head again and again.
And no matter how careful any budding producer, cameraman, or sound person is, there’s always a chance that hiss can inadvertently end up being recorded. Even in loud environments or noisy locations, hiss can still turn up, unwanted noise getting in the way of great-sounding audio.
Hiss noise can be a real problem. But, fortunately, there are many ways to deal with it.
Hiss is something you will be able to identify almost immediately when you hear it. It’s a sound that is most audible at high frequencies and is unwanted noise recorded alongside the audio recording you are trying to capture.
But although the sound is most audible at high frequencies, it is actually recorded across the whole of the audio spectrum — this is referred to as broadband noise (because it’s noise across all of the audio band).
In terms of what you hear on your recording, it sounds like air being let out of a tire, or someone pronouncing a long “S”.
But whatever it sounds like, it’s something you want to avoid recording. Few things undermine the quality of a recording more than unwanted hiss.

Hiss can come from a variety of sources, but the most common is from electronic components. This can be microphones, interfaces, video cameras, or indeed anything with electronics inside it.
The electronic components themselves are where hiss comes from and is called self-noise. It is inevitable — the result of the heat energy created by moving electrons. All audio circuits generate some level of self-noise. The noise floor is the level of a circuit’s inherent noise, expressed in decibels (dB).
The amount of hiss that electronic components generate is dependent on the screening and the quality of the actual components themselves. Cheap or poorly made equipment will generate far more hiss than expensive, well-manufactured gear that has been properly screened.
No equipment produces zero self-noise. As a rule of thumb, the more expensive the hardware you invest in, the less self-noise will be generated. And the less background noise you have to deal with, the less noise reduction needs to be applied to your audio tracks.
Poor-quality audio cables can also contribute to hum and hiss being picked up when you record. Cables are usually screened to help cut down on this, but screening can crack or become less effective in older cables, or jacks can become damaged.
And cheaper cables will inevitably have less good screening than more expensive ones.
All this can contribute to his on your recorded audio.
Fortunately, there are plenty of ways you can reduce and remove hiss from your audio.

Plug-ins come in many different varieties. CrumplePop’s AudioDenoise plug-in works with Premiere Pro, Final Cut Pro, Logic Pro GarageBand, and other DAWs and provides studio-quality denoising.
This works exceptionally well on hiss, of course, as well as being extremely effective on other sounds. Fridges, air conditioners, and many other sounds simply disappear from the audio, and you are left with a clear, clean-sounding end result.
The software itself is simple to use — adjust the strength of the denoise then check your audio. If you are happy with the results, that’s it! If not, simply adjust the strength and check again.
However, there are plenty of other plug-ins on the market. Some of them are bundled with DAWs, others will need to be downloaded and installed.
There are audio plug-ins for all DAWs and all budgets. All you need to do is choose one!

Noise Gates are a simple tool that almost all DAWs (digital audio workstations) have.
A noise gate is a tool that allows you to set a threshold for sound. Anything which is below that sound is automatically cut out.
Using a noise gate works well for hiss, and can also be effective at removing other unwanted noises as well. By adjusting the threshold of the noise gate you can adjust how much sound is let through. It is particularly handy to use during sections where there is no sound at all.
So, for example, if you have two podcast hosts and one is silent when the other is talking, using a noise gate to remove any hiss would work well.
Using a noise gate is simple and generally only requires adjusting a slider to set the volume threshold, though more involved ones are available. This makes it an ideal technique for beginners to get to grips with.
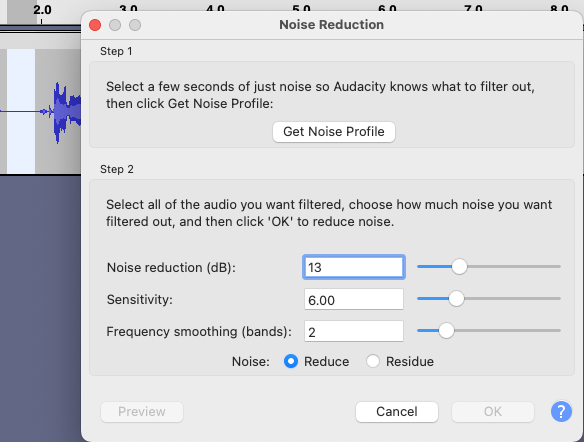
Many DAWs come with noise removal as part of their feature set to eliminate background noise. These can be high-end professional pieces of software like Adobe Audition or free like Audacity. Audacity actually has a very effective noise-removal effect.
What the Noise Removal tool does is take a part of the audio that contains the hiss, analyze it, then remove the unwanted sound from either the whole track or a section of it.
To do this, you need to highlight a part of the audio file that has the unwanted hiss noise on it. Ideally, this should be a part of the audio track where there is no other sound featured other than what you want to remove. When a podcast host has stopped speaking or when a singer is in-between lines would be ideal.
This is then analyzed by the software so it can identify the sounds which need noise reduction. You can then apply this to the track as necessary.
Audacity also allows you to adjust different settings such as the sensitivity and amount of noise reduction, so you can always tweak the settings until you find a result that you are happy with.
There are lots of good ways to deal with hiss.

It sounds obvious, but the less hiss you have on the recording, the less hiss you will need to deal with when it comes to noise removal in post-production. This means checking that you have good-quality audio cables, good equipment to capture your sound, and ensuring that you are as isolated as possible from any other stray sounds that your microphone might pick up.
It’s better to eliminate the problem before it occurs rather than trying to fix it with noise reduction after the fact!
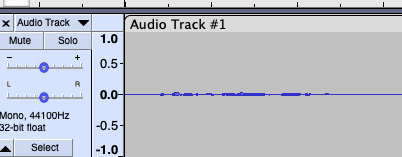
Record some background noise before you start recording your actual audio. Don’t speak or do anything else, just record the ambient sound.
This is known as getting the room tone. Your microphone will pick up any hiss and you will be able to easily identify it without any other sounds getting in the way.
This means you can either take manual action to eliminate anything causing hiss, such as turning off any unnecessary equipment that might be generating hiss, checking your leads and connections, etc.
Or if you are going to use a Noise Removal tool in your DAW it gives the software a nice, clean recording to be analyzed so that the noise removal can be as effective as possible.

When you are recording, you want to ensure the audio is recorded cleanly and with a good, strong signal. However, turning the gain on your microphone up high will not only mean a high volume for your recording, but it will also amplify any hiss which is present, making noise removal harder.
To address this, you need to experiment a little. Turn the gain down to a level that allows the capturing of a good audio signal but which keeps the hiss as low as possible.
There’s no one correct setting for this, as every set-up is different depending on the equipment being used. However, it is worth spending the time to get this balance right as it can make a big difference as to the amount of hiss which gets captured.
Many recording spaces seem great, to begin with, but when you listen back you start to notice all sorts of hiss and background noise. It’s worth taking the time to ensure that your recording environment is set up in the most optimal way possible.
If it’s possible to invest in soundproofing this can make a big difference — sometimes hiss can be generated by equipment that isn’t even in the room and even simple soundproofing can dramatically cut down the amount of hiss that gets captured.
When you are recording it’s also a good idea to ensure the distance between the person you are recording and the microphone is correct.
The closer your subject is to the microphone, the stronger the recorded signal is going to be. That means less hiss will be audible, so less noise removal needs to be applied to your audio files.
This is also true for any other background noises which might potentially be captured too.
As a rule, you want to keep the subject you are recording as close to the microphone as possible, but not so close that they cause plosives on the recording. As with a lot of these techniques, this will take a little practice to get right, depending on both your host and your recording equipment. But it will be time well spent, and the results will be worth it.
Hiss is an annoying problem. Unwanted sounds are something that everyone struggles with, from the most amateur podcast producer to the most expensive professional recording studio. Even the best environments can suffer from it.
However with a little time, patience and knowledge, hiss can become a thing of the past and you will be left with pristine, clean audio.


