If you regularly record sound, one challenge you’ll often face is cleaning up your recordings in post-production, i.e., reducing noise, unwanted silences, and irregular volume dynamics to improve audio quality.
In this post, we’ll show you how to clean up your audio using Audacity. Whether for live performances, voice recordings, or background music, it’s easy to improve audio quality with Audacity.
Reasons for Using Audacity for Editing Audio
Audacity is a free, open-source, cross-platform, and versatile editor for audio recordings. With Audacity, you can:
Work with 16-bit or 24-bit recordings
Import an audio track and use a range of essential audio editing tools
Convert files across different formats, e.g., WAV, AIFF, AU, FLAC, and MP3
Mix and combine audio files
Work with a variety of platforms, including Windows, Linux, and Mac OS
While Audacity’s features are limited compared with more sophisticated (mostly paid) DAWs, it is capable and easy to use, making it a popular choice with audio enthusiasts and researchers worldwide.
How to Clean Up Audio Using Audacity
There are many ways to clean up audio—how much noise you’re comfortable with and the overall sound you’re after will guide your approach. In this post, we’ll look at reducing background noise, removing pops and clicks, trimming silences, and normalizing volume.
1. Import or Make a Copy of the Audio File You’re Cleaning Up
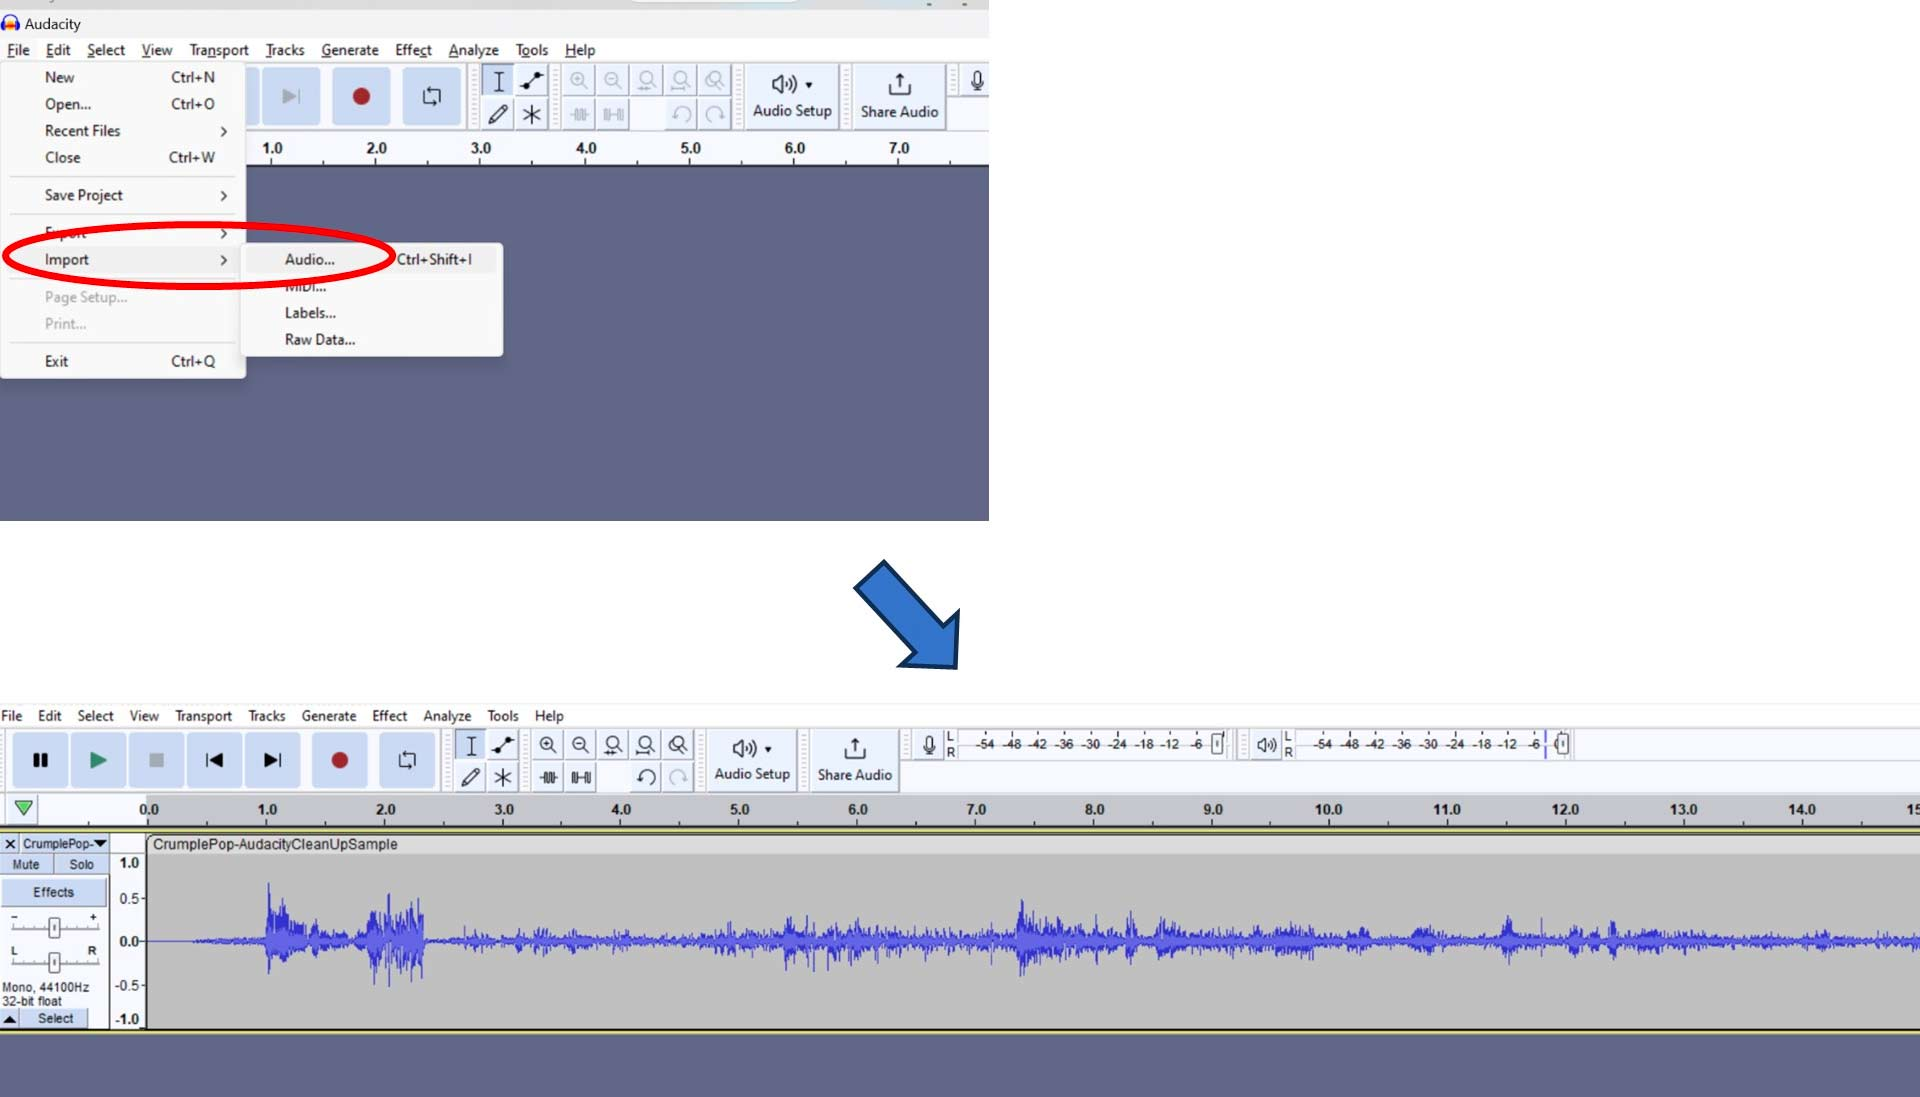
With Audacity installed, the first step is to import the audio file that you want to clean up:
Find the audio file that you want to clean up and select it
Audacity will open up the file and display its waveform, ready for you to edit.
Note that if you have difficulty importing some file formats, e.g., M4A files, you can convert them using an additional tool such as FFmpeg which can be easily installed in Audacity.
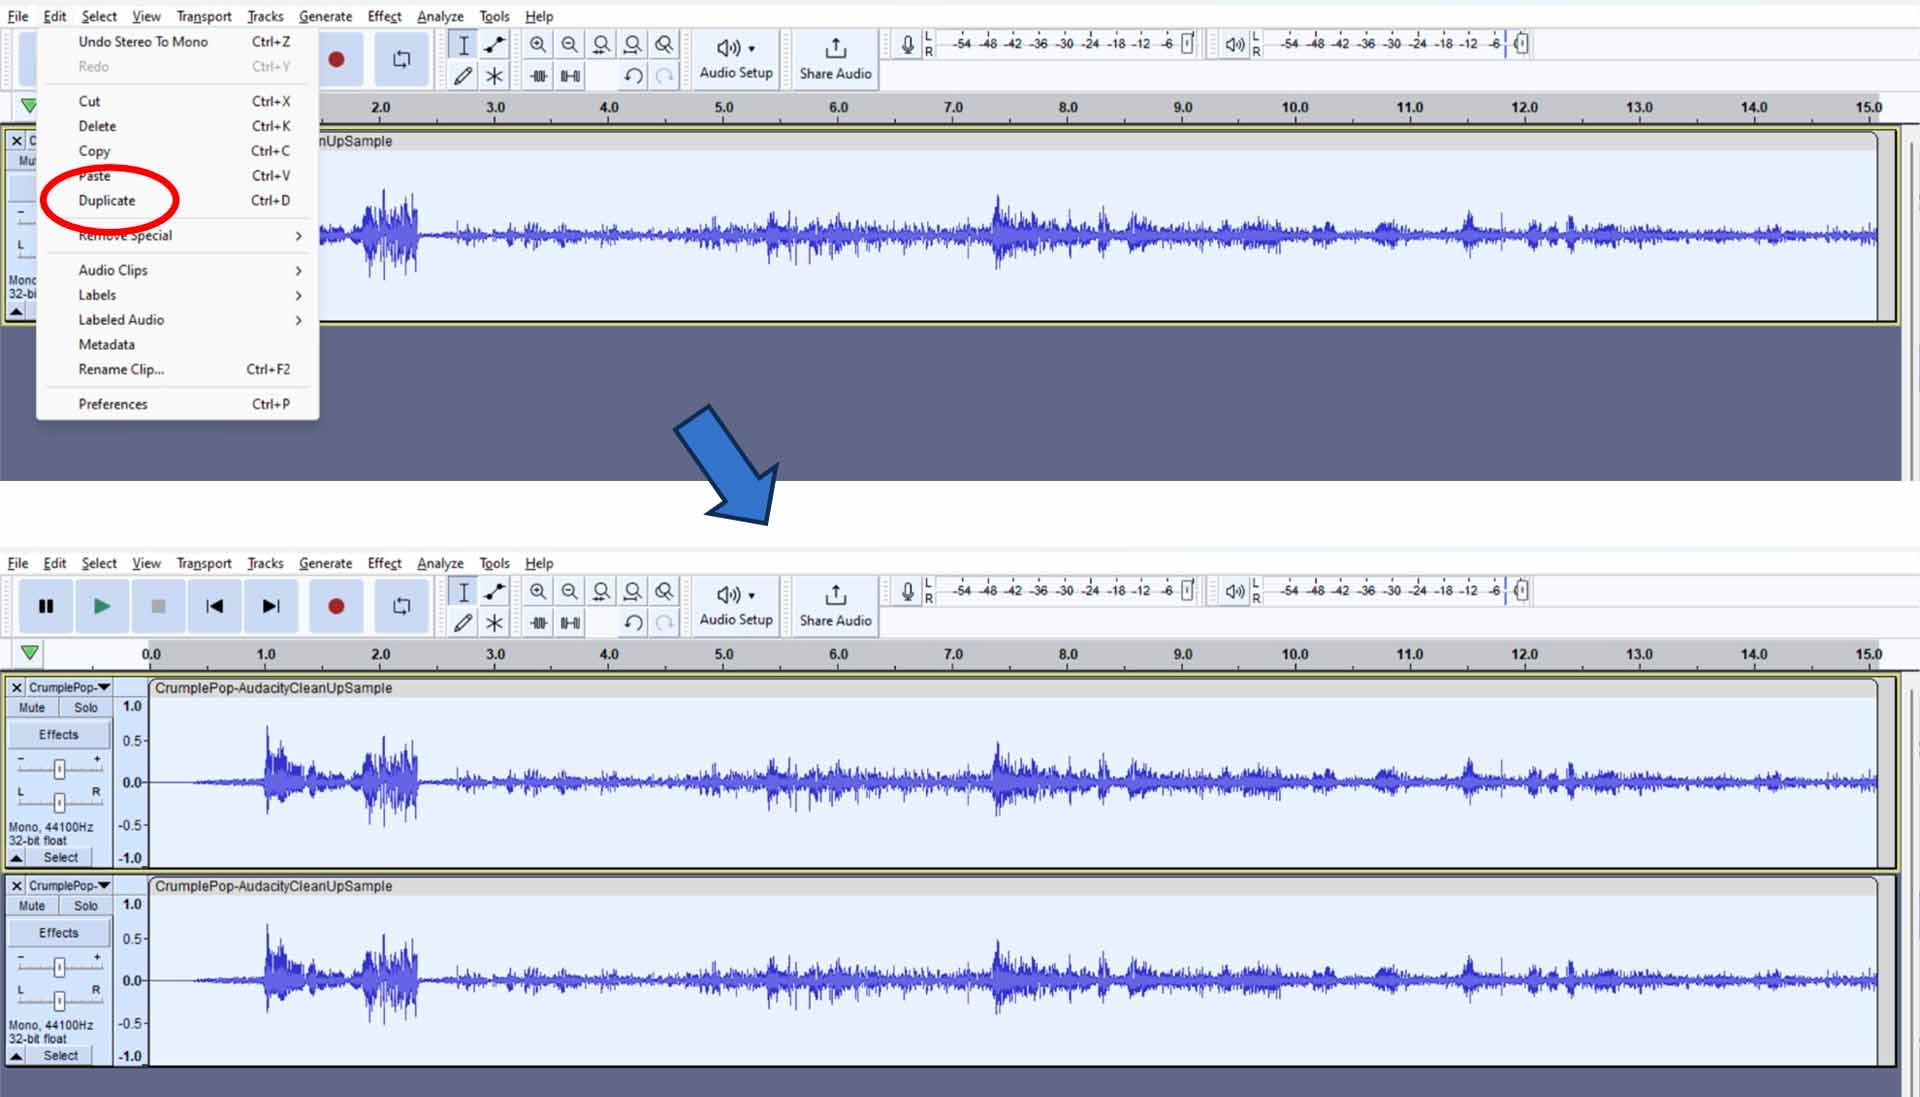
As an alternative, you can make a copy of a file that’s already in Audacity and clean up the copy. The easiest way to do this is with the Duplicate command:
Select the audio file that you want to duplicate
Choose Edit > Duplicate (shortcut: CTRL + D)
2. Noise Reduction: Remove Background Noise, Pops, and Clicks
Noise comes in many forms but most often appears as background (ambient) noise, pops (plosives), and clicks in your recordings. You can either use Audacity’s built-in tools or external plug-ins to clean this up.
2.1 Remove Background Noise Using Audacity’s Built-In Tools
It’s easy to remove background noise in Audacity:
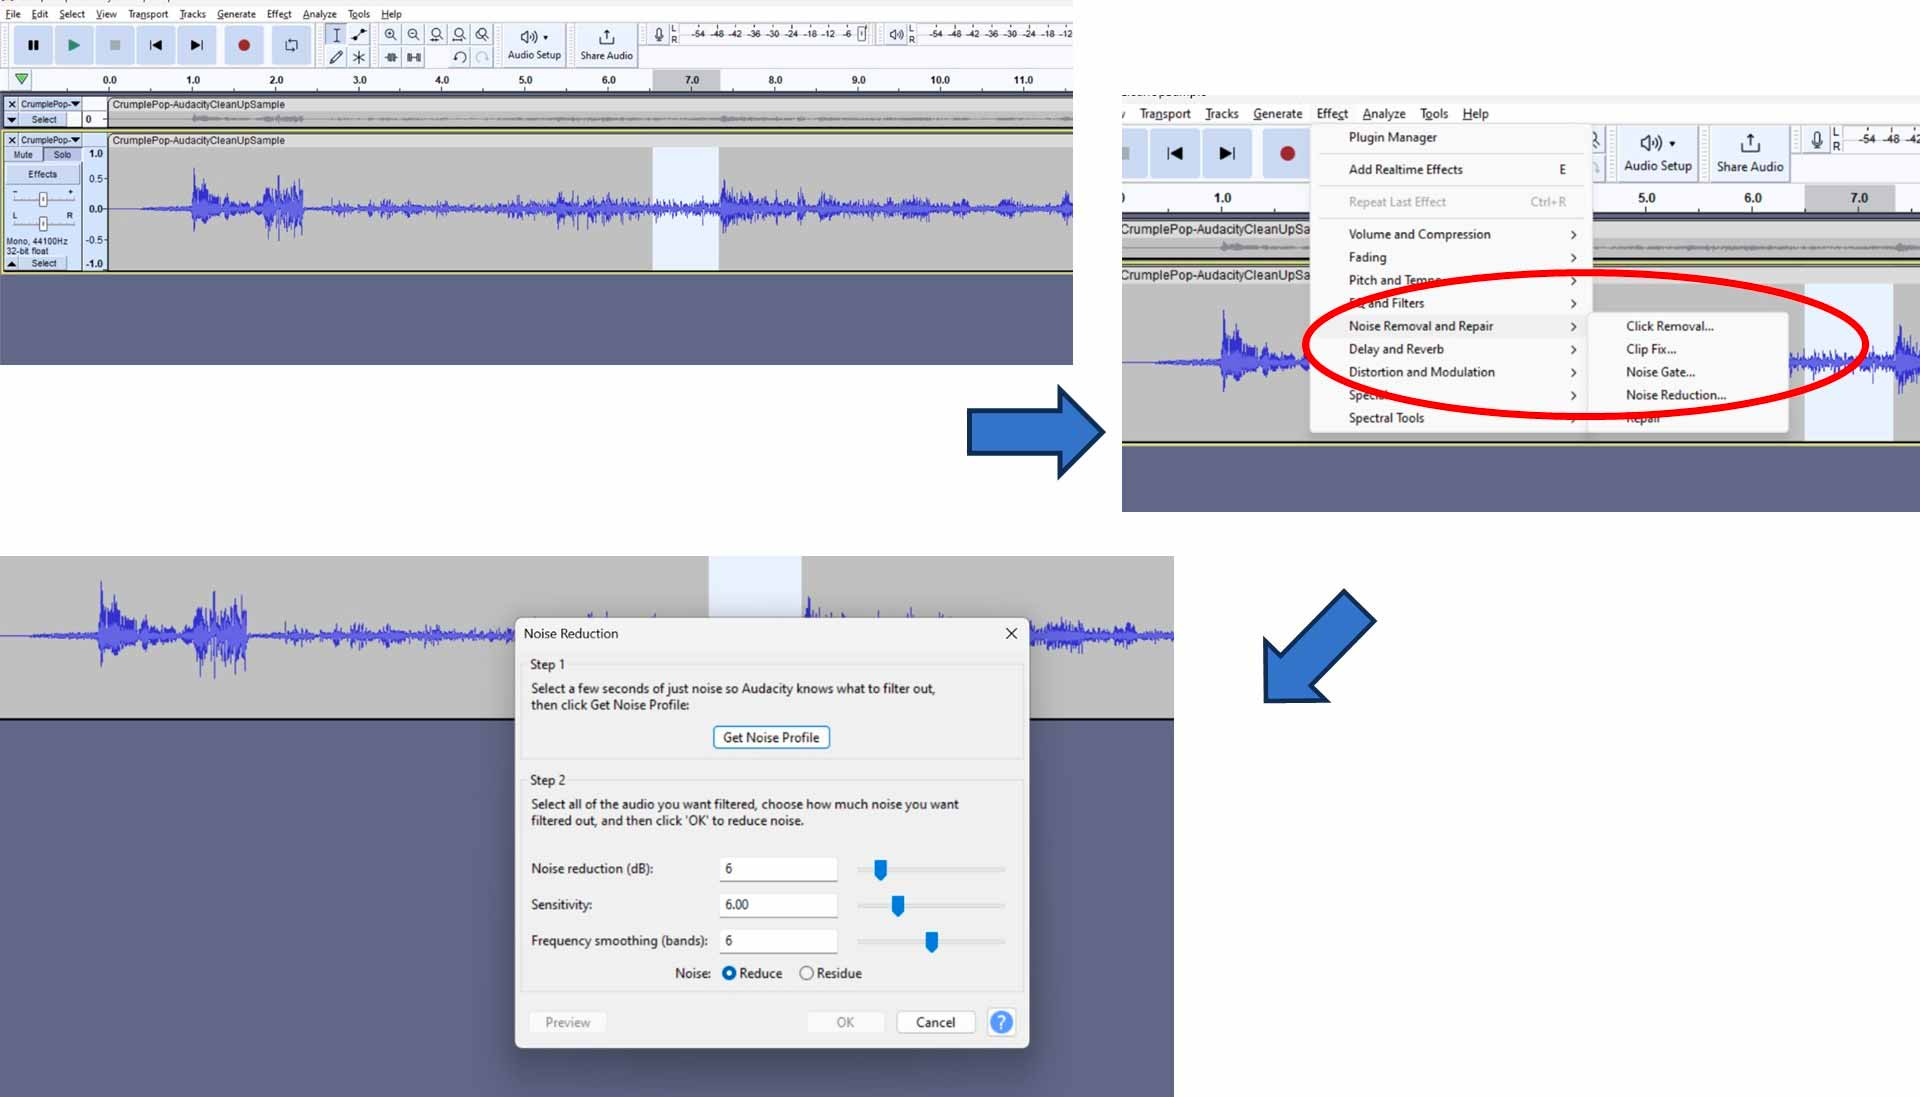
Find a noise sample, i.e., a section of your audio track that has only background noise—hopefully, you can find something that’s a few seconds long to provide a sufficient noise profile, otherwise, find the longest section that you can.
Select the section—you can do this by placing your cursor at the beginning of the section, clicking the left mouse button, dragging the cursor to the end of the section, then releasing the mouse button.
Choose Effect > Noise Removal and Repair > Noise Reduction.
In the popup box that appears, press the ‘Get Noise Profile’ button.
Select the entire track for which you want to remove background noise.
Fine tune the parameters for noise reduction, i.e., the level (dB), the sensitivity, and the frequency smoothing bands. To help find the correct settings:> Listen to the sound that will be removed by selecting the ‘Residue’ toggle and clicking ‘Preview’.> Listen to the sound that will remain by selecting the ‘Reduce’ toggle and clicking ‘Preview’.
When you’re happy with your chosen parameter settings, select ‘OK’ (be sure to select the ‘Reduce’ toggle if you had previously selected the ‘Residue’ toggle.)
Play back your track. If you’ve chosen your noise reduction parameters well, you should notice an improvement.
And if you find that the noise you want to remove is more like a high-frequency hissing sound rather than a more general background or ambient noise, our guide on how to remove hiss in Audacity will help you.
2.2 Remove Background Noise Using an External Plug-in
As useful as Audacity’s built-in noise removal features are, you may find that you can’t get quite the results that you want. In this case, it’s worth turning to more sophisticated external audio editing tools that can do a better job.
Let’s look at CrumplePop’s noise removal plug-in, AudioDenoise, which uses advanced AI techniques to achieve superior audio quality.
AudioDenoise works with a variety of DAWs, including Audacity, and has a free trial that you can take advantage of. It’s easy to download and install by following the instructions on CrumplePop’s free download page.
It may be worth making a fresh (duplicate) copy of your sound file so that you can compare results between AudioDenoise and Audacity’s built-in noise reduction. Once AudioDenoise is installed, here’s how to use it:
Select the entire recording of the (duplicate) audio track that you want clean up.
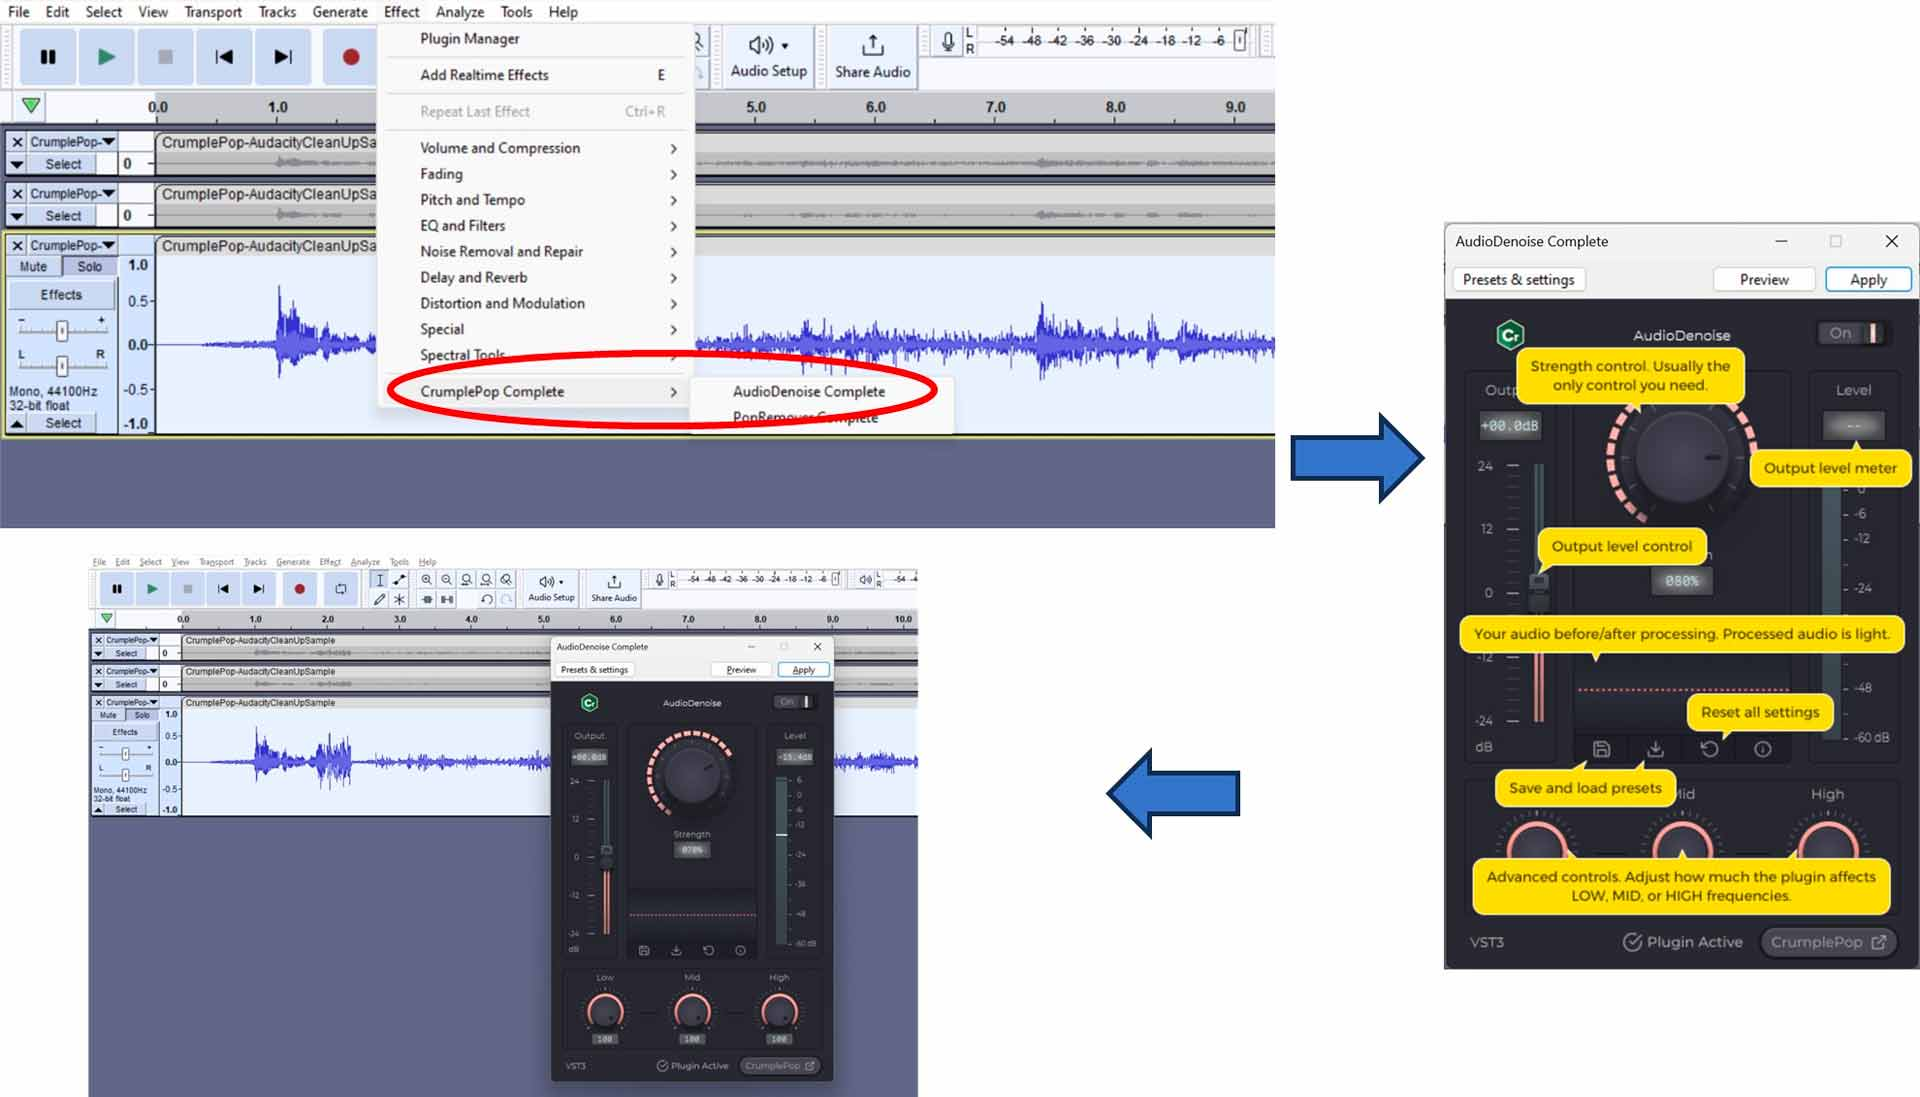
Choose Effect > CrumplePop Complete > AudioDenoise Complete (this will appear in Audacity’s menu after you follow CrumplePop’s installation instructions.)
The AudioDenoise interface will appear and give you several controls and indicators that you can work with. Usually, all you’ll need to do is adjust the ‘Strength’ control (the large round dial), but you can also tweak the low, medium, and high frequency noise levels using the three smaller knobs at the bottom of the interface.
Play around with the controls and use the Preview button to hear your results—once you’re happy, click the Apply button.
You probably won’t need too much tweaking when you use the AudioDenoise tool, as the AI functionality does a lot of the work in the background. You should get much better results using this tool.
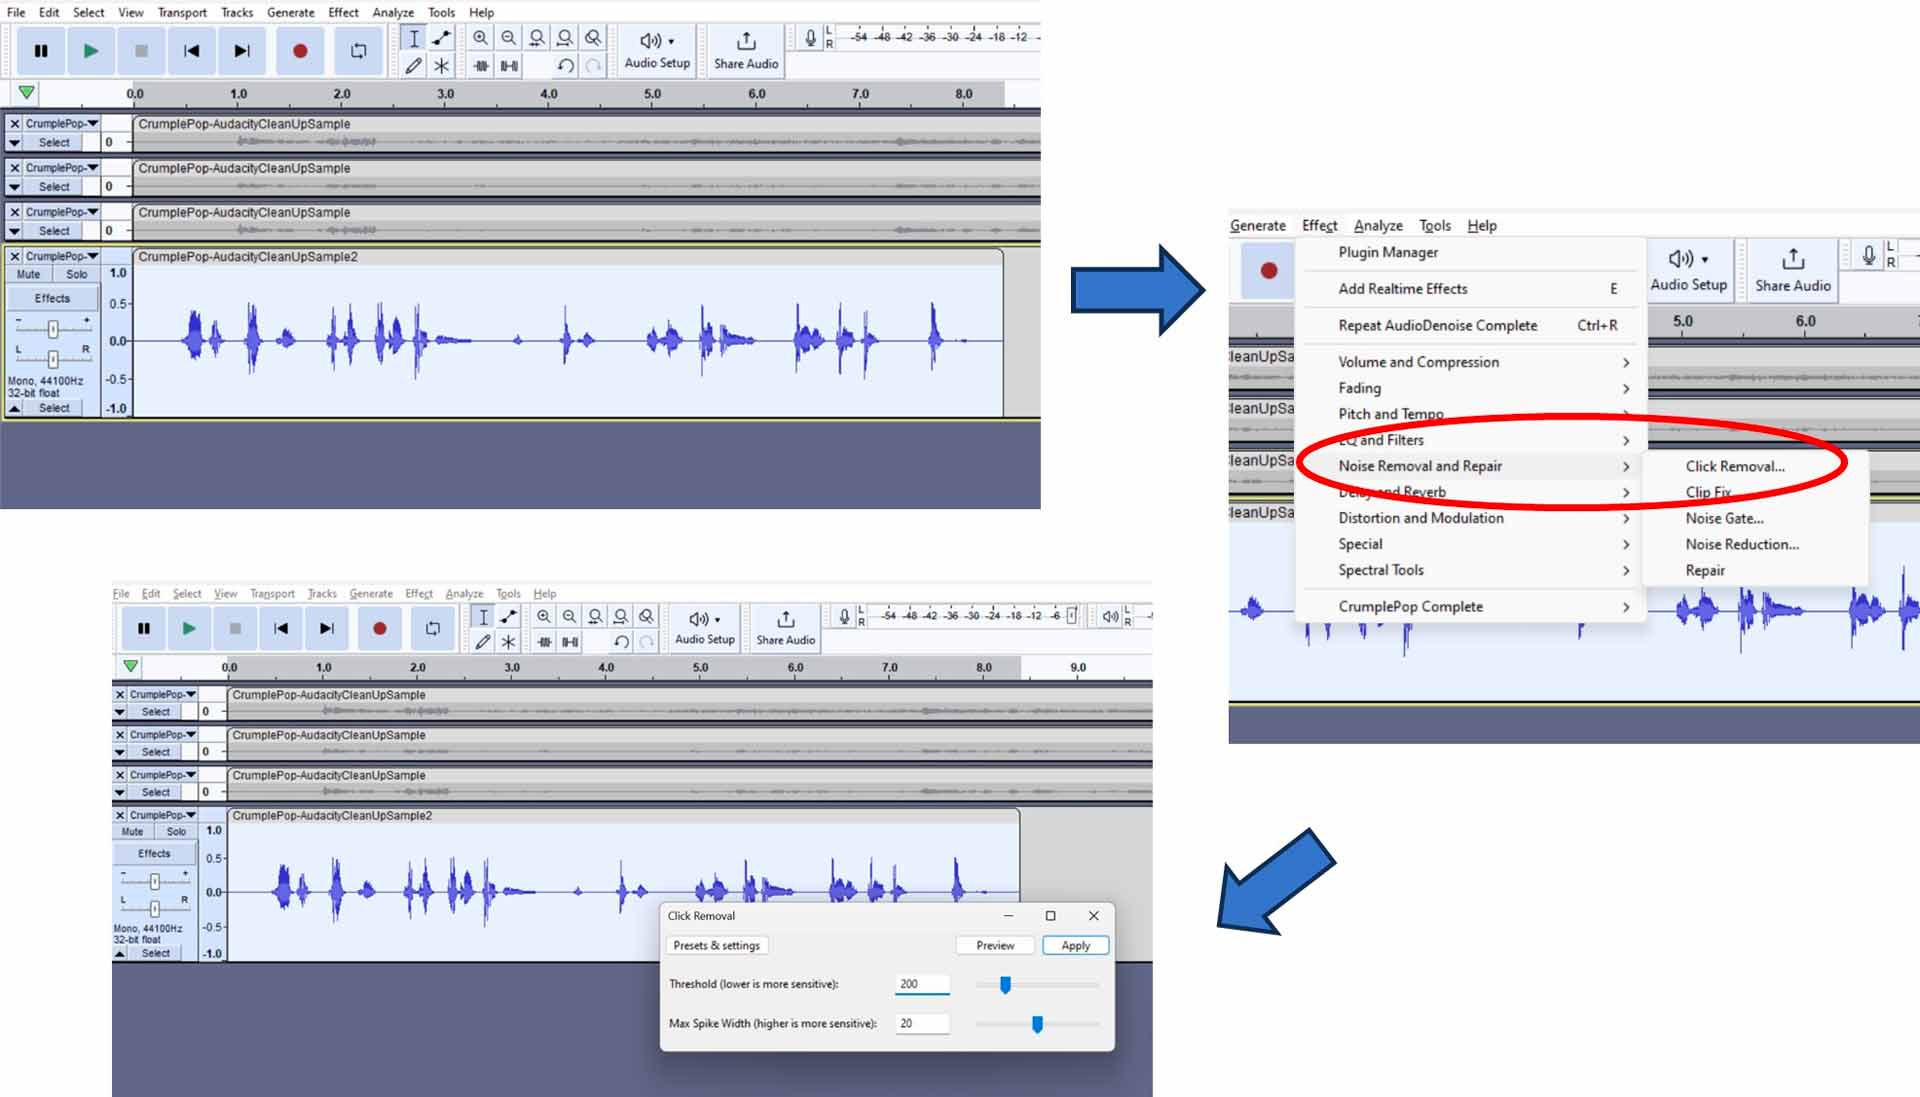
2.3 Remove Pops and Clicks Using Audacity’s Built-in Tools
Rather than constant background noise, sometimes you’ll need to remove intermittent pops, clicks, or plosives from your audio tracks, as often occurs with voice recordings. Audacity has a convenient built-in tool for this:
Select the audio track that you want to remove pops, clicks, or plosives from—the tool will work across the entire file.
Choose Effect > Noise Removal and Repair > Click Removal.
In the popup box that appears, set the parameters for Threshold and Max Spike Width, and as with the Noise Reduction tool, you can preview your audio before finalizing.
When your parameters are set, select ‘OK’.
2.4 Remove Pops and Clicks Using an External Plug-in
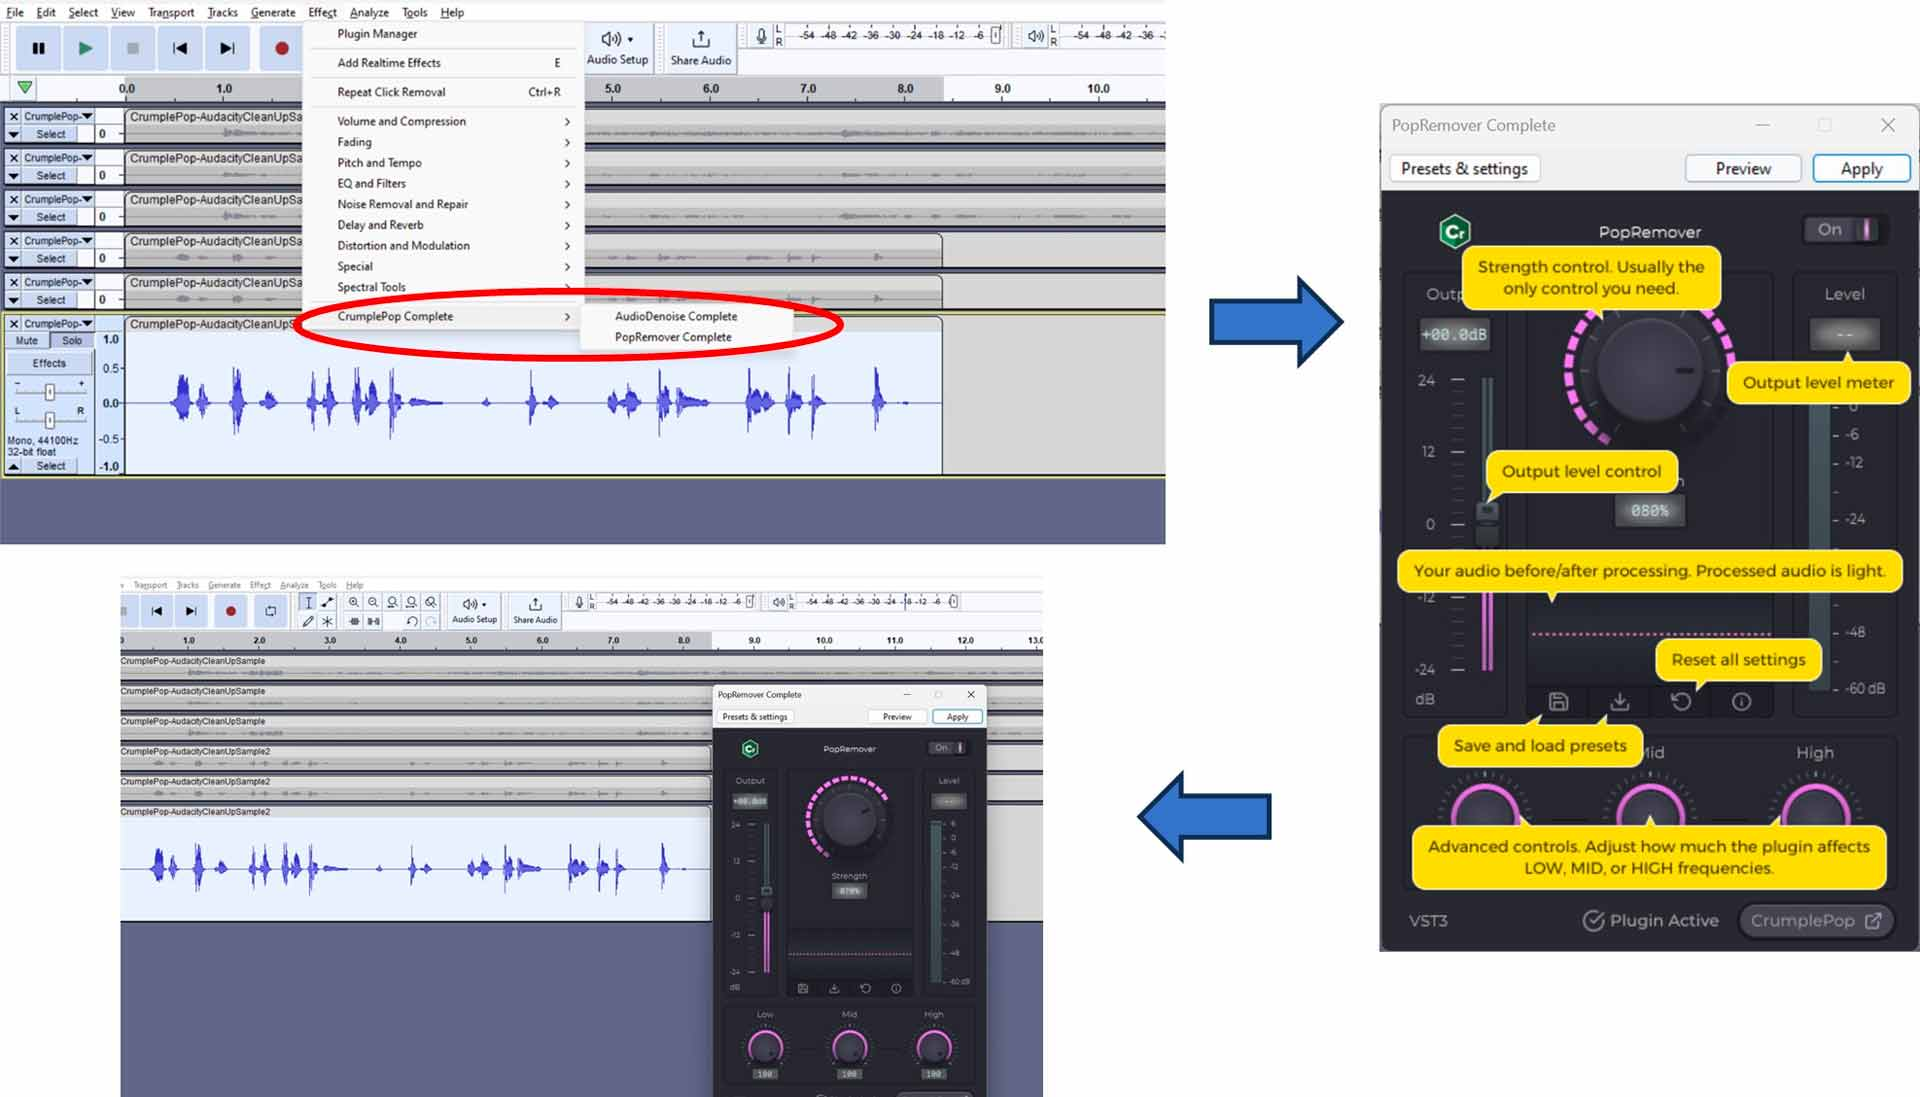
As before, Audacity’s built-in Click Removal tool is good but you can get better results with an external plug-in, so let’s try CrumplePop’s AI-powered PopRemover tool:
Install PopRemover just as you did with AudioDenoise (if you downloaded the CrumplePop suite of tools earlier, you won’t need to download PopRemover separately.)
Select the (duplicate) audio track that you want to remove pops and clicks from.
Choose Effect > CrumplePop Complete > PopRemover Complete (this will appear in Audacity’s menu.)
As with AudioDenoise, the PopRemover interface is easy to use and you’ll usually need to adjust only the ‘Strength’ control.
Adjust your settings with the help of the Preview button, and once you’re happy click the Apply button.
3. Cut and Trim Silence
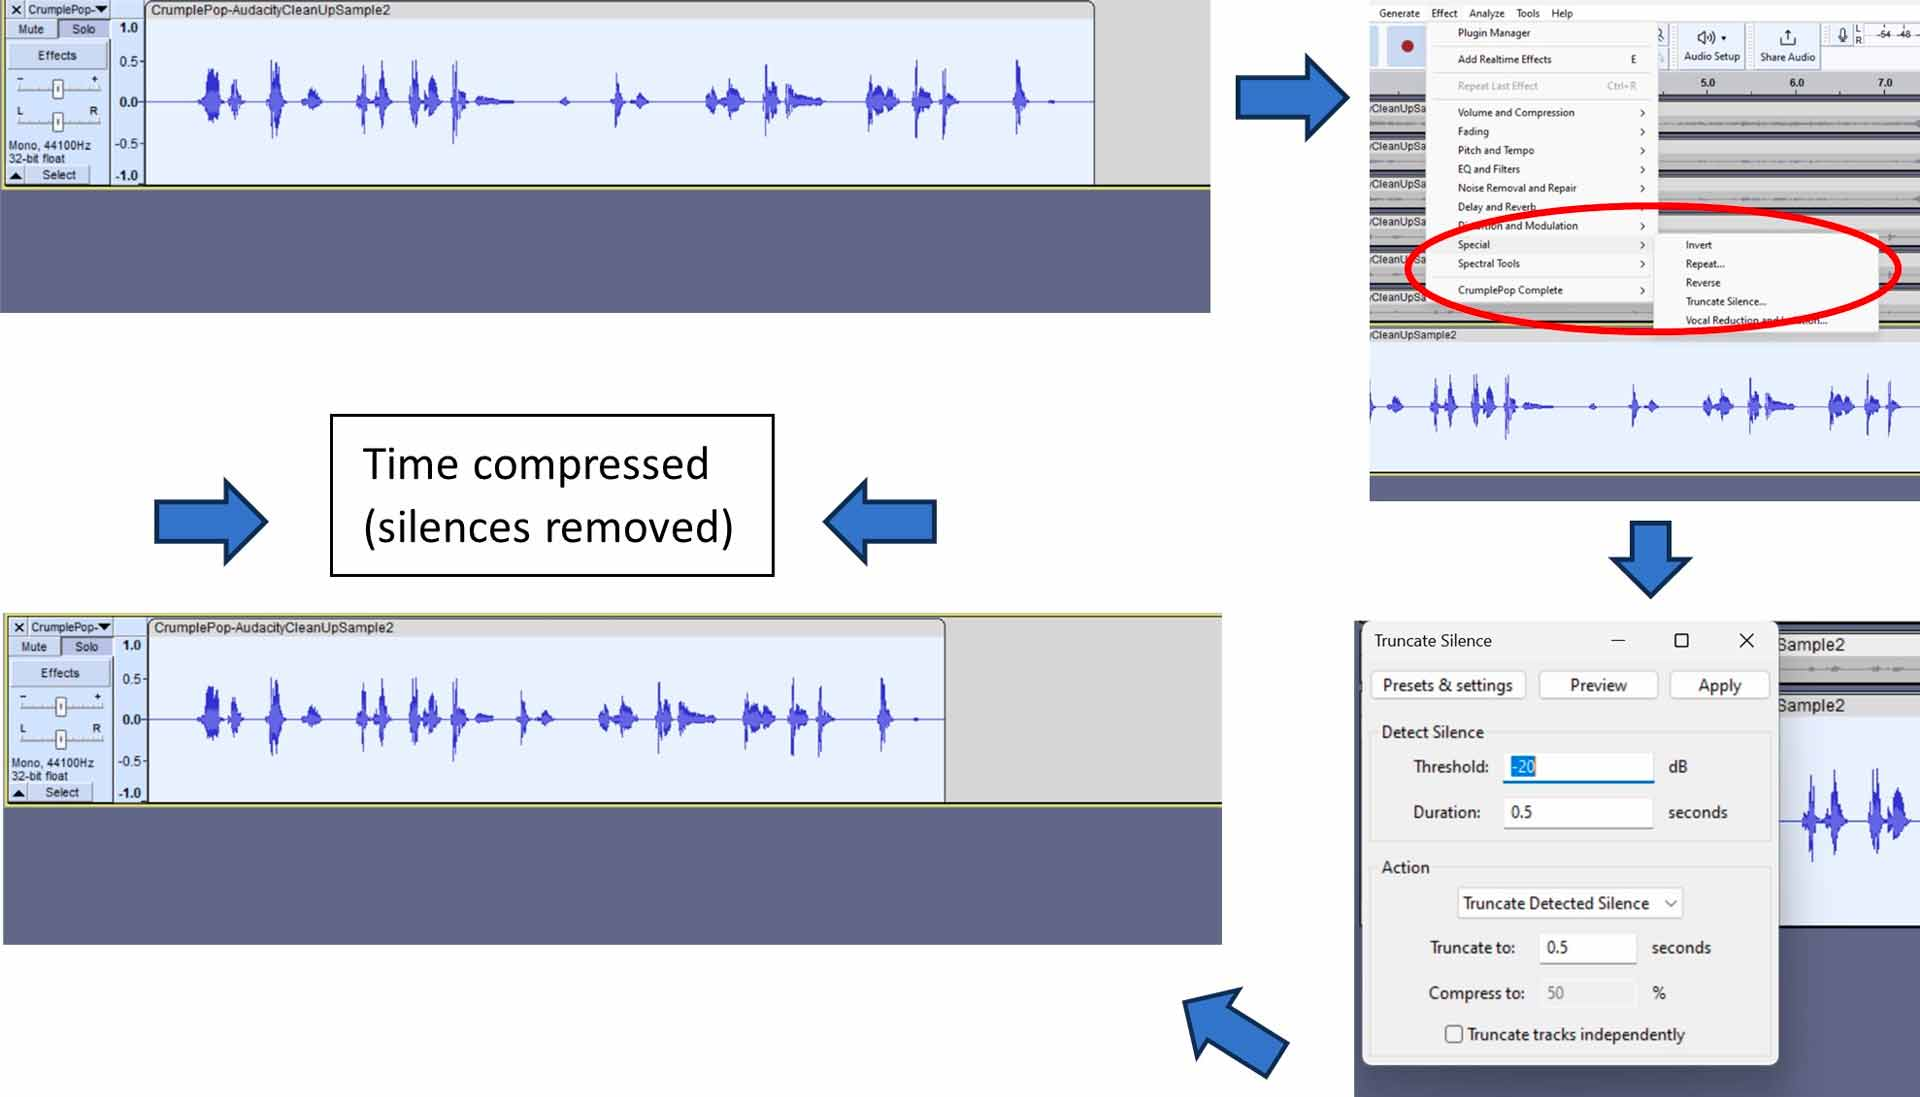
Other than reducing noise, you can improve your audio by removing unwanted silences. Fortunately, this is easy to do in Audacity with its Truncate Silence tool:
Select the track that you want to remove silences from.
Choose Effect > Special > Truncate Silence.
Set your parameters:> You can detect silence by setting its ‘Threshold’ level and ‘Duration’, i.e., any sound that’s quieter than the silence threshold (e.g., -20 dB), for longer than the max duration (e.g., 0.5 secs), is treated as silence.> You can decide what action to take by selecting ‘Truncate Detected Silence’ and choosing how long to truncate the detected silences to, e.g., setting this to 0.5 secs means that all detected silences will be truncated to 0.5 secs.
When you’re happy with your settings, select ‘Apply’.
For more detailed instructions, including how to cut and trim single or multiple tracks, and how to rearrange tracks, check out our guide on how to cut audio in Audacity.
4. Normalize Audio Levels
While it may seem less obvious, variations in the noise level of your audio play an important role in how it sounds. You can balance out the loudness of your whole track by normalizing it:
Select the track that you want to normalize.
Choose Effect > Volume and Compression > Normalize.
Set your parameters:> Check the ‘Remove DC offset’ box to prevent possible distortion or reduction in headroom (if you’re unsure, just keep this checked.)> Set the peak amplitude, i.e., the maximum amplitude that you want to normalize to (NB. This is expressed as a -ve dB level, i.e., dBFS, by default.)> Select whether you want to normalize stereo channels independently or identically.
When you’re happy with your settings, select ‘Apply’.
While this will get the job done, there’s a lot more to loudness normalization in Audacity—check out our guide on Audacity loudness normalization for more on this important aspect of audio production.
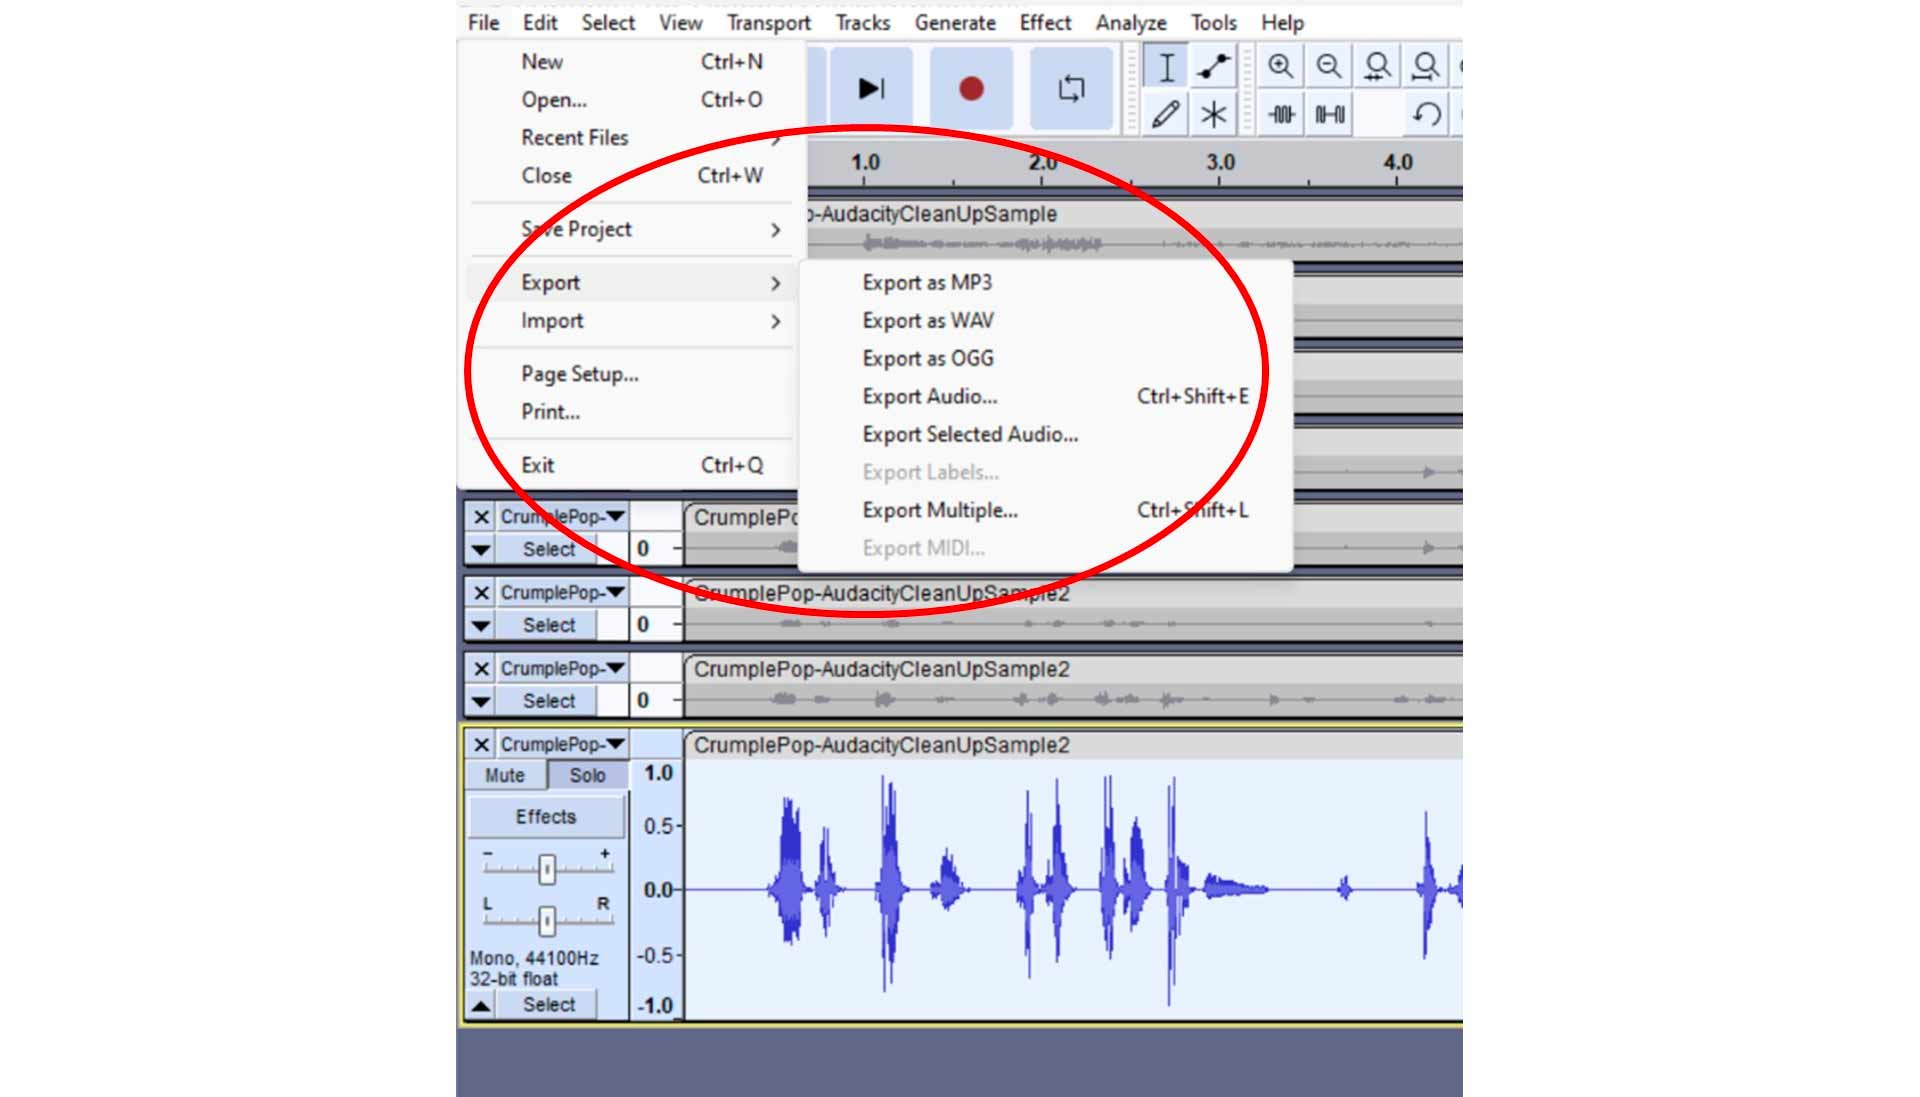
5. Export Audio File
Last, but not least, once you’ve cleaned up your audio file you can export it to a number of popular formats:
Choose File > Export > Export Audio.
Select the file format that you want from the menu.
What it Takes to Get the Best Possible Audio Recording in Audacity
Sound production is both art and science. How you finish your audio depends on your technical approach and your personal preferences. Nevertheless, here are a few guidelines to help you get good results:
Use decent equipment, e.g., good quality microphones, pop filters, interfaces, and cables.
Pay attention to acoustics, e.g., external disturbances, placement of people (for a voice track), musicians, and equipment, and the acoustic properties of your recording space.
Get the volume levels and dynamics right during recording, i.e., minimize the need for post-production and do a test recording before committing a take.
Conclusion
In this post, we’ve looked at how to remove noise and improve audio quality with Audacity. It’s easy to do since Audacity is versatile and capable, and best of all, it’s free!
So, if you’re looking to clean up your recordings without purchasing a sophisticated DAW, then Audacity, possibly with the help of external plug-ins, may be just what you need.
This site and third party services use cookies to provide you with the best user experience and deliver offers that are relevant to you. By continuing to use this site you will be agreeing to our terms of service and privacy policy. Accept
Privacy & Cookies Policy
Privacy Overview
This website uses cookies to improve your experience while you navigate through the website. Out of these, the cookies that are categorized as necessary are stored on your browser as they are essential for the working of basic functionalities of the website. We also use third-party cookies that help us analyze and understand how you use this website. These cookies will be stored in your browser only with your consent. You also have the option to opt-out of these cookies. But opting out of some of these cookies may affect your browsing experience.
Necessary cookies are absolutely essential for the website to function properly. This category only includes cookies that ensures basic functionalities and security features of the website. These cookies do not store any personal information.
Any cookies that may not be particularly necessary for the website to function and is used specifically to collect user personal data via analytics, ads, other embedded contents are termed as non-necessary cookies. It is mandatory to procure user consent prior to running these cookies on your website.