Graham Efurhievwe
Nov 18th, 2022Plugins are a great way to enhance the performance of your software in ways that are not native to it. Davinci Resolve plugins are a fine demonstration of this, as they greatly augment the video editing capabilities of an already very flexible and robust tool.
There are a lot of these plugins available for use, although many of them you have to buy to use.
In this guide, we’ll discuss 9 (some free and some paid, but all important) of the most commonly used Davinci Resolve plugins.
Plugins add functionality to host software, when using DaVinci Resolve, they can help you build bigger and better projects by expanding your armory with new tools and features.
For example, CrumplePop Audio Suite can clear up audio issues in your desired project and help you make high-quality videos. You can also find a ton of other noise reduction plugins on the market.
LUTs and presets allow you to apply template cinema-like effects to your video. Some tools help you clean up artificial light or lens flares from your video, or help with color analysis and pixel tracking.
There’s a whole world of plugins to explore.
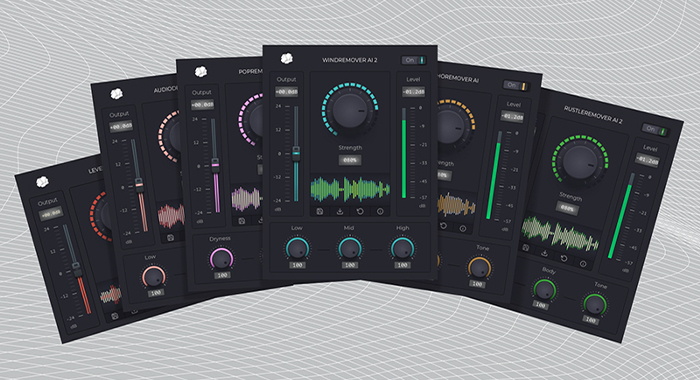
The CrumplePop Audio Suite is a very handy toolbox of audio restoration plugins for media creators. It contains a complete set of plugins aimed at the most common audio problems that plague video makers, music producers, and podcasters:
CrumplePop’s next-generation tech allows you to repair otherwise unfixable errors in your audio clip, leaving your voice signal intact while intelligently targeting and removing problematic noise like hiss and background noise.
This suite contains half a dozen top plugins and has an eye-friendly UI designed with both beginners and professionals in mind. With simple adjustments to your clip, you can brush up on your audio quality without having to leave Davinci Resolve.
If you’re a musician, filmmaker, podcaster, or video editor, CrumplePop’s audio suite is the perfect audio plugin collection to improve your audio editing workflow.
$48
Pixel’s False Color plugin is an exposure matching tool that is very popular among today’s colorists. Using DaVinci Resolve and the benefit of GPU acceleration, you can access excellent exposure monitoring and shot matching in real-time.
With the high-quality and accurate presets offered by False Color, you can optimize your work while growing as a colorist and acquiring a better understanding of exposure. Recent versions use a false coloring method that allows you to view your work in real-time while your false color overlay is transmitted to a secondary monitor.
False Color offers a range of customization options such as multiple grayscale options, custom transitions between colors, and so on. The False Color presets available in version 2.0 have been bolstered and refined for a more natural outcome. A few new effects have also been added and more are added with every false color upgrade.

Free
Reactor is a free, open-source plugin manager for both Blackmagic Design’s DaVinci Resolve and Fusion. There are a lot of plugins out there and no way to find which ones are most relevant for your work. Reactor and its community-based model make this easier by granting you access to the best plugins used by creators worldwide, uploaded by the creators themselves.
Reactor is the home to many free plugins, as well as much more. You also have access to templates, scripts, fuses, and macros. These are all available in your DaVinci Resolve workflow, and if you have a plugin of your own you want to share to help the community, you can very easily upload it.
With Reactor, you can access third-party Resolve content without having to go through the tedious downloading, syncing, and editing processes. Its advanced user interface may make it hard to navigate at first, but you should get used to it with time. Every tool on Reactor is free, but if you want to compensate the author, Reactor lets you do that with its Optional Donation feature.

$75
Neat Video for DaVinci Resolve is a plug-in designed to reduce visible noise and grain in videos. Visual noise is no joke and can ruin the quality of your work if it persists. If you use anything less than professional-level cameras (and even then), your videos are probably going to contain large amounts of noise that can distract viewers.
It appears as fine, moving speckles in certain parts of a video. It can be caused by many things you’ll encounter like low light, high sensor gain, and electronic interference. Aggressive compression of video data can also cause some noise.
Neat Video offers an easy way to filter out the noise from noisy clips. With an intuitive user interface and a well-designed automation algorithm, you can apply targeted noise reduction with just a few clicks. You can maintain the original footage’s beauty, detail, and clarity, even with clips that may have been otherwise unusable.
Featured in this plug-in is a built-in auto-profiling tool that makes it easy to generate noise profiles to work with. You can save these profiles and employ them when you want, or tweak them to further streamline your workflow. This lets it draw a clear wedge between random noise and details in video data. All these make it a fine addition to your video post-production software.
Sometimes, aggressive noise reduction takes away some of the detailing in your videos. Auto profiling helps you avoid this. Neat Video requires a lot of GPU VRAM, and there have been reported crashing issues in older models.
$295
Mocha Pro is a filmmaking plugin popular among modern filmmakers, and it has found utility among even the best visual effects movies. It is used for planar tracking, rotoscoping, object removal, and PowerMesh tracking among other things. Mocha is versatile and can be used as a standalone app, or as a plugin for another program, like DaVinci Resolve.
With Mocha Pro you can track warped surfaces and organic objects, making it even more useful for matching shots and isolating objects for manipulation. You can easily edit out elements of your setup like wires, marking, and rigs, or unwanted natural elements like trees or people.
With its Remove Module feature, you can automatically remove objects and align pixels with minimal input. You can also center objects to give your film a cinematic feel. It offers a host of VFX tools too like false color settings, alongside lens calibration, a 3D camera solver, stereo 360/VR support, and more.
$495 annually
Sapphire VFX is designed for artists working in the broadcast, advertising, film, and online content creation industries. It has a stunning but simple UI that appeals to VFX artists, but its true draw is its range of visual effects (over 260) that help you deliver user-friendly and creatively superior video quality.
Boris recently integrated planar tracking and masking via Mocha Pro, making it a more robust product. Sapphire VFX also offers over 3000 presets crafted by professional colorists worldwide to help you create. At $495 annually, it is among the more expensive DaVinci Resolve plugins suitable for film professionals.
$250 (single-user license)
DEFlicker works by automatically smoothening out annoying flickers when shooting high frame rate or time-lapse video. Flicker is a problem most video editors will face when working with natural light, and DEFlicker can help you handle all that strobing and flickering when shooting high frame rate footage.
If you work with time-lapse photography as is common with Davinci Resolve users, it can help you smooth over the pops that usually accompany it. There’s a multi-rate flicker tool that lets you handle flicker that only shows up in different parts of your image, and at different rates within the same sequence.
Now you use a higher frame when you need to without having to care about flicker and noise. It can be run on most systems but performs faster on GPU. It requires DaVinci Resolve 15.0 (or higher).
$30 per month
Red Giant Universe is a subscription-based cluster of 89 plugins curated for editors and Davinci Resolve artists. All plugins are GPU-accelerated and cover a wide range of video editing and motion graphics. Plugins include image stylizers, motion graphics, text generators, and transition engines, among others.
Red Giant Universe runs on most of the NLEs and Motion Graphics programs, including DaVinci Resolve. It can be run on macOS 10.11 at least, or alternatively Windows 10. You’ll need a quality GPU card to run this, and DaVinci Resolve 14 or later. It costs about $30 a month, but you can save a lot more by getting the yearly $200 subscription instead.

$129
With the Alex Audio Butler plugin, you can automate the audio editing parts of your work. Alex Audio Butler mixes your audio automatically so you don’t have to worry about the smaller details like loudness and frequency. This extra software component works directly within your NLE, allowing you to save time and produce videos faster. Supports Premiere Pro, DaVinci Resolve, and more (the list is growing.)
DaVinci Resolve is an excellent tool for all types of creators, but even powerful editing software can benefit from the added functionality of plugins. DaVinci Resolve plugins and DaVinci Resolve alternatives can help you maximize your creativity.
All you have to do is find the right one. You should note that some of these plugins don’t work in the free version of DaVinci Resolve. Above we discussed a few of these plugins, some of which would make a great starting point for any user.
Davinci Resolve needs a bit of learning and time to work around, even if you’ve had prior experience with other NLE software. For an absolute beginner, DaVinci Resolve will require some patience and dedication.
If you have that, then go right ahead. If you don’t, you should look at other options, like iMovie for example. iMovie has a user-friendly interface and it is very simple to use, even if you are just at the beginning of your journey.
To find the main differences between these two, we suggest that you compare Davinci Resolve vs iMovie for yourself.
DaVinci Resolve is great for YouTube. It has all the tools required for a perfect YouTube video, as well as a direct upload option for a seamless workflow.